Team:EPF-Lausanne/Tools/Microfluidics/Tamagotchip
From 2011.igem.org
(→The Game) |
|||
| Line 1: | Line 1: | ||
| - | {{:Team:EPF-Lausanne/Templates/MicrofluidicsHeader|title=Tamagotchip: an online microfluidics | + | {{:Team:EPF-Lausanne/Templates/MicrofluidicsHeader|title=Tamagotchip: an online microfluidics demo}} |
| - | In our quest to promote the use of microfluidics within the iGEM community, we decided to make iGEMers play with a chip from the comfort of their own labs. To do so, we built a web-controlled microfluidics setup, where users can view the chip live and control the valves from a web browser. | + | In our quest to promote the use of microfluidics within the iGEM community, we decided to make iGEMers play with a chip from the comfort of their own labs. To do so, we built a web-controlled microfluidics setup, where users can view the chip live and control the valves from a web browser. For historical reasons (see bottom), it was called ''Tamagotchip'', a play on the words "Tamagotchi" and "chip". |
[[File:EPFL-Muigi-schematic.png|700px|center|RAINBOW UNICORN!!!!111one]] | [[File:EPFL-Muigi-schematic.png|700px|center|RAINBOW UNICORN!!!!111one]] | ||
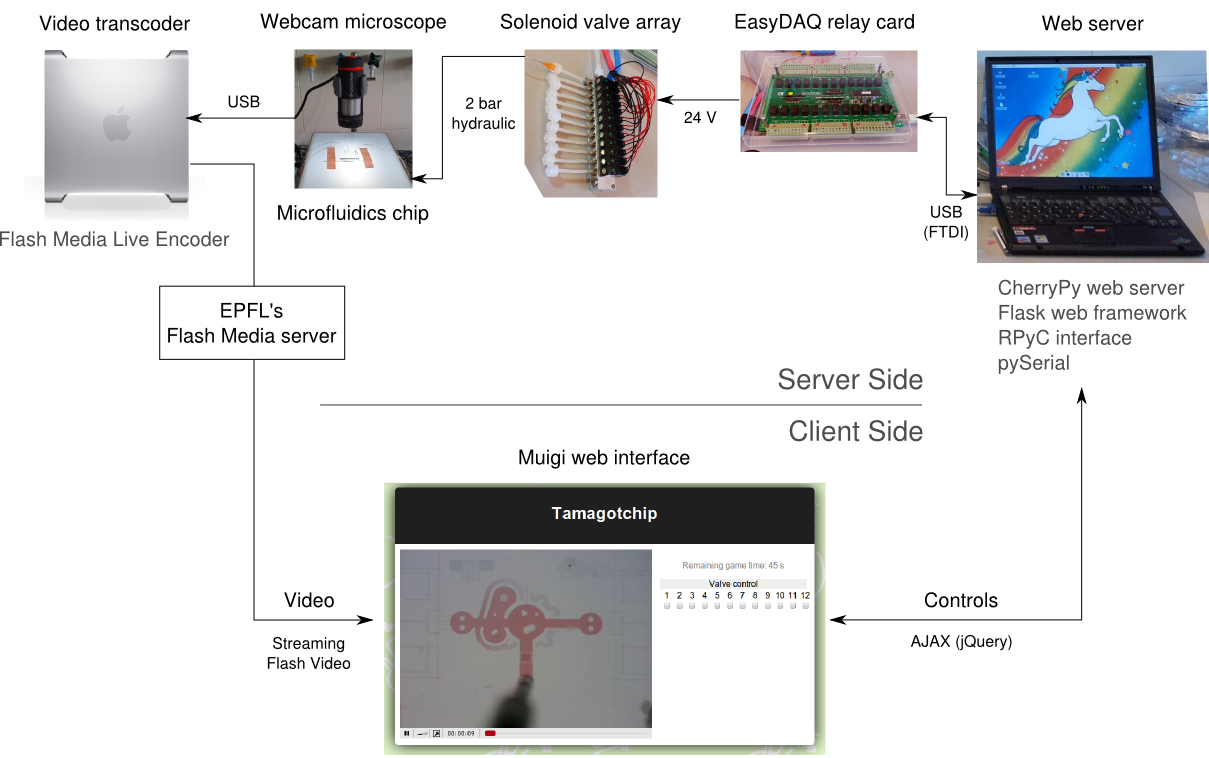
''Outline of the web-controlled system: users see a live stream from our microscope, streamed through EPFL's Flash Media Server, and can control the chip from a standard form. AJAX requests, sent by the user, are relayed by the web server to an EasyDAQ card, which in turn controls the solenoid valves of our setup.'' | ''Outline of the web-controlled system: users see a live stream from our microscope, streamed through EPFL's Flash Media Server, and can control the chip from a standard form. AJAX requests, sent by the user, are relayed by the web server to an EasyDAQ card, which in turn controls the solenoid valves of our setup.'' | ||
| - | |||
== The Game == | == The Game == | ||
| - | The | + | The first demo showed flow and mixing of fluids on chip shaped like an iGEM logo. Two dyes, red and blue, as well as transparent liquid, could be injected into the chip from each side. We showed this demo in Amsterdam during the poster session, and to other groups at EPFL. The demo stayed live for half of September, and most of October, allowing other groups (mostly on campus) to try it out. |
| - | + | ||
| - | The | + | |
| - | + | ||
| - | + | ||
[[File:EPFL-TamagotchipScreenshot.png|600px|Our latest chip, demonstrating mixing of two dyes|center]] | [[File:EPFL-TamagotchipScreenshot.png|600px|Our latest chip, demonstrating mixing of two dyes|center]] | ||
| Line 49: | Line 44: | ||
Video is streamed through EPFL's Flash streaming server. The video is transcoded live by ''Flash Media Encoder'' on a Mac Pro, to which the webcam microscope is connected. | Video is streamed through EPFL's Flash streaming server. The video is transcoded live by ''Flash Media Encoder'' on a Mac Pro, to which the webcam microscope is connected. | ||
| + | |||
| + | == Older plans and origin of the name == | ||
| + | |||
| + | The culmination of our system was initially to be an on-chip "Tamagotchi": the goal of the game is to take care of a ''C. Elegans'' larva living on the chip, feeding him with bacteria every now and then, and watch him grow into an adult. If you didn't feed him, he would go into ''dauer'' stage or, worse, die. This game idea was abandoned shortly before the regional wiki freeze for two reasons: the worms are very hard to see under our cheap microscope, and they do not thrive in our kind of microfluidic chip. Instead, we used the setup as an educational tool, to demo microfluidics. The name stuck, though. | ||
| + | |||
| + | The tamagotchi chip has higher channels than the MITOMI chips, to make space for the worm. It is designed with a cavernous main lounge (by nematode standards), with two adjacent dining rooms (or feeding chambers), to allow feeding of the worm with slightly different foods, to observe its preference. | ||
| + | |||
| + | [[File:Worm chip.png|700x306px]] | ||
{{:Team:EPF-Lausanne/Templates/Footer}} | {{:Team:EPF-Lausanne/Templates/Footer}} | ||
Latest revision as of 12:57, 23 October 2011
Tamagotchip: an online microfluidics demo
Microfluidics Main | How-To Part I | How-To Part II | TamagotchipIn our quest to promote the use of microfluidics within the iGEM community, we decided to make iGEMers play with a chip from the comfort of their own labs. To do so, we built a web-controlled microfluidics setup, where users can view the chip live and control the valves from a web browser. For historical reasons (see bottom), it was called Tamagotchip, a play on the words "Tamagotchi" and "chip".
Outline of the web-controlled system: users see a live stream from our microscope, streamed through EPFL's Flash Media Server, and can control the chip from a standard form. AJAX requests, sent by the user, are relayed by the web server to an EasyDAQ card, which in turn controls the solenoid valves of our setup.
Contents |
The Game
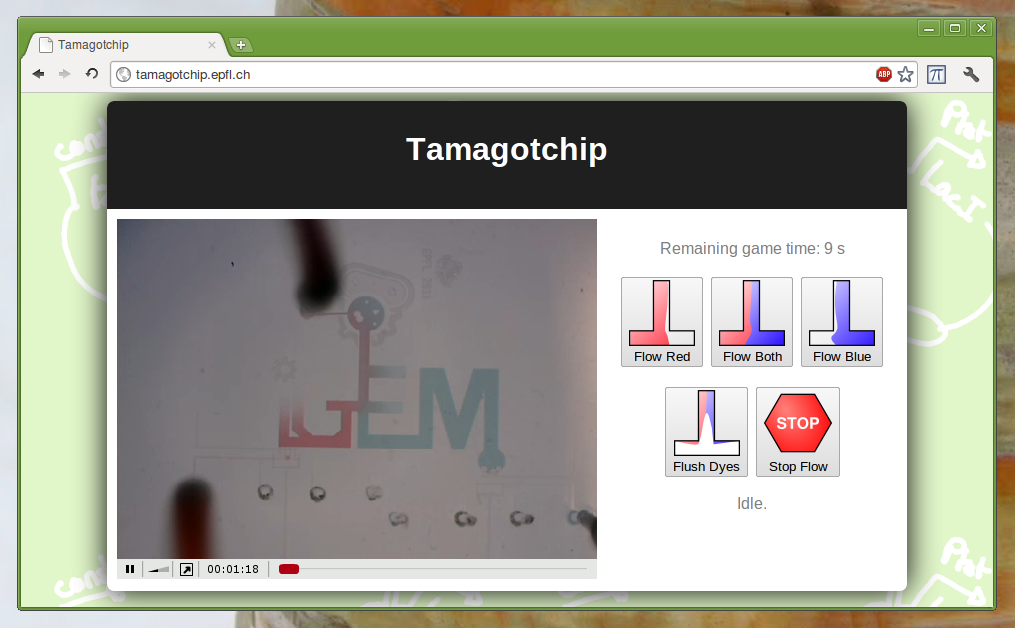
The first demo showed flow and mixing of fluids on chip shaped like an iGEM logo. Two dyes, red and blue, as well as transparent liquid, could be injected into the chip from each side. We showed this demo in Amsterdam during the poster session, and to other groups at EPFL. The demo stayed live for half of September, and most of October, allowing other groups (mostly on campus) to try it out.
[http://www.megavideo.com/?v=OOADAQL9 Our latest attempt at mixing fluids on a chip]
Hardware
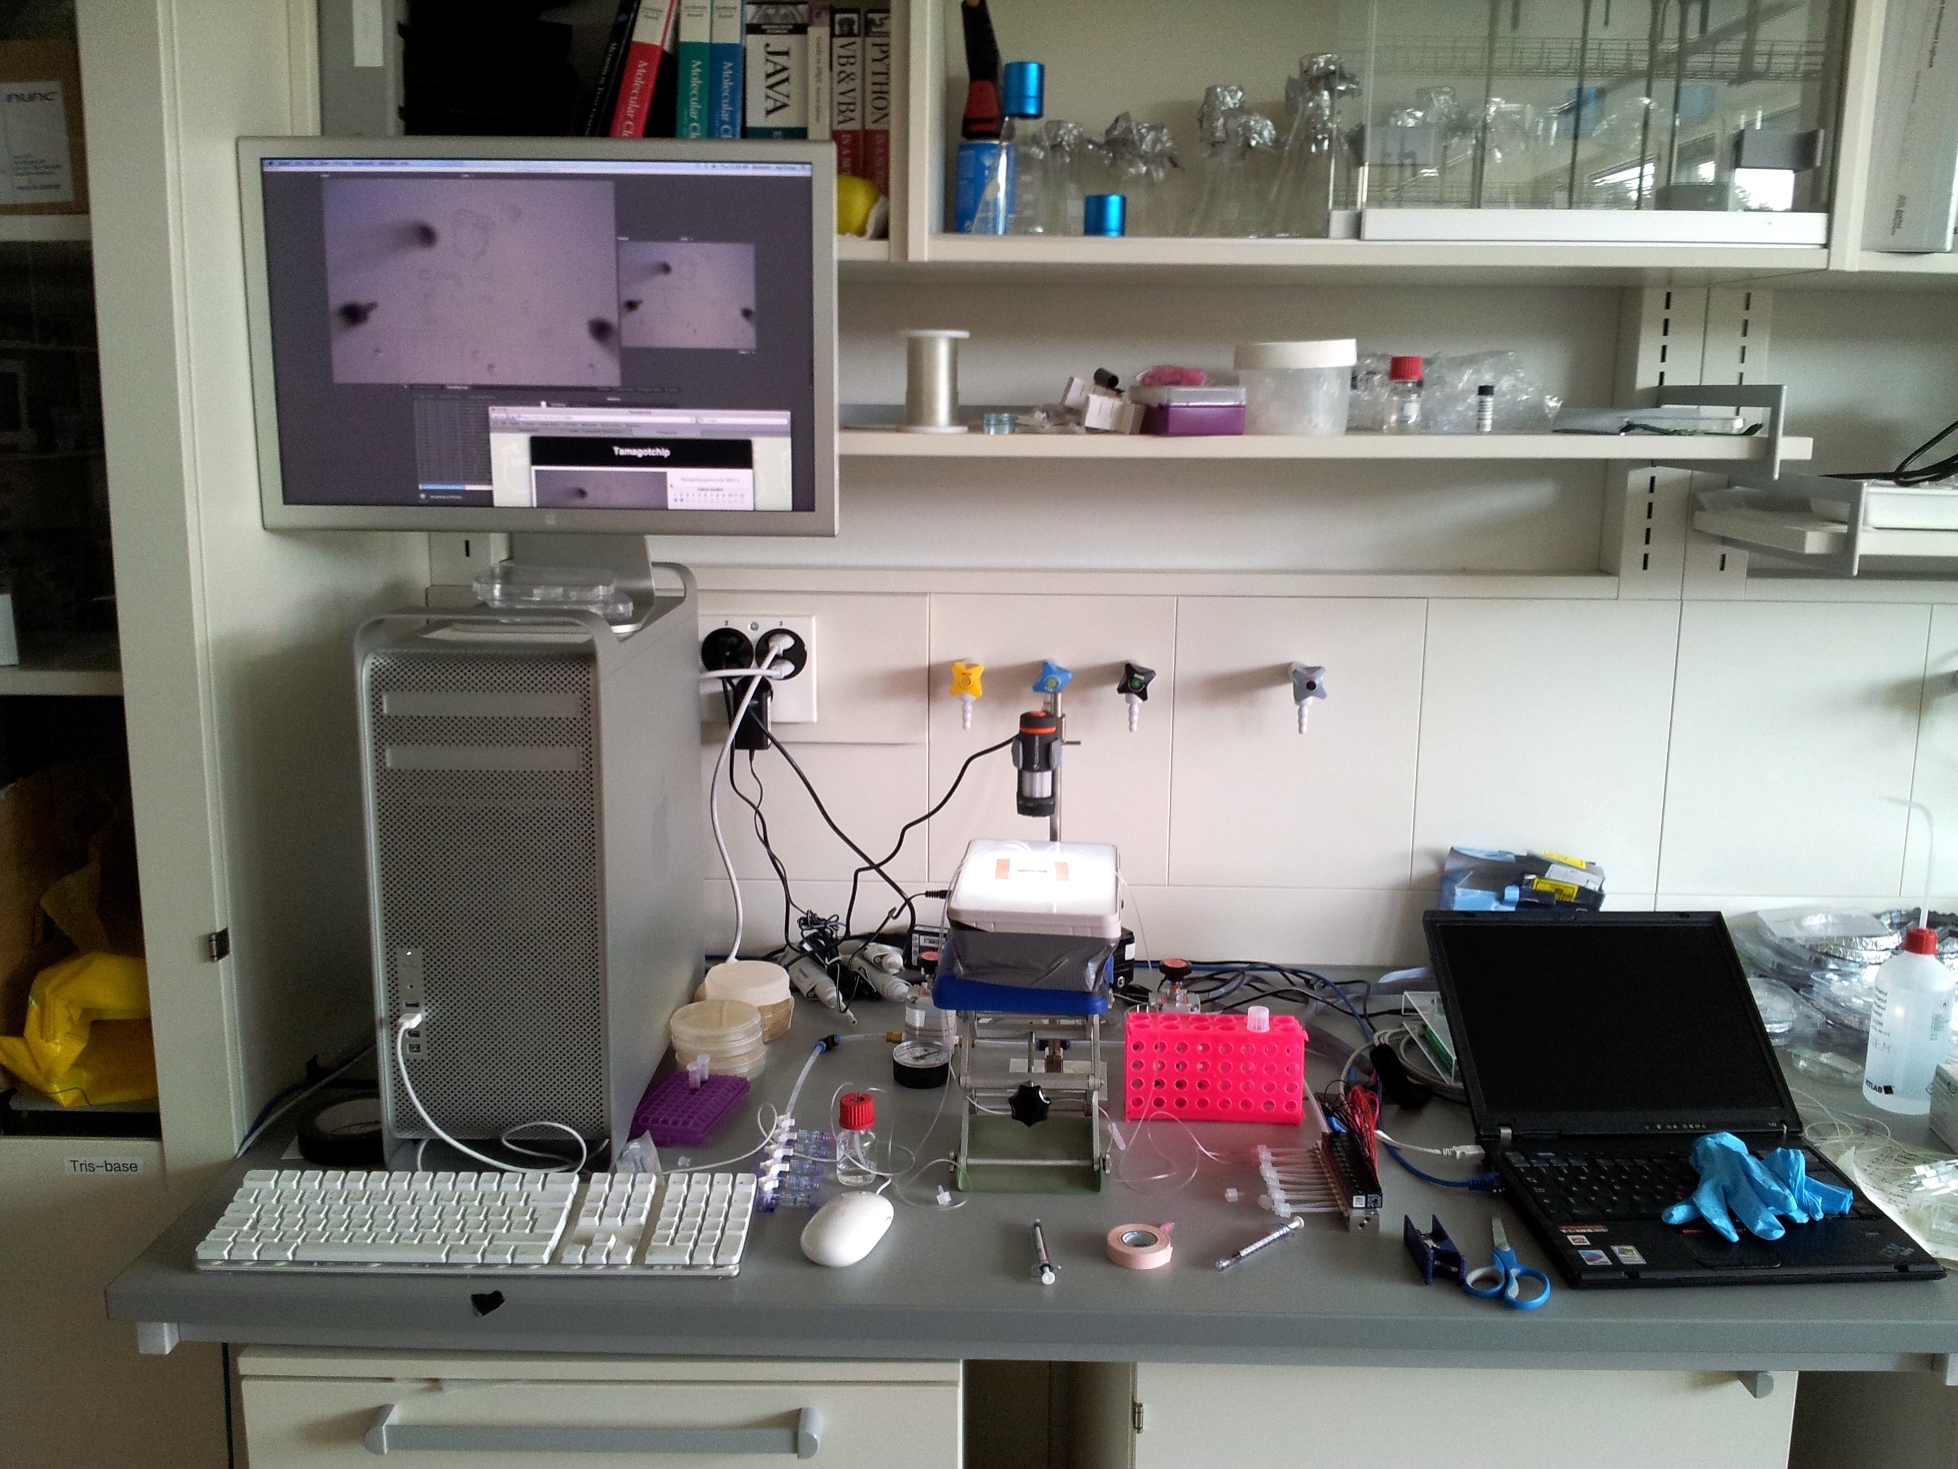
The hardware is a relatively standard microfluidics setup, as described on the how-to page. It has two different pressure outputs, one with five manual twist valves and the other with twelve solenoid three-way valves. The solenoid valves are controlled by an EasyDAQ USB24mx relay card, connected by USB to a Thinkpad T43 running Ubuntu Linux 11.04. We wrote our own Python software to control the EasyDAQ.
The video stream comes from a our toy USB microscope (Celestron Deluxe Handheld Digital Microscope), connected to an Apple Mac Pro. The Mac encodes the video for live streaming through EPFL's Flash Media Server.
Software
When users points their browser to tamagotchip.epfl.ch, they are presented with a video player and a set of controls for the valves. The video player streams live video from the microscope, with a buffering delay of approximately five seconds. When they click one of the controls, the instruction is relayed to the hardware and the valves respond accordingly.
Since there is only one piece of hardware, but many users could log in at the same time, the web application puts users in a waiting line, with only the first person having access to the controls. The others can only watch the video stream. However, to give every one a chance to play, the user in control is swapped every minute, and the others are presented with a countdown of waiting time.
For the geeks: details of the software framework
The entire software framework, code-named Muigi the Microplumber was written in Python, and is open sourced under the GPL license. The source code is available on [http://github.com/douglas-watson/muigi github]. The following lists all the packages used, from the hardware up.
Communicating with the EasyDAQ is done through the pySerial library. The EasyDAQ expects two-character strings to set the state of its on-chip relays. To provide a clearer interface to the card, a driver-like library provides a set of high level functions, allowing explicit opening or closing of valves, which are then used by the other layers. It also automatically reconnects to the EasyDAQ when it drops the connection. Overall, it provides an abstraction from the hardware, to avoid dealing with low-level hardware communication in the other layers.
On top of that, a Remote Procedure Call (RPC) layer provides the connection between the web application and the hardware driver, enabling the two to run on separate computers. All this is handled by the RPyC library and its registry server (which used by the RPC client to discover RPC servers on the network).
The final layer is the web application written in Flask, with jQuery on the client side for AJAX calls (to submit forms, and keep track of users in the queue). The queue is kept in a Redis database. The application is served by the CherryPy web server. The automatic twitter posting, from the web app, is managed by python-twitter. All scheduled events (tweeting, clearing the queue of inactive users) is managed by kronos.
Video is streamed through EPFL's Flash streaming server. The video is transcoded live by Flash Media Encoder on a Mac Pro, to which the webcam microscope is connected.
Older plans and origin of the name
The culmination of our system was initially to be an on-chip "Tamagotchi": the goal of the game is to take care of a C. Elegans larva living on the chip, feeding him with bacteria every now and then, and watch him grow into an adult. If you didn't feed him, he would go into dauer stage or, worse, die. This game idea was abandoned shortly before the regional wiki freeze for two reasons: the worms are very hard to see under our cheap microscope, and they do not thrive in our kind of microfluidic chip. Instead, we used the setup as an educational tool, to demo microfluidics. The name stuck, though.
The tamagotchi chip has higher channels than the MITOMI chips, to make space for the worm. It is designed with a cavernous main lounge (by nematode standards), with two adjacent dining rooms (or feeding chambers), to allow feeding of the worm with slightly different foods, to observe its preference.
 "
"


