Team:Macquarie Australia/Notebook
From 2011.igem.org
(→2/9/2011) |
(→28-30/9/11) |
||
| (121 intermediate revisions not shown) | |||
| Line 5: | Line 5: | ||
| - | + | =Notebook= | |
| + | =='''August'''== | ||
| - | ===12/8/2011=== | + | ===12-19/8/2011=== |
| - | + | '''TEAM PCR''' | |
Today, we started the PCR process in order to amplify our T7 promoter, HO1, At, Dr. | Today, we started the PCR process in order to amplify our T7 promoter, HO1, At, Dr. | ||
| Line 68: | Line 69: | ||
* Step 6) We set up the PCR machine with the following protocol: | * Step 6) We set up the PCR machine with the following protocol: | ||
| - | :::'''Initial denaturation – | + | :::'''Initial denaturation – 94°C for 2 minutes''' |
| - | :::Denaturation – | + | :::Denaturation – 94°C for 30 sec |
| - | :::Annealing – | + | :::Annealing – 60°C for 30 seconds ] 10 cycles in total |
| - | :::Extension – | + | :::Extension – 72°C for 2min 30sec |
::'''THEN''' | ::'''THEN''' | ||
| - | :::Denaturation – | + | :::Denaturation – 94°C for 30 sec |
| - | :::Annealing – | + | :::Annealing – 52°C for 30 seconds ] 15 cycles in total. |
| - | :::Extension – | + | :::Extension – 72°C for 2min 30sec |
| - | :::Final extension – | + | :::Final extension – 72°C for 10 min |
| - | :::Hold period – | + | :::Hold period – 4°C for 2 minutes |
| - | :::We’ve labelled the protocol ‘330’ and it’s the same as last years’ protocol with a few additions. Note that we made a mistake during our 15 cycle stage - it should be at | + | :::We’ve labelled the protocol ‘330’ and it’s the same as last years’ protocol with a few additions. Note that we made a mistake during our 15 cycle stage - it should be at 72°C. Our bad. We have fixed this - the protocol has been corrected. |
* Step 7) We conducted our PCR! It took 2 hours and 13 minutes to complete. | * Step 7) We conducted our PCR! It took 2 hours and 13 minutes to complete. | ||
| + | |||
| + | [[File:PCR run 2.jpg|250px]] | ||
| + | |||
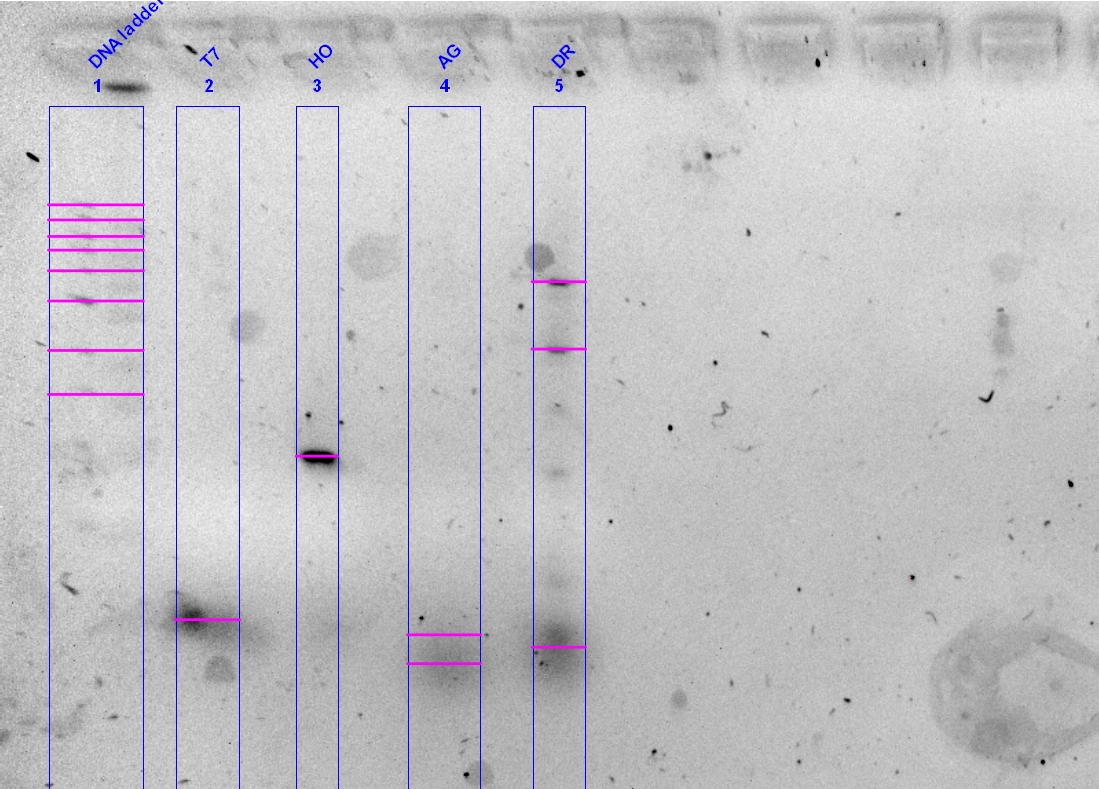
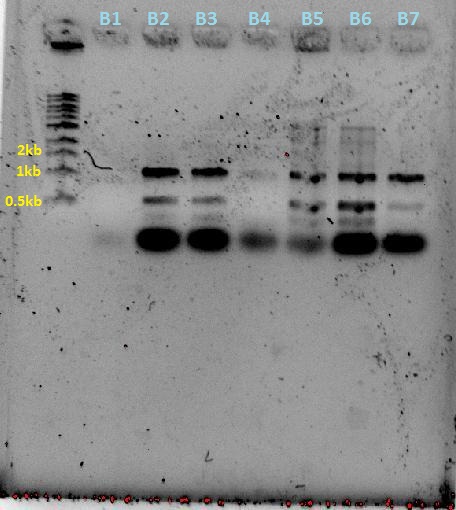
| + | HO product was good, at the right size and is a strong band. The T7 was pretty decent as well, but the phytochromes did not work. | ||
* Step 8) With our PCR complete, we then set about preparing the Chloramphenicol vector [which is the one we need to submit for any medal] as well as the clean up protocol. | * Step 8) With our PCR complete, we then set about preparing the Chloramphenicol vector [which is the one we need to submit for any medal] as well as the clean up protocol. | ||
| Line 144: | Line 149: | ||
* Step 10) Cleaned PCR products were diluted with water [20ul PCR product + 30ul water] and were then double digested using X + S [1ul each] in 5ul of 10x buffer and 1ul of BSA. | * Step 10) Cleaned PCR products were diluted with water [20ul PCR product + 30ul water] and were then double digested using X + S [1ul each] in 5ul of 10x buffer and 1ul of BSA. | ||
| + | |||
'''TEAM LIGATION''' | '''TEAM LIGATION''' | ||
| Line 160: | Line 166: | ||
Incubation | Incubation | ||
1. Incubate at room temperature for 10 mins | 1. Incubate at room temperature for 10 mins | ||
| - | 2. Incubate at | + | 2. Incubate at 80°C for 20 mins in water bath (preheat water-bath) |
| + | |||
'''TEAM COMPETENT CELLS''' | '''TEAM COMPETENT CELLS''' | ||
| - | -Competent Cell Method Modified from Inoue et al. 1992- Colonies isolated and inoculated to 150ml of SOB medium and grown to an A600 of between 0.2-0.8 at room temperature overnight (18-22 C) with vigorous shaking (200-250 rpm), then place on ice for 10min. The culture was transferred to a 15 ml centrifuge tube and spun at 2500 x g for 10 min at 4 C. Cells pelleted by spinning the tubes at ~2,500 g for ~7 min at | + | -Competent Cell Method Modified from Inoue et al. 1992- Colonies isolated and inoculated to 150ml of SOB medium and grown to an A600 of between 0.2-0.8 at room temperature overnight (18-22 C) with vigorous shaking (200-250 rpm), then place on ice for 10min. The culture was transferred to a 15 ml centrifuge tube and spun at 2500 x g for 10 min at 4 C. Cells pelleted by spinning the tubes at ~2,500 g for ~7 min at 4°C in the Sigma centrifuge. Supernatant removed, and immediately the tube was placed on ice. Cells were resuspended in 1-5 ml of ice-cold TB buffer by gently pipetting up and down with a 1 ml pipette. Ice-cold TB buffer was added to bring the volume up to ~1/5th of the original culture volume, and mixed by gently inverting. Tube was incubated on ice for 10 min. Centrifugation step repeated, supernatant poured off and cells gently resuspend in ~1/20th of the original culture volume of ice-cold TB buffer. 930 l of your cell suspension added to 1.5 microcentrifuges. 70 l of DMSO added to each. Aliquots of 100 *l of the competent cell suspension were combined with DMSO into microcentrifuge tubes. Competent cell aliquots where then frozen in liquid nitrogen. |
In order to prepare and transform competent E.coli cells various nutrient broths, such as LB, LB agar, SOC and SOB medium, were prepared. | In order to prepare and transform competent E.coli cells various nutrient broths, such as LB, LB agar, SOC and SOB medium, were prepared. | ||
| - | + | ||
| + | '''MEDIA PREP''' | ||
-LB media Method- | -LB media Method- | ||
| - | Dissolve 10g tryptone, 5g yeast extract and 10g NaCl in 800 mL MilliQ water, making use of a magnetic stirrer. Once dissolved, bring volume up to 1 liter using the MilliQ water. Autoclave 500 mL of the solution ( | + | Dissolve 10g tryptone, 5g yeast extract and 10g NaCl in 800 mL MilliQ water, making use of a magnetic stirrer. Once dissolved, bring volume up to 1 liter using the MilliQ water. Autoclave 500 mL of the solution (121°C, 15 min, standard liquid cycle). |
-LB agar Method- | -LB agar Method- | ||
| - | Add 7.5 g Bacto agar to the remaining 500 mL of LB media and autoclave [ | + | Add 7.5 g Bacto agar to the remaining 500 mL of LB media and autoclave [121°C, 15 min, standard liquid cycle]. Add 250 µL of Chloroamphenicol and mix well before plating out and setting agar. |
| - | After cooling and antibiotic addition, the LB agar was plated out using aseptic technique. 14 LB agar plates were prepared and allowed to cool next to the Bunsen. After this all plates were aseptically sealed using parafilm and stored in the refrigerator. | + | After cooling and antibiotic addition, the LB agar was plated out using aseptic technique. 14 LB agar plates were prepared and allowed to cool next to the Bunsen. After this all plates were aseptically sealed using parafilm and stored in the refrigerator. |
SOC and SOB medium are known to result in higher transformation efficiencies of plasmids (1). | SOC and SOB medium are known to result in higher transformation efficiencies of plasmids (1). | ||
| Line 186: | Line 194: | ||
Distilled H2O of volume 900ml was added with 5g Bacto Tryptone, 1.25g Bacto Yeast Extract, 0.124 grams NaCl and 0.0475 grams KCl. This was then adjust to pH 7.0 with NaOH or HCl and then to 250mL with distilled H2O. The system was then sterilized by autoclaving. | Distilled H2O of volume 900ml was added with 5g Bacto Tryptone, 1.25g Bacto Yeast Extract, 0.124 grams NaCl and 0.0475 grams KCl. This was then adjust to pH 7.0 with NaOH or HCl and then to 250mL with distilled H2O. The system was then sterilized by autoclaving. | ||
| - | + | ||
| + | '''BUFFER PREP''' | ||
TB buffer (for competent cells)- 2 grams of CaCl2-2H2O, 18.6 grams of KCl and 3 grams of PIPES where mixed and dissolved in ca 500ml of water with the pH adjusted to 6.7 with KOH. Then, 10.9 grams of MnCl2-4H2O, isdissolved in 300 ml of water, mixed and the solution adjusted to 1L. This is then sterilized by filtration through a pre-rinsed 0.45 µm filter unit and stored at 4 C. The solution is stable at 4 C indefinitely. All salts are added as solids. Resulting solution was colourless and unautoclaved. | TB buffer (for competent cells)- 2 grams of CaCl2-2H2O, 18.6 grams of KCl and 3 grams of PIPES where mixed and dissolved in ca 500ml of water with the pH adjusted to 6.7 with KOH. Then, 10.9 grams of MnCl2-4H2O, isdissolved in 300 ml of water, mixed and the solution adjusted to 1L. This is then sterilized by filtration through a pre-rinsed 0.45 µm filter unit and stored at 4 C. The solution is stable at 4 C indefinitely. All salts are added as solids. Resulting solution was colourless and unautoclaved. | ||
| Line 194: | Line 203: | ||
EDTA buffer - 18.61 g of EDTA solid, 90 mL of water, and was adjusted to pH 8.0 using 10 M NaOH. | EDTA buffer - 18.61 g of EDTA solid, 90 mL of water, and was adjusted to pH 8.0 using 10 M NaOH. | ||
| - | + | '''Preparation of gel electrophoresis system''' | |
A Sub-Cell GT Agarose Gel Electrophoresis system was set up according to the manufacturer’s instructions. The tray used was 15 x 10 cm and required 120ml gel volume to achieve a 1cm thick gel size. | A Sub-Cell GT Agarose Gel Electrophoresis system was set up according to the manufacturer’s instructions. The tray used was 15 x 10 cm and required 120ml gel volume to achieve a 1cm thick gel size. | ||
| Line 215: | Line 224: | ||
''2. Sambrook, J. (1989) Molecular Cloning: A Laboratory Manual, 2nd Ed ed., Plainview, NY'' | ''2. Sambrook, J. (1989) Molecular Cloning: A Laboratory Manual, 2nd Ed ed., Plainview, NY'' | ||
| - | |||
===23/08/2011=== | ===23/08/2011=== | ||
| Line 221: | Line 229: | ||
No colonies from ligation: Possible reasons. | No colonies from ligation: Possible reasons. | ||
Restriction enzyme or plasmid problem. Competent cells not competent or low efficiency. | Restriction enzyme or plasmid problem. Competent cells not competent or low efficiency. | ||
| - | However, | + | However, we've realised that the sequences of the linearised vectors don’t have the ''Spe''I or ''Xba''I sites. These supplied linearised vectors can only be used in subsequent biobrick construction when they are cut with ''Eco''RI and ''Pst''RI. |
| - | + | ||
| - | + | ||
| - | + | ||
| - | + | ||
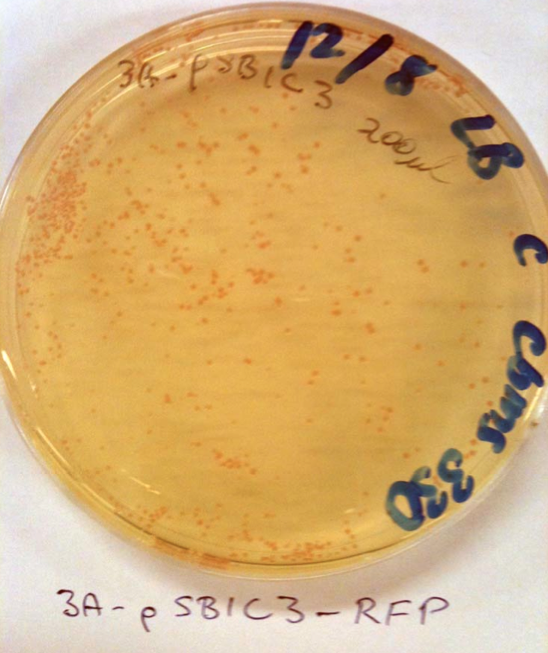
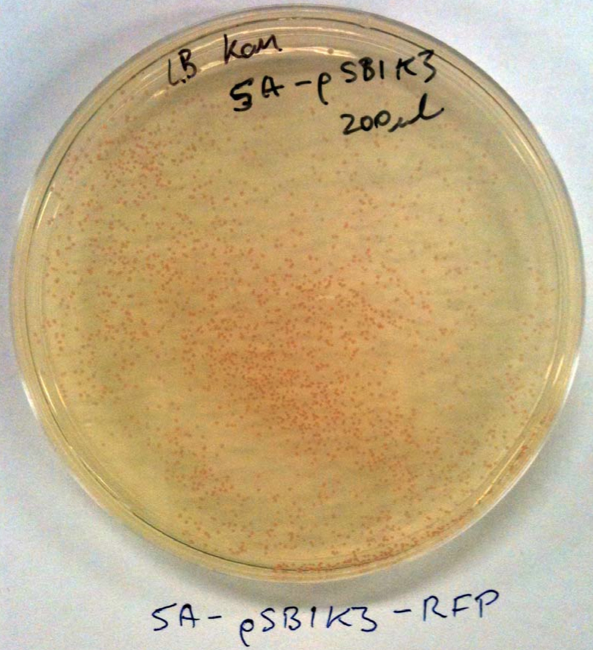
| + | Checked competent cells with some pSB1C3 and pSB1K3 clones from the iGEM distribution kit (Plate 1, position 3A and 5A) that we can use instead. See the photos: This means that our competent cells are good!!! Yay. These plasmids can be used for digestion with ''Spe''I and ''Xba''I for your initial cloning. | ||
| + | The cool thing is that they express red fluorescent protein (RFP) and are red in colour when IPTG is added. When digested with ''Spe''I and ''Xba''I and ligated with the genes they will be white. | ||
| Line 236: | Line 242: | ||
</gallery> | </gallery> | ||
| - | |||
===25/08/2011=== | ===25/08/2011=== | ||
| - | + | '''PCR for ''D. radiodurans''''' | |
| - | This PCR reaction is to test the “assumed” right template for the D. radiodurans phytochrome. The materials that we have are 6 tubes (3 orange and 3 pink, labeled 1, 2 and 3 for each colour). 100ul of water was added to increase the sample volume, as per Rob’s instructions to dilute the concentration as they were PCR products. PCR was carried out as per normal. | + | This PCR reaction is to test the “assumed” right template for the ''D. radiodurans'' phytochrome. The materials that we have are 6 tubes (3 orange and 3 pink, labeled 1, 2 and 3 for each colour). 100ul of water was added to increase the sample volume, as per Rob’s instructions to dilute the concentration as they were PCR products. PCR was carried out as per normal. |
| Line 291: | Line 296: | ||
| - | 4°C for 18 hours | + | 4°C for 18 hours |
| - | + | ||
| - | + | ||
===26/8/11=== | ===26/8/11=== | ||
| - | + | '''Colony PCR''' | |
Based on the protocol on iGEM website. | Based on the protocol on iGEM website. | ||
| Line 308: | Line 311: | ||
|'''Components''' | |'''Components''' | ||
|'''Per 10ul Reaction vol.''' | |'''Per 10ul Reaction vol.''' | ||
| - | |'''BB-fwd + BB-Rev ( | + | |'''BB-fwd + BB-Rev (~50 reactions)''' |
|'''BB-Fwd + HO-rev''' | |'''BB-Fwd + HO-rev''' | ||
|'''BB-Fwd + T7-rev''' | |'''BB-Fwd + T7-rev''' | ||
| Line 348: | Line 351: | ||
|41.6 | |41.6 | ||
|- | |- | ||
| - | |'''Master Mix''' | + | |colspan="5" align="center"| '''Master Mix, 9.5 ul per tube''' |
| - | + | ||
| - | + | ||
| - | + | ||
| - | + | ||
|- | |- | ||
|Template | |Template | ||
| Line 367: | Line 366: | ||
|} | |} | ||
| - | *Calculation error | + | (*)Calculation error, it should have been 260 |
40 tubes for HO → 20 chloramphenicol resistance, 20 kanamycin resistance | 40 tubes for HO → 20 chloramphenicol resistance, 20 kanamycin resistance | ||
| Line 396: | Line 395: | ||
===29/8/2011=== | ===29/8/2011=== | ||
| - | + | '''Index plates results:''' | |
Chloramphenicol plate (OH) – Plate were slightly discoloured. The agar had cracks within. Colonies 1-7, 11 and 12 were white. The rest haven't really grown because of agar issue. | Chloramphenicol plate (OH) – Plate were slightly discoloured. The agar had cracks within. Colonies 1-7, 11 and 12 were white. The rest haven't really grown because of agar issue. | ||
| Line 408: | Line 407: | ||
All plates were sealed, labeled and refrigerated for storage. | All plates were sealed, labeled and refrigerated for storage. | ||
| + | ==September== | ||
===1/9/2011=== | ===1/9/2011=== | ||
| - | + | '''Prep for plasmid extraction''' | |
Inoculated liquid cultures from the T7 and HO PCR colony screen plates for overnight growth and prep for plasmid extraction. sequencing need to be carried out to confirm BB part is correct. | Inoculated liquid cultures from the T7 and HO PCR colony screen plates for overnight growth and prep for plasmid extraction. sequencing need to be carried out to confirm BB part is correct. | ||
| - | Agarose gel of | + | Agarose gel of ''Eco''RI digestion of 2010 agro-BP plasmids to check plasmids are ok. Agarose gel of samples from opt PCR reaction for amplifying agro-BP (i.e. more ''Eco''RI added). Digested plasmids will then be run on gel. |
===2/9/2011=== | ===2/9/2011=== | ||
| + | <br> | ||
| - | + | • Running of the PCR gel, containing the DR and AT PCR products from last week, along with the ''Eco''RI digest of the AT template. See gel photo, but basically, conclusion was nothing worked. AT product sizes are either too big or too small, ''Eco''RI digest did nothing, DR has no products. | |
| - | + | ||
| - | • Running of the PCR gel, containing the DR and AT PCR products from last week, along with the | + | |
So, | So, | ||
• Set-up re-PCR of AT and DR. For AT, the PCR was done with the 5 templates, along with 2 previously amplified PCR products of the region we want, and a set of replicates using Rob’s taq and PCR solutions (see gel photo on PCR optimization, only Rob’s samples were ran cause his thermocycler is faster). Recipe for PCR is the same, I’ve put up so many sets of them, just take a look at the others if you want to see the concentrations. | • Set-up re-PCR of AT and DR. For AT, the PCR was done with the 5 templates, along with 2 previously amplified PCR products of the region we want, and a set of replicates using Rob’s taq and PCR solutions (see gel photo on PCR optimization, only Rob’s samples were ran cause his thermocycler is faster). Recipe for PCR is the same, I’ve put up so many sets of them, just take a look at the others if you want to see the concentrations. | ||
| - | • Re-digest of the AT templates using a different | + | • Re-digest of the AT templates using a different ''Eco''RI from Rob, theory was that the digest didn’t work because the ''Eco''RI that we were using was spoiled, from all the taking in and out of the freezer, not keeping on ice etc. So, take a note. |
Re-PCR and the re-digest have yet to be ran, so those need to be done during next week. | Re-PCR and the re-digest have yet to be ran, so those need to be done during next week. | ||
| Line 434: | Line 433: | ||
• Setting up prep for sequencing facility, a reaction volume of 12ul, containing 200-500ng of DNA and 3.2pmol of primers were required. Primer used for this sequencing is the BB-Fwd primer. | • Setting up prep for sequencing facility, a reaction volume of 12ul, containing 200-500ng of DNA and 3.2pmol of primers were required. Primer used for this sequencing is the BB-Fwd primer. | ||
| - | Using the plasmids purified, 8.2ul of template was added to 3.8ul of 10pmol concentration of primers | + | Using the plasmids purified, 8.2ul of template was added to 3.8ul of 10pmol concentration of primers. |
Fingers crossed that we get a good sequence by next Friday. | Fingers crossed that we get a good sequence by next Friday. | ||
| + | |||
| + | *'''However, from the sequencing (results not shown), the inserts were either the original red fluorescent protein, or were in the wrong orientation, as the primers were not specific enough (only 1 base pair difference if orientation was wrong).''' | ||
| Line 441: | Line 442: | ||
<gallery caption="" widths="200px" heights="200px"> | <gallery caption="" widths="200px" heights="200px"> | ||
| - | Image:Photochrome_ecoR1_digest_2-9-11.JPG | + | Image:Photochrome_ecoR1_digest_2-9-11.JPG|Digest of templates + PCR results |
</gallery> | </gallery> | ||
| + | Simple put, it was no good, digest did not work, PCR did not work | ||
| - | + | ===9/9/11=== | |
| - | + | ||
| + | More or less the same protocol as previously done. | ||
| + | 3ul of colony (white) was picked off the antibiotic plates and added to 20ul of water. 3ul of the mixture was used to spot the index plate. The PCR reactions were set up as follows: | ||
| + | ::{| border="1" cellpadding="5" cellspacing="0" | ||
| + | |+ align="bottom" style="color:#e76700;" | | ||
| + | |- | ||
| + | |'''Reactants''' | ||
| + | |'''Per 10ul reaction vol.''' | ||
| + | |'''BB-Fwd + BB-rev (Mastermix for ~22 reactions)''' | ||
| + | |'''BB-Fwd + DR-rev (Mastermix for ~22 reactions)''' | ||
| + | |- | ||
| + | |5x buffer | ||
| + | |2 | ||
| + | |44 | ||
| + | |44 | ||
| + | |- | ||
| + | |F-primer (10uM) | ||
| + | |0.5 | ||
| + | |11 | ||
| + | |11 | ||
| + | |- | ||
| + | |R-primer (10uM) | ||
| + | |0.5 | ||
| + | |11 | ||
| + | |11 | ||
| + | |- | ||
| + | |dNTP | ||
| + | |0.2 | ||
| + | |4.4 | ||
| + | |4.4 | ||
| + | |- | ||
| + | |Taq | ||
| + | |0.1 | ||
| + | |2.2 | ||
| + | |2.2 | ||
| + | |- | ||
| + | |Water | ||
| + | |6.2 | ||
| + | |126.4 | ||
| + | |126.4 | ||
| + | |- | ||
| + | |Master mix | ||
| + | | n/a | ||
| + | |Aliquot 9.5ul to each tube | ||
| + | |Aliquot 9.5ul to each tube | ||
| + | |- | ||
| + | |Template | ||
| + | |0.5 | ||
| + | |0.5 | ||
| + | |0.5 | ||
| + | |- | ||
| + | |Reaction volume | ||
| + | |10ul | ||
| + | |20 * 10ul | ||
| + | |20 * 10ul | ||
| + | |- | ||
| + | |} | ||
| + | The only difference of this protocol to the previous colony PCR is that the primer volumes were halved, since we have been getting a lot of primer dimmers from the previous colony PCR. | ||
| + | The tubes were labelled 1 to 20, with BB-Fwd and BB-rev group being red, BB-Fwd and Dr-rev being blue. The colonies were only picked from the chloramphenicol plate, simply cause the other plates had nothing. | ||
| + | :::{| border="1" cellpadding="10" cellspacing="0" | ||
| + | |+ align="bottom" style="color:#e76700;" | | ||
| + | |- | ||
| + | |'''Conditions''' | ||
| + | |'''Time''' | ||
| + | |- | ||
| + | |Initial denaturation | ||
| + | |95°C for 15 mins | ||
| + | |- | ||
| + | |Denaturation | ||
| + | |95°C for 30s | ||
| + | |- | ||
| + | |Annealing | ||
| + | |56°C for 30s | ||
| + | |- | ||
| + | |Elongation | ||
| + | |68°C for 1 min | ||
| + | |} | ||
| - | + | The PCR machine was set for 30 cycles. | |
| + | Note that the PCR cycle conditions are the same, which is NOT supposed to be correct for this reaction. The elongation time should have been 2.5 mins and not 1 min, which can be seen from the gel (not shown), that most of the lanes had nothing but dimerized primers. Only good thing we can get out of that is, if a band is present, it probably would not contain the things that we want. | ||
| + | ==The 2 weeks of mid-semester break== | ||
| + | '''Full throttle AHEAD!!''' | ||
| - | + | ===19/9/11=== | |
| - | + | ||
| - | + | ||
| + | Today we transformed cells using the registry of parts T7 promoters, and our ligated products from last Friday. We also spread these onto agar plates so that growth can be checked tomorrow. | ||
| + | A PCR of the templates was run, using two different primer combinations for AT (Gel result attached). | ||
| + | Further stock agar plates made up for use at a later time. (Both Kana and Cam) | ||
| + | |||
| + | [[File:Image-PCR_19-9.JPG|200px]] | ||
| + | |||
| + | Somehow the HO did not work, the DR band was deemed to be the original template due to the excessive primer dimer bands, and the AT did not work. | ||
| + | |||
| + | ===20/9/11=== | ||
| + | |||
| + | So today we had a look at the plates from yesterday of the T7, HO, DR, 6N and 15N (the last two were extracted from the Bio-Brick kit on Monday and grown on plates like our own T7, HO and DR). The HO and DR plates had lots of white colonies for both Kan and Cam vectors….indicating that some of these may have our insert in the vector in the correct orientation. However, the T7 was filled only with 5% white colonies and this most likely represents re-ligated plasmids. Also, the proportion of white colonies to red ones on the plate was very similar to the control (the water). Therefore, it was decided that the T7 didn’t work so only the HO and DR colonies were inoculated. | ||
| + | Also, as a sidenote, since we didn’t know which antibiotic the blue and red plates represented, the group yesterday spread each of our inserts onto both. Today, from the growth/lack there of, we now know that ‘red’ denotes Kan and ‘blue’ is Cam. | ||
| + | |||
| + | As the restriction digest of the insert was done with ''Xba''I and ''Spe''I (due to our primer design), orientation of the insert becomes an issue. To screen for this, we’ve decided to screen the colonies using an ''Xba''I restriction digest, instead of a colony PCR; inserts that are in the wrong orientation would have a scar tissue instead of an ''Xba''I or ''Spe''I cut site. | ||
| + | |||
| + | So, we inoculated 44 tubes. From each of the Kan-DR, Cam-DR, Kan-HO, Cam-HO plates, 10 individual white colonies were selected and each colony was put into a separate flacon tube containing 2mL liquid medium+ 2μl of the correct antibiotic. For example, for the Kan-DR, a white colony from the ‘Red-DR’ plate was chosen and put into a liquid medium containing 2μl kanamycin. For the 4 remaining tubes, the same process was repeated but this time with 6N and 15N and using Ampicillin. Only 2 colonies were selected for each because 6N and 15N are BioBricks, therefore, all the colonies should have the T7 insert in the vector. The 44 plates were then put on a shaker overnight at 37˚C and 120rpm. | ||
| + | |||
| + | ===21/9/11=== | ||
| + | |||
| + | Colonies were mini-prep-ed using a Qiagen Spin Miniprep Kit. The extracted plasmids were then nano-dropped and have an average of about 10ng/ul of DNA. A 25ul restriction digest using ''Xba''I and ''Spe''I was set up as follows: | ||
| + | |||
| + | :::{| border="1" cellpadding="10" cellspacing="0" | ||
| + | |+ align="bottom" style="color:#e76700;" | | ||
| + | |- | ||
| + | |'''MasterMix''' | ||
| + | |'''~45 tubes''' | ||
| + | |- | ||
| + | |10X NEBuffer 2 | ||
| + | |112.5 ul | ||
| + | |- | ||
| + | |100X BSA | ||
| + | |11.25 ul | ||
| + | |- | ||
| + | |''Xba''I | ||
| + | |45 ul | ||
| + | |- | ||
| + | |Water | ||
| + | |281.25 ul | ||
| + | |- | ||
| + | |Total | ||
| + | |450 ul | ||
| + | |} | ||
| + | |||
| + | 10ul of MasterMix was added to 15ul of DNA and then chuck these into the PCR machine. The cycle was set for 37deg for 10mins, then 80deg for 20mins. | ||
| + | |||
| + | The digested products were then ran on a 1% gel containing GelRed. | ||
| + | |||
| + | [[File:DR_+_HO_uncut_21-9.JPG|350px]][[File:DR_+_HO_cut_21-9.JPG|350px]] | ||
| + | |||
| + | Cut and uncut plasmids are all of the same size, showing that the ''Xba''I digestion did not occur; re-ligation of plasmid would result in a scar tissue that ''Xba''I could not cleave. | ||
| + | |||
| + | ===22-23/9/11=== | ||
| + | |||
| + | '''22/9/11''' | ||
| + | |||
| + | As we’ve only got re-ligated plasmid backbones, we’ve decided to re-digest the pSB1C3-RFP with ''Xba''I and ''Spe''I, followed by an shrimp alkaline phosphatase digest for a couple of hours at 37 degress. | ||
| + | Along with that, another PCR optimization for the 2 phytochromes was set-up, using different buffers and different annealing temperature ranges. | ||
| + | |||
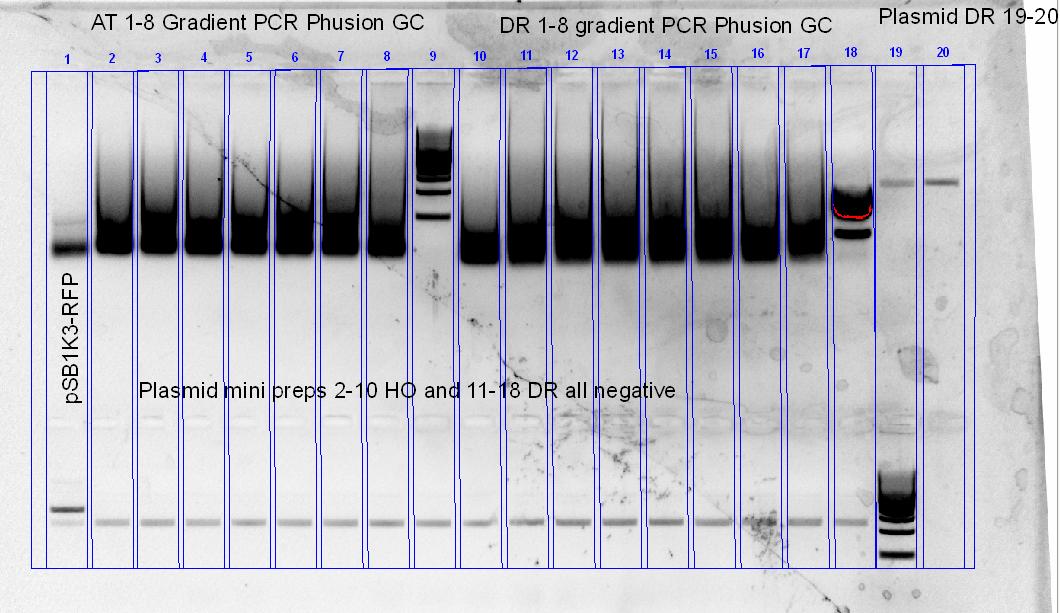
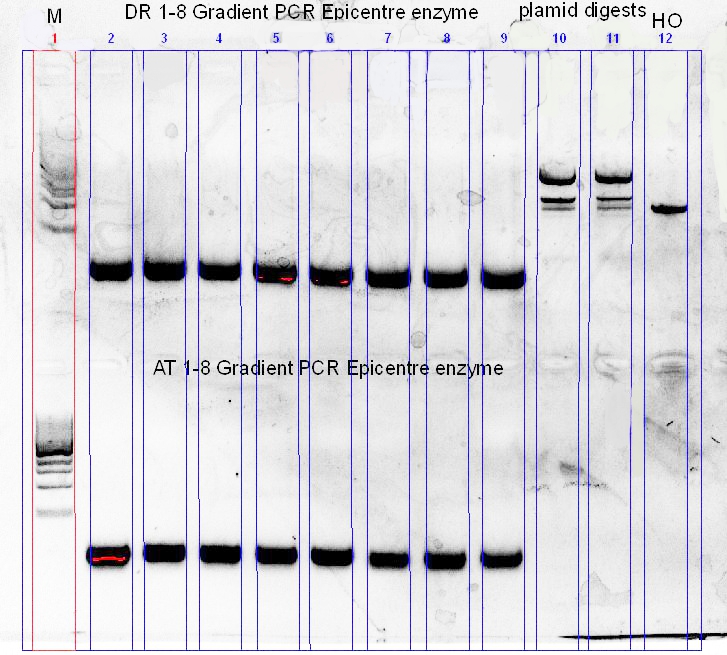
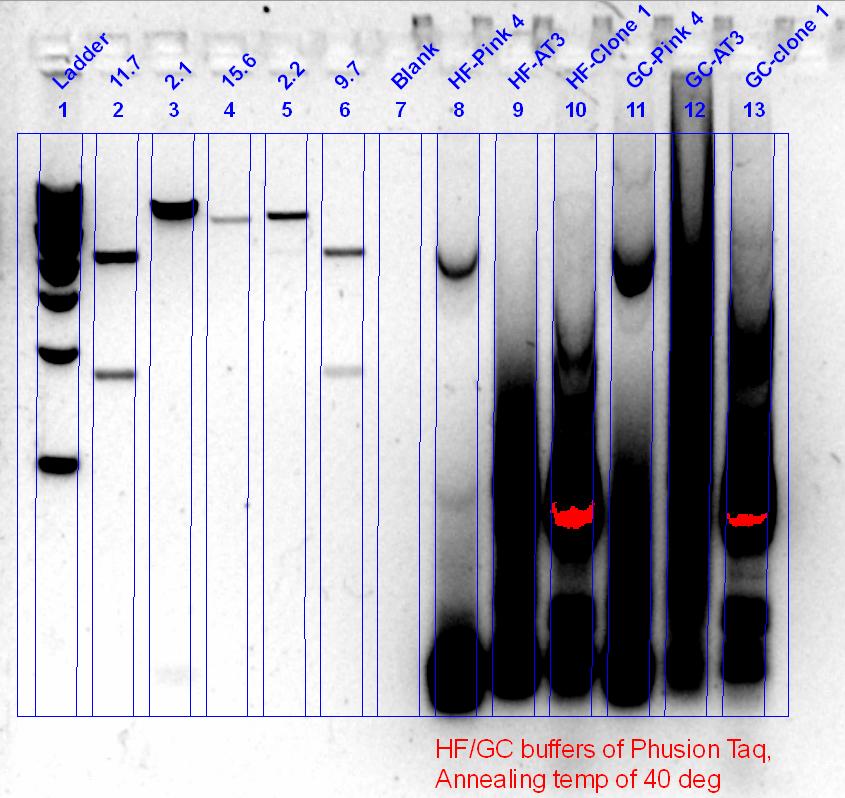
| + | [[File:Gradient PCR of phusion GC.JPG|400px]][[File:Graident_pcr_of_epicentre.JPG|300px]] | ||
| + | |||
| + | The newly digested and treated plasmid backbone was then used to ligate with a cut HO PCR product (''Xba''I + ''Spe''I), and then transformed using top10 cells. | ||
| + | |||
| + | '''23/9/11''' | ||
| + | |||
| + | Only 1 colony of the HO-biobrick with the chloramphenicol backbone grew, and the colony was inoculated onto liquid broth, then plasmid prep-ed and digested with ''Xba''I. | ||
| + | |||
| + | [[File:Biobrick_23-9.JPG|200px]] | ||
| + | |||
| + | The size of the ''Xba''I cut plasmid of the HO1-biobrick looked about the right size, so we’ve finally got our first biobrick!! | ||
| + | |||
| + | ===26-27/9/11=== | ||
| + | <br> | ||
| + | '''26/9/11''' | ||
| + | <br> | ||
| + | |||
| + | PCR of DR and AT again, this time with a series of buffers. | ||
| + | |||
| + | [[File:Cbms330 2011-09-26 DR and AT PCR screen.JPG|350px]] | ||
| + | |||
| + | The ''Deinococcus'' one seemed to work, we had a band at about slightly more than 2kbp, which is good, and was cut out and gel purified (50ng/ul). ''Agrobacterium'' didn’t work, so another set of reactions, this time with a lower annealing temperature, was set up. | ||
| + | |||
| + | Ligation and transformation of more HO, as backup, for DR to construct the biobrick, and to test the T7, into T7 (15N and 6N from the 2011 iGEM plates) biobricks, with different types of restriction digest. | ||
| + | |||
| + | <br> | ||
| + | |||
| + | :::{| border="1" cellpadding="10" cellspacing="0" | ||
| + | |+ align="center" style="color:#e76700;" | | ||
| + | |- | ||
| + | |'''Transformation''' | ||
| + | |'''Cells''' | ||
| + | |'''Plates''' | ||
| + | |- | ||
| + | |1. pSB1A-T7 6N (''Spe''I) + HO1 (''Xba''I + ''Spe''I) | ||
| + | |BL21(DE3) Tuner | ||
| + | |Amp-IPTG-ALA | ||
| + | |- | ||
| + | |2. pSB1A-T7 6N (''Spe''I) + HO1 (''Xba''I + ''Spe''I) | ||
| + | |TOP10 | ||
| + | |Amp | ||
| + | |- | ||
| + | |3. pSB1A-T7 15N (''Spe''I) + HO1 (''Xba''I + ''Spe''I) | ||
| + | |BL21(DE3) Tuner | ||
| + | |Amp-IPTG-ALA | ||
| + | |- | ||
| + | |4. pSB1A-T7 15N (''Spe''I) + HO1 (''Xba''I + ''Spe''I) | ||
| + | |TOP10 | ||
| + | |Amp | ||
| + | |- | ||
| + | |5. pSB1A-T7 6N (''Spe''I + ''Pst''I) + HO1 (''Xba''I + ''Pst''I) | ||
| + | |BL21(DE3) Tuner | ||
| + | |Amp-IPTG-ALA | ||
| + | |- | ||
| + | |6. pSB1A-T7 6N (''Spe''I + ''Pst''I) + HO1 (''Xba''I + ''Pst''I) | ||
| + | |TOP10 | ||
| + | |Amp | ||
| + | |- | ||
| + | |7. pSB1A-T7 15N (''Spe''I + ''Pst''I) + HO1 (''Xba''I + ''Pst''I) | ||
| + | |BL21(DE3) Tuner | ||
| + | |Amp-IPTG-ALA | ||
| + | |- | ||
| + | |8. pSB1A-T7 15N (''Spe''I + ''Pst''I) + HO1 (''Xba''I + ''Pst''I) | ||
| + | |TOP10 | ||
| + | |Amp | ||
| + | |- | ||
| + | |9. pSB1K3 (''Xba''I + ''Spe''I) + HO1 (''Xba''I + ''Spe''I) | ||
| + | |TOP10 | ||
| + | |Kan | ||
| + | |- | ||
| + | |10. pSB1K3 (''Xba''I + ''Spe''I) + Water | ||
| + | |TOP10 | ||
| + | |Kan | ||
| + | |- | ||
| + | |11. pSB1C3 (''Xba''I + ''Spe''I) + HO1 (''Xba''I + ''Spe''I) | ||
| + | |TOP10 | ||
| + | |Chl | ||
| + | |- | ||
| + | |12. pSB1C3 (''Xba''I + ''Spe''I) + Water | ||
| + | |TOP10 | ||
| + | |Chl | ||
| + | |- | ||
| + | |13. pSB1K3 (''Xba''I + ''Spe''I) gel purified + HO1 (''Xba''I + ''Spe''I) | ||
| + | |TOP10 | ||
| + | |Kan | ||
| + | |- | ||
| + | |14. pSB1C3 (''Xba''I + ''Spe''I) gel purified + HO1 (''Xba''I + ''Spe''I) | ||
| + | |TOP10 | ||
| + | |Chl | ||
| + | |- | ||
| + | |15. pSB1K3 (''Xba''I + ''Spe''I) gel purified + DR (''Xba''I + ''Spe''I) | ||
| + | |TOP10 | ||
| + | |Kan | ||
| + | |- | ||
| + | |16. pSB1C3 (''Xba''I + ''Spe''I) gel purified + DR (''Xba''I + ''Spe''I) | ||
| + | |TOP10 | ||
| + | |Chl | ||
| + | |- | ||
| + | |} | ||
| + | |||
| + | More PCRs of the AT was set-up to run overnight. | ||
| + | |||
| + | '''27/9/11''' | ||
| + | |||
| + | To summarise, over half the plates did not have any growth, and for those that have colonies, we've inoculated them into liquid broth to grow them up for plasmid preps. The PCR of the AT phytochrome seemed to have a good band at the right size, and it was cut-out, gel purified, digested (''Xba''I + ''Spe''I), ligated with the treated plasmid backbone and transformed into TOP10 cells for screening. The HO-biobrick that we constructed was also digested, and tested with the HO-primers that we used in the initial digestion to check for its product size, and it works! | ||
| + | |||
| + | [[File:Cbm330_2011-09-27_AT_PCR_buffer_screen_with_HO_digest.JPEG|350px]] | ||
| + | |||
| + | ===28-30/9/11=== | ||
| + | |||
| + | For the last 3 days that we have to work in the lab with, we've mass screened a lot of plates, plasmid preps, digests, and gels. | ||
| + | |||
| + | Series of gel photos | ||
| + | |||
| + | [[File:Colony screen w.atpcr 28-9.JPG|250px]][[File:Plate colony screen 28-9.JPG|350px]] | ||
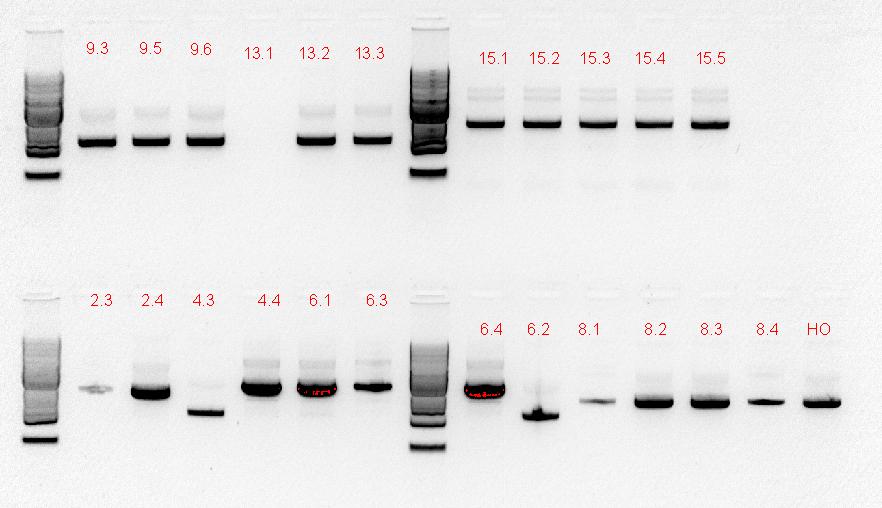
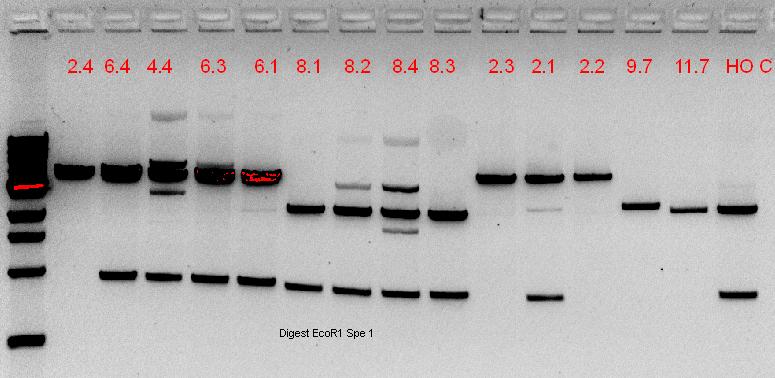
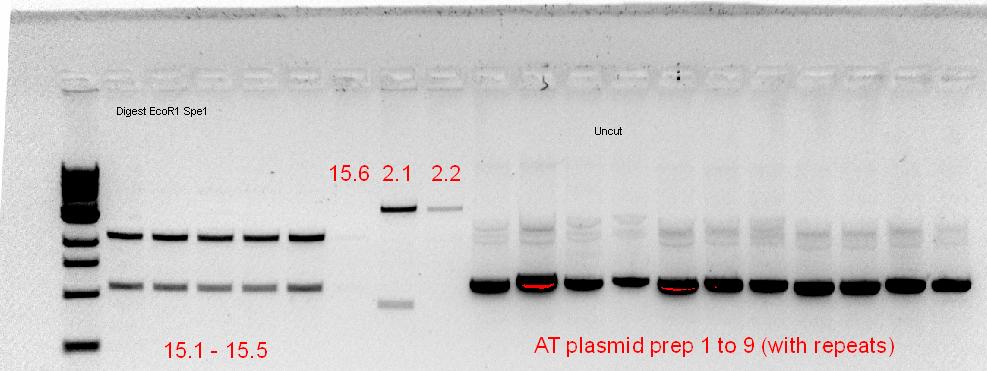
| + | [[File:29-9-11_SpeI_EcoRI_digest_of_plsmid_screen.jpg|400px]][[File:29-9-11 digest and AT plasmid prep.jpg|350px]] | ||
| + | |||
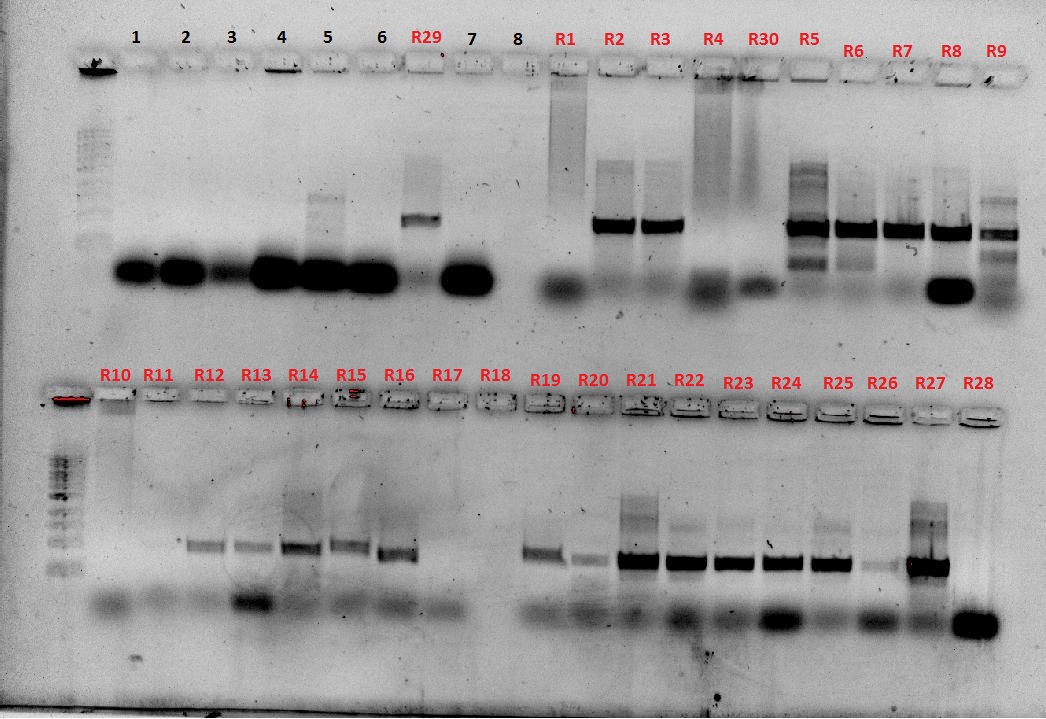
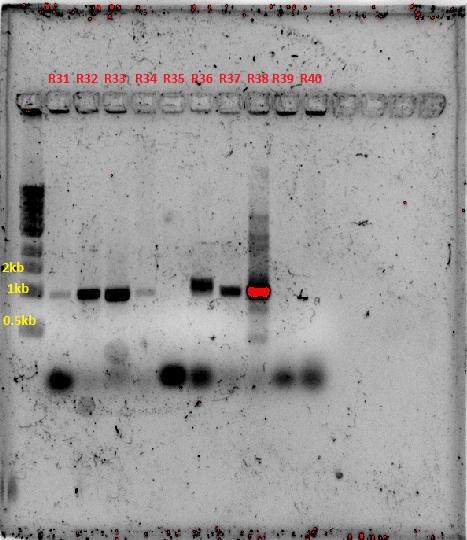
| + | The numbers of the lanes correspond to the plate number from the table above (27/9/11), and goes in the format of (plate#.colony#). It was observed that the plasmids are of different sizes, showing a positive insertion of the HO or the T7-HO composite part. However, the AT-still did not work, and the transformed DR ended up expressing red fluorescent protein, hence another PCR was done. | ||
| + | |||
| + | [[File:Dr and AT play.JPG|350px]] | ||
| + | |||
| + | And we've got a good size for the band! | ||
| + | |||
| + | |||
| + | <html> | ||
| + | <body> | ||
| + | <div id="banner1" style="text-align: center;"> | ||
| + | <a href="https://2011.igem.org/Team:Macquarie_Australia/Attributions"><img src="https://static.igem.org/mediawiki/2011/4/4a/Sponsor_logo_mq.gif" width="450" ></a> | ||
| + | </div> | ||
| + | </div> | ||
</body> | </body> | ||
| + | </html> | ||
Latest revision as of 11:05, 4 October 2011
Contents |
Notebook
August
12-19/8/2011
TEAM PCR
Today, we started the PCR process in order to amplify our T7 promoter, HO1, At, Dr.
- Step 1) We diluted the primer stock down to a concentration of 100uM. We did this by taking the weight of the primers and multiplying them by 100 and then adding this amount of water to the stock.
- So, for example, if our amount of Oligo = 38.3nmol, we add 383ul of water (which gives us a concentration of 100uM)
- Step 2) We performed a second dilution (1:10) to produce a concentration of 10uM for each primer.
- So, 100uM --> 10uM
- Step 3) A master-mix was made containing:
Reactants Volume Water 41.4ul 5x buffer 16ul 10mM DNTP 1.6ul Taq poly 1ul
- Step 4) Mix was spun for a couple of seconds. This master mix as divided up into 4 15ul aliquots [you can take out 3 lots of 15ul and keep the final 15ul in the mastermix tube and use that as a housing].
- Step 5) To these 15ul aliquots, we add into each:
Primers/Template (steps 1-2) Volume Forward 2ul Reverse 2ul Template [Ho, Dr etc] 1ul
- What we end up with is 4 reaction tubes with our plasmid template with the primers in the correct dilution.
- Step 6) We set up the PCR machine with the following protocol:
- Initial denaturation – 94°C for 2 minutes
- Denaturation – 94°C for 30 sec
- Annealing – 60°C for 30 seconds ] 10 cycles in total
- Extension – 72°C for 2min 30sec
- THEN
- Denaturation – 94°C for 30 sec
- Annealing – 52°C for 30 seconds ] 15 cycles in total.
- Extension – 72°C for 2min 30sec
- Final extension – 72°C for 10 min
- Hold period – 4°C for 2 minutes
- We’ve labelled the protocol ‘330’ and it’s the same as last years’ protocol with a few additions. Note that we made a mistake during our 15 cycle stage - it should be at 72°C. Our bad. We have fixed this - the protocol has been corrected.
- Step 7) We conducted our PCR! It took 2 hours and 13 minutes to complete.
HO product was good, at the right size and is a strong band. The T7 was pretty decent as well, but the phytochromes did not work.
- Step 8) With our PCR complete, we then set about preparing the Chloramphenicol vector [which is the one we need to submit for any medal] as well as the clean up protocol.
Rectants Volume DPN1 1ul Xba1 + Spe1 1ul + 1ul 100x BSA 1ul Template DNA - Ch vector 20ul 10x NEBuffer 4 5ul Water 21.5ul Total 50.5ul
- Clean up prep:
- Sigma GENELUTE PCR clean up kit has the protocol
- Step 9) We set up the nanodrop to determine the quality of our PCR results:
PCR product Concentration T7 1.1ug [23ng/ul] HO 870ng [17.4ng/ul] Agro 500ng [10.4ng/ul] Dino 1.8ug [36.1ng/ul]
- Step 10) Cleaned PCR products were diluted with water [20ul PCR product + 30ul water] and were then double digested using X + S [1ul each] in 5ul of 10x buffer and 1ul of BSA.
TEAM LIGATION
Preparation of ligation mix 1. 11 uL H2O in PCR tube 2. 1.2 uL plasmid 3. Digests (in separate PCR tubes): i. 0.42 uL of T7 ii. 7.76 uL of D iii. 26.92 uL of AT iv. 4.60 uL of HO 4. 2 uL of 10 x T4 DNA ligase Reaction buffer (vortex to make sure precipitate goes into solution) 5. 1 uL of T4 DNA ligase 6. Mix well – centrifuge for a few seconds Incubation 1. Incubate at room temperature for 10 mins 2. Incubate at 80°C for 20 mins in water bath (preheat water-bath)
TEAM COMPETENT CELLS
-Competent Cell Method Modified from Inoue et al. 1992- Colonies isolated and inoculated to 150ml of SOB medium and grown to an A600 of between 0.2-0.8 at room temperature overnight (18-22 C) with vigorous shaking (200-250 rpm), then place on ice for 10min. The culture was transferred to a 15 ml centrifuge tube and spun at 2500 x g for 10 min at 4 C. Cells pelleted by spinning the tubes at ~2,500 g for ~7 min at 4°C in the Sigma centrifuge. Supernatant removed, and immediately the tube was placed on ice. Cells were resuspended in 1-5 ml of ice-cold TB buffer by gently pipetting up and down with a 1 ml pipette. Ice-cold TB buffer was added to bring the volume up to ~1/5th of the original culture volume, and mixed by gently inverting. Tube was incubated on ice for 10 min. Centrifugation step repeated, supernatant poured off and cells gently resuspend in ~1/20th of the original culture volume of ice-cold TB buffer. 930 l of your cell suspension added to 1.5 microcentrifuges. 70 l of DMSO added to each. Aliquots of 100 *l of the competent cell suspension were combined with DMSO into microcentrifuge tubes. Competent cell aliquots where then frozen in liquid nitrogen. In order to prepare and transform competent E.coli cells various nutrient broths, such as LB, LB agar, SOC and SOB medium, were prepared.
MEDIA PREP
-LB media Method- Dissolve 10g tryptone, 5g yeast extract and 10g NaCl in 800 mL MilliQ water, making use of a magnetic stirrer. Once dissolved, bring volume up to 1 liter using the MilliQ water. Autoclave 500 mL of the solution (121°C, 15 min, standard liquid cycle).
-LB agar Method- Add 7.5 g Bacto agar to the remaining 500 mL of LB media and autoclave [121°C, 15 min, standard liquid cycle]. Add 250 µL of Chloroamphenicol and mix well before plating out and setting agar.
After cooling and antibiotic addition, the LB agar was plated out using aseptic technique. 14 LB agar plates were prepared and allowed to cool next to the Bunsen. After this all plates were aseptically sealed using parafilm and stored in the refrigerator.
SOC and SOB medium are known to result in higher transformation efficiencies of plasmids (1).
-SOC media (for competent cells)- A mixture of 4g 2% w/v bacto-tryptone (20 g), 1g 0.5% w/v bacto-yeast extract, 400µl 5M NaCl, 250 µl 2M KCl, 20mM MgSO4 (0.4821 g), 0.7222g 20mM glucose and MilliQ H2O to 200 mL. The adjusted quantities were combined in 1l measuring column with constant stirring and then placed in the autoclave for sterilization.
-SOB Media (for competent cells)-
Distilled H2O of volume 900ml was added with 5g Bacto Tryptone, 1.25g Bacto Yeast Extract, 0.124 grams NaCl and 0.0475 grams KCl. This was then adjust to pH 7.0 with NaOH or HCl and then to 250mL with distilled H2O. The system was then sterilized by autoclaving.
BUFFER PREP
TB buffer (for competent cells)- 2 grams of CaCl2-2H2O, 18.6 grams of KCl and 3 grams of PIPES where mixed and dissolved in ca 500ml of water with the pH adjusted to 6.7 with KOH. Then, 10.9 grams of MnCl2-4H2O, isdissolved in 300 ml of water, mixed and the solution adjusted to 1L. This is then sterilized by filtration through a pre-rinsed 0.45 µm filter unit and stored at 4 C. The solution is stable at 4 C indefinitely. All salts are added as solids. Resulting solution was colourless and unautoclaved.
TAE buffer - A total volume of 500 mL was made up as a 50x stock solution from 121 g of Tris base dissolved in water with 28.55 mL of glacial acetic acid and 50 mL 0.5 M EDTA (pH 8.0).
EDTA buffer - 18.61 g of EDTA solid, 90 mL of water, and was adjusted to pH 8.0 using 10 M NaOH.
Preparation of gel electrophoresis system
A Sub-Cell GT Agarose Gel Electrophoresis system was set up according to the manufacturer’s instructions. The tray used was 15 x 10 cm and required 120ml gel volume to achieve a 1cm thick gel size.
The 1.2% agarose gel was made up to 200ml by combining 2.4g of agarose gel powder with 200ml of previously prepared TAE buffer. This was placed in the microwave to fully dissolve the agar powder. After the gel liquid cooled to around 60°C it was poured into the UV Transparent Plastic (UVTP) tray.
During this time a GelGreen Nucleic Acid Gel Stain was prepared for post gel staining. A 0.1M NaCl solution was made up to 500ml and 150μl of 10000X GelGreen stock was added.
After the gel solidified the system was submerged in TAE buffer. The samples were loaded in appropriate wells and the system was allowed to run for 1 hour.
Following this the gel was removed and submerged in the previously prepared GelGreen stain. The gel remained submerged in the staining solution for 30min with constant agiatation.
The stained gel was finally analysed using a Gel-Doc EZ Imager for visualisation of PCR products.
REFERENCES
1. Hanahan, D. (1983) J Mol Biol 166, 557-580
2. Sambrook, J. (1989) Molecular Cloning: A Laboratory Manual, 2nd Ed ed., Plainview, NY
23/08/2011
No colonies from ligation: Possible reasons. Restriction enzyme or plasmid problem. Competent cells not competent or low efficiency. However, we've realised that the sequences of the linearised vectors don’t have the SpeI or XbaI sites. These supplied linearised vectors can only be used in subsequent biobrick construction when they are cut with EcoRI and PstRI.
Checked competent cells with some pSB1C3 and pSB1K3 clones from the iGEM distribution kit (Plate 1, position 3A and 5A) that we can use instead. See the photos: This means that our competent cells are good!!! Yay. These plasmids can be used for digestion with SpeI and XbaI for your initial cloning.
The cool thing is that they express red fluorescent protein (RFP) and are red in colour when IPTG is added. When digested with SpeI and XbaI and ligated with the genes they will be white.
25/08/2011
PCR for D. radiodurans
This PCR reaction is to test the “assumed” right template for the D. radiodurans phytochrome. The materials that we have are 6 tubes (3 orange and 3 pink, labeled 1, 2 and 3 for each colour). 100ul of water was added to increase the sample volume, as per Rob’s instructions to dilute the concentration as they were PCR products. PCR was carried out as per normal.
Components Volumes 5X buffer 24ul F- primer 12ul R-primer 12ul dNTP 1.8ug [36.1ng/ul] Taq 1.2ul H2O 62.4ul Total volume (Master mix) 114ul Template 1ul X6 PCR reaction volume 20ul
PCR cycle
Initial denaturation – 98°C for 2 minutes
Denaturation – 98°C for 30 sec
Annealing – 60°C for 30 seconds ] 25 cycles in total
Extension – 72°C for 2min 30sec
4°C for 18 hours
26/8/11
Colony PCR
Based on the protocol on iGEM website. 3ul of colony (white) was picked off the antibiotic plates and added to 20ul of water. 3ul of the mixture was used to spot the index plate. The PCR reactions were set up as follows:
Components Per 10ul Reaction vol. BB-fwd + BB-Rev (~50 reactions) BB-Fwd + HO-rev BB-Fwd + T7-rev 5x buffer 2 100 84 16 F-primer 1 50 42 8 R-primer 1 50 42 8 dNTP 0.2 10 8.4 1.6 Taq 0.1 5 4.2 0.8 Water 5.2 520* 218.4 41.6 Master Mix, 9.5 ul per tube Template 0.5 0.5 * 40 (HO), 0.5 * 8 (T7) 0.5 * 40 (HO) 0.5 * 8 (T7) Reaction Volume 10ul 48 * 10ul 40 * 10ul 8 * 10ul
(*)Calculation error, it should have been 260 40 tubes for HO → 20 chloramphenicol resistance, 20 kanamycin resistance
The tubes were labelled coded with a coloured circle, and numbered.
- Blue circles → (BB-fwd + HO-rev) for HO, no. 1 to 20 for kanamycin, 21 to 40 for chloramphenicol
- Red circles → (BB-Fwd + BB-Rev) for HO, no. 1 to 20 for kanamycin, 21 to 40 for chloramphenicol
- Black circles → (BB-Fwd + BB-Rev) for T7, no. 1 to 8 for kanamycin
- No circles → (BB-Fwd + T7-Rev) for T7, no. 1 to 8 for kanamycin
For T7, there were no colonies from the chloramphenicol plates.
PCR cycle conditions Initial denaturation 95°C for 15 mins Denaturation 95°C for 30s Annealing 56°C for 30s } ~30 cycles Elongation 68°C for 1 min
PCR products were ran on a gel with the code on the gels being the same as the labelled tubes
29/8/2011
Index plates results:
Chloramphenicol plate (OH) – Plate were slightly discoloured. The agar had cracks within. Colonies 1-7, 11 and 12 were white. The rest haven't really grown because of agar issue.
Kanamycin plate (OH) - A swipe of agar has been taken out, possibly due to excessive heat, however all colonies 1-20 grew. All were white except 15 and 18 which were red.
Chloramphenicol plate (T7) - Colonies 1,6,8 (and one extra un-numbered colony) were white. Colonies 2,4,5,7 were red. Colony 3 didn't grown.
Kanamycin plate (T7) - Again, plate looked discoloured in the top half and a big swipe of agar had been taken out. Colonies 3, 11, 16 were pink. Colonies 8, 13, 17, 19 were white.
All plates were sealed, labeled and refrigerated for storage.
September
1/9/2011
Prep for plasmid extraction
Inoculated liquid cultures from the T7 and HO PCR colony screen plates for overnight growth and prep for plasmid extraction. sequencing need to be carried out to confirm BB part is correct.
Agarose gel of EcoRI digestion of 2010 agro-BP plasmids to check plasmids are ok. Agarose gel of samples from opt PCR reaction for amplifying agro-BP (i.e. more EcoRI added). Digested plasmids will then be run on gel.
2/9/2011
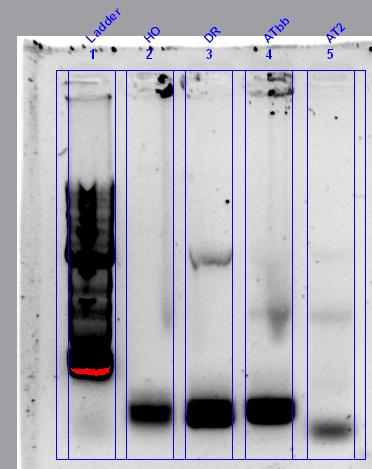
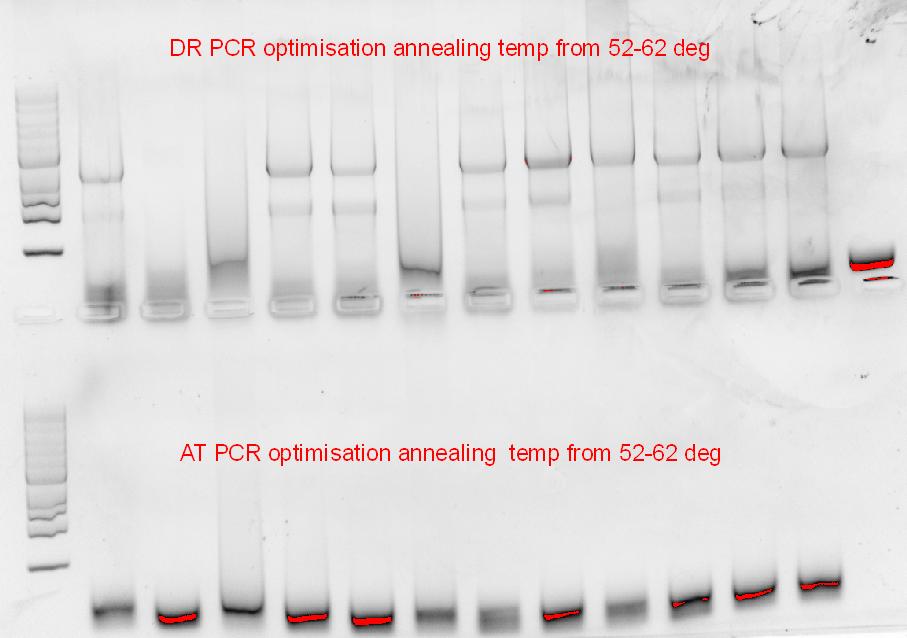
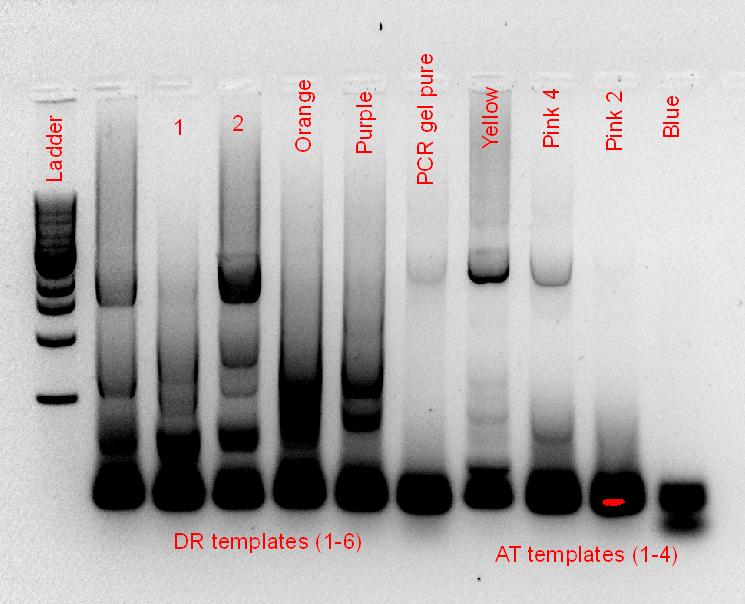
• Running of the PCR gel, containing the DR and AT PCR products from last week, along with the EcoRI digest of the AT template. See gel photo, but basically, conclusion was nothing worked. AT product sizes are either too big or too small, EcoRI digest did nothing, DR has no products. So, • Set-up re-PCR of AT and DR. For AT, the PCR was done with the 5 templates, along with 2 previously amplified PCR products of the region we want, and a set of replicates using Rob’s taq and PCR solutions (see gel photo on PCR optimization, only Rob’s samples were ran cause his thermocycler is faster). Recipe for PCR is the same, I’ve put up so many sets of them, just take a look at the others if you want to see the concentrations.
• Re-digest of the AT templates using a different EcoRI from Rob, theory was that the digest didn’t work because the EcoRI that we were using was spoiled, from all the taking in and out of the freezer, not keeping on ice etc. So, take a note.
Re-PCR and the re-digest have yet to be ran, so those need to be done during next week. Next, • Ligation of the previously cleaned pooled DR PCR product to pSB1K3 and pSB1C3 plasmid backbone, along with the transformation. See previous protocol for recipe.
• Plasmid prep from the selected colonies, following the Qiagen Miniprep kit. For the colonies that we used, as corresponding to the colony PCR gel, see Nina’s results on the nanodrop.
• Setting up prep for sequencing facility, a reaction volume of 12ul, containing 200-500ng of DNA and 3.2pmol of primers were required. Primer used for this sequencing is the BB-Fwd primer. Using the plasmids purified, 8.2ul of template was added to 3.8ul of 10pmol concentration of primers. Fingers crossed that we get a good sequence by next Friday.
- However, from the sequencing (results not shown), the inserts were either the original red fluorescent protein, or were in the wrong orientation, as the primers were not specific enough (only 1 base pair difference if orientation was wrong).
A gel was also run analysing the EcoR1 digest of our phytochromes
Simple put, it was no good, digest did not work, PCR did not work
9/9/11
More or less the same protocol as previously done. 3ul of colony (white) was picked off the antibiotic plates and added to 20ul of water. 3ul of the mixture was used to spot the index plate. The PCR reactions were set up as follows:
Reactants Per 10ul reaction vol. BB-Fwd + BB-rev (Mastermix for ~22 reactions) BB-Fwd + DR-rev (Mastermix for ~22 reactions) 5x buffer 2 44 44 F-primer (10uM) 0.5 11 11 R-primer (10uM) 0.5 11 11 dNTP 0.2 4.4 4.4 Taq 0.1 2.2 2.2 Water 6.2 126.4 126.4 Master mix n/a Aliquot 9.5ul to each tube Aliquot 9.5ul to each tube Template 0.5 0.5 0.5 Reaction volume 10ul 20 * 10ul 20 * 10ul
The only difference of this protocol to the previous colony PCR is that the primer volumes were halved, since we have been getting a lot of primer dimmers from the previous colony PCR.
The tubes were labelled 1 to 20, with BB-Fwd and BB-rev group being red, BB-Fwd and Dr-rev being blue. The colonies were only picked from the chloramphenicol plate, simply cause the other plates had nothing.
Conditions Time Initial denaturation 95°C for 15 mins Denaturation 95°C for 30s Annealing 56°C for 30s Elongation 68°C for 1 min
The PCR machine was set for 30 cycles.
Note that the PCR cycle conditions are the same, which is NOT supposed to be correct for this reaction. The elongation time should have been 2.5 mins and not 1 min, which can be seen from the gel (not shown), that most of the lanes had nothing but dimerized primers. Only good thing we can get out of that is, if a band is present, it probably would not contain the things that we want.
The 2 weeks of mid-semester break
Full throttle AHEAD!!
19/9/11
Today we transformed cells using the registry of parts T7 promoters, and our ligated products from last Friday. We also spread these onto agar plates so that growth can be checked tomorrow.
A PCR of the templates was run, using two different primer combinations for AT (Gel result attached).
Further stock agar plates made up for use at a later time. (Both Kana and Cam)
Somehow the HO did not work, the DR band was deemed to be the original template due to the excessive primer dimer bands, and the AT did not work.
20/9/11
So today we had a look at the plates from yesterday of the T7, HO, DR, 6N and 15N (the last two were extracted from the Bio-Brick kit on Monday and grown on plates like our own T7, HO and DR). The HO and DR plates had lots of white colonies for both Kan and Cam vectors….indicating that some of these may have our insert in the vector in the correct orientation. However, the T7 was filled only with 5% white colonies and this most likely represents re-ligated plasmids. Also, the proportion of white colonies to red ones on the plate was very similar to the control (the water). Therefore, it was decided that the T7 didn’t work so only the HO and DR colonies were inoculated. Also, as a sidenote, since we didn’t know which antibiotic the blue and red plates represented, the group yesterday spread each of our inserts onto both. Today, from the growth/lack there of, we now know that ‘red’ denotes Kan and ‘blue’ is Cam.
As the restriction digest of the insert was done with XbaI and SpeI (due to our primer design), orientation of the insert becomes an issue. To screen for this, we’ve decided to screen the colonies using an XbaI restriction digest, instead of a colony PCR; inserts that are in the wrong orientation would have a scar tissue instead of an XbaI or SpeI cut site.
So, we inoculated 44 tubes. From each of the Kan-DR, Cam-DR, Kan-HO, Cam-HO plates, 10 individual white colonies were selected and each colony was put into a separate flacon tube containing 2mL liquid medium+ 2μl of the correct antibiotic. For example, for the Kan-DR, a white colony from the ‘Red-DR’ plate was chosen and put into a liquid medium containing 2μl kanamycin. For the 4 remaining tubes, the same process was repeated but this time with 6N and 15N and using Ampicillin. Only 2 colonies were selected for each because 6N and 15N are BioBricks, therefore, all the colonies should have the T7 insert in the vector. The 44 plates were then put on a shaker overnight at 37˚C and 120rpm.
21/9/11
Colonies were mini-prep-ed using a Qiagen Spin Miniprep Kit. The extracted plasmids were then nano-dropped and have an average of about 10ng/ul of DNA. A 25ul restriction digest using XbaI and SpeI was set up as follows:
MasterMix ~45 tubes 10X NEBuffer 2 112.5 ul 100X BSA 11.25 ul XbaI 45 ul Water 281.25 ul Total 450 ul
10ul of MasterMix was added to 15ul of DNA and then chuck these into the PCR machine. The cycle was set for 37deg for 10mins, then 80deg for 20mins.
The digested products were then ran on a 1% gel containing GelRed.
Cut and uncut plasmids are all of the same size, showing that the XbaI digestion did not occur; re-ligation of plasmid would result in a scar tissue that XbaI could not cleave.
22-23/9/11
22/9/11
As we’ve only got re-ligated plasmid backbones, we’ve decided to re-digest the pSB1C3-RFP with XbaI and SpeI, followed by an shrimp alkaline phosphatase digest for a couple of hours at 37 degress. Along with that, another PCR optimization for the 2 phytochromes was set-up, using different buffers and different annealing temperature ranges.
The newly digested and treated plasmid backbone was then used to ligate with a cut HO PCR product (XbaI + SpeI), and then transformed using top10 cells.
23/9/11
Only 1 colony of the HO-biobrick with the chloramphenicol backbone grew, and the colony was inoculated onto liquid broth, then plasmid prep-ed and digested with XbaI.
The size of the XbaI cut plasmid of the HO1-biobrick looked about the right size, so we’ve finally got our first biobrick!!
26-27/9/11
26/9/11
PCR of DR and AT again, this time with a series of buffers.
The Deinococcus one seemed to work, we had a band at about slightly more than 2kbp, which is good, and was cut out and gel purified (50ng/ul). Agrobacterium didn’t work, so another set of reactions, this time with a lower annealing temperature, was set up.
Ligation and transformation of more HO, as backup, for DR to construct the biobrick, and to test the T7, into T7 (15N and 6N from the 2011 iGEM plates) biobricks, with different types of restriction digest.
Transformation Cells Plates 1. pSB1A-T7 6N (SpeI) + HO1 (XbaI + SpeI) BL21(DE3) Tuner Amp-IPTG-ALA 2. pSB1A-T7 6N (SpeI) + HO1 (XbaI + SpeI) TOP10 Amp 3. pSB1A-T7 15N (SpeI) + HO1 (XbaI + SpeI) BL21(DE3) Tuner Amp-IPTG-ALA 4. pSB1A-T7 15N (SpeI) + HO1 (XbaI + SpeI) TOP10 Amp 5. pSB1A-T7 6N (SpeI + PstI) + HO1 (XbaI + PstI) BL21(DE3) Tuner Amp-IPTG-ALA 6. pSB1A-T7 6N (SpeI + PstI) + HO1 (XbaI + PstI) TOP10 Amp 7. pSB1A-T7 15N (SpeI + PstI) + HO1 (XbaI + PstI) BL21(DE3) Tuner Amp-IPTG-ALA 8. pSB1A-T7 15N (SpeI + PstI) + HO1 (XbaI + PstI) TOP10 Amp 9. pSB1K3 (XbaI + SpeI) + HO1 (XbaI + SpeI) TOP10 Kan 10. pSB1K3 (XbaI + SpeI) + Water TOP10 Kan 11. pSB1C3 (XbaI + SpeI) + HO1 (XbaI + SpeI) TOP10 Chl 12. pSB1C3 (XbaI + SpeI) + Water TOP10 Chl 13. pSB1K3 (XbaI + SpeI) gel purified + HO1 (XbaI + SpeI) TOP10 Kan 14. pSB1C3 (XbaI + SpeI) gel purified + HO1 (XbaI + SpeI) TOP10 Chl 15. pSB1K3 (XbaI + SpeI) gel purified + DR (XbaI + SpeI) TOP10 Kan 16. pSB1C3 (XbaI + SpeI) gel purified + DR (XbaI + SpeI) TOP10 Chl
More PCRs of the AT was set-up to run overnight.
27/9/11
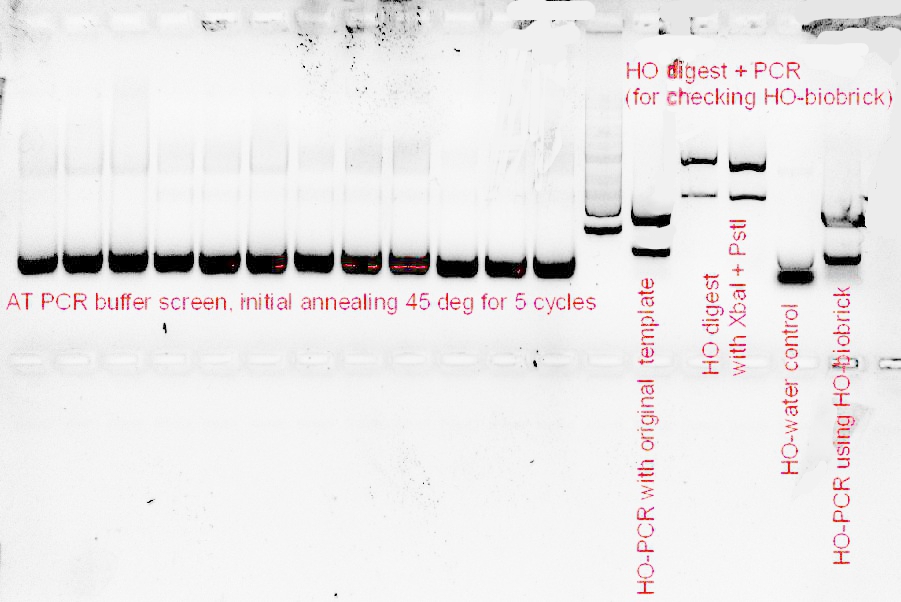
To summarise, over half the plates did not have any growth, and for those that have colonies, we've inoculated them into liquid broth to grow them up for plasmid preps. The PCR of the AT phytochrome seemed to have a good band at the right size, and it was cut-out, gel purified, digested (XbaI + SpeI), ligated with the treated plasmid backbone and transformed into TOP10 cells for screening. The HO-biobrick that we constructed was also digested, and tested with the HO-primers that we used in the initial digestion to check for its product size, and it works!
28-30/9/11
For the last 3 days that we have to work in the lab with, we've mass screened a lot of plates, plasmid preps, digests, and gels.
Series of gel photos
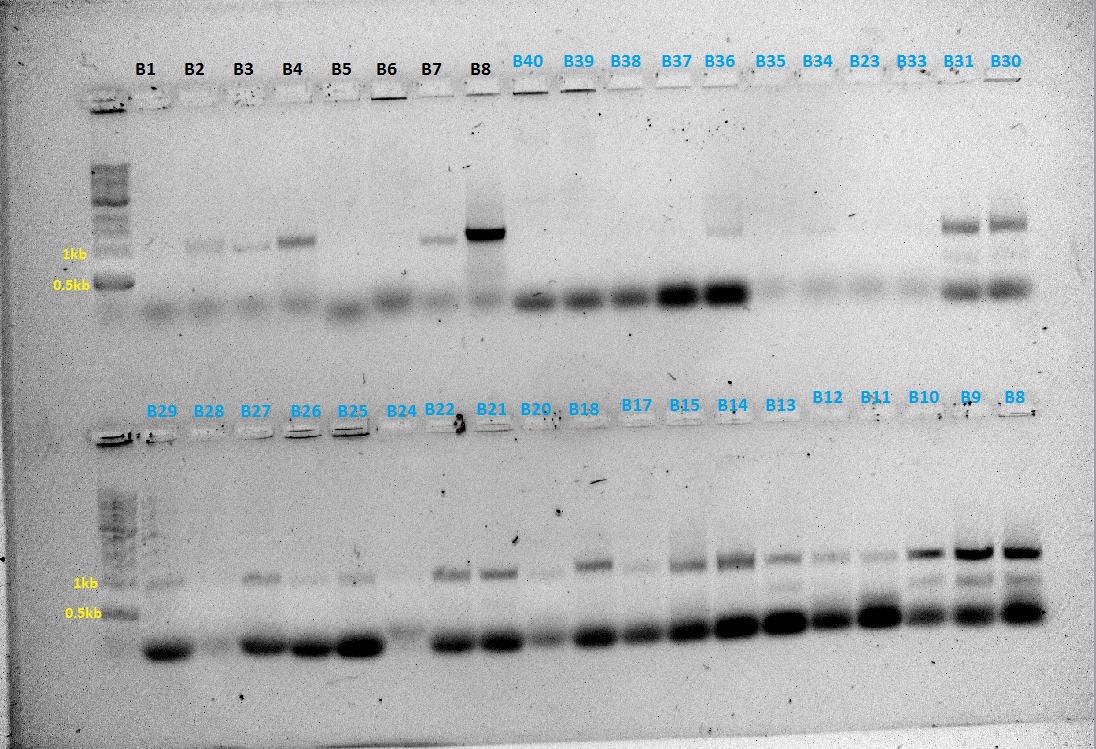
The numbers of the lanes correspond to the plate number from the table above (27/9/11), and goes in the format of (plate#.colony#). It was observed that the plasmids are of different sizes, showing a positive insertion of the HO or the T7-HO composite part. However, the AT-still did not work, and the transformed DR ended up expressing red fluorescent protein, hence another PCR was done.
And we've got a good size for the band!
 "
"

