Team:BU Wellesley Software/Notebook/CraigNotebook
From 2011.igem.org
Craiglaboda (Talk | contribs) |
Craiglaboda (Talk | contribs) m |
||
| Line 97: | Line 97: | ||
Hash map implementation is a success! I can now run my 5 part design in about 2 minutes, using 11 invertases. Without completely redesigning the software, I think this is as good as it will ever get. Thus, for now I am going to work on using this "completed" tool to characterize the different categories I outlined last week. | Hash map implementation is a success! I can now run my 5 part design in about 2 minutes, using 11 invertases. Without completely redesigning the software, I think this is as good as it will ever get. Thus, for now I am going to work on using this "completed" tool to characterize the different categories I outlined last week. | ||
| + | |||
| + | |||
| + | <h4> 6/20/11 </h4> - Although I will not be able to attend Tuesday's meeting this week, I wanted to address the update information that will be discussed. | ||
| + | |||
| + | So for, I have been working on developing an initial expensive invertase architecture that is scalable to N inputs. To accomplish this, I have built two tools, both enclosed in a single Clotho tool. One of these tools takes an invertase design and an input, and shows the user what would happen if those invertases were added to the design. The other tool takes a design and automatically checks whether the design allows for all part permutations to be made. Now that these are in working order, I found an expensive algorithm and am currently trying to understand why it works properly. | ||
| + | |||
| + | This fits well into the overall iGEM project because we are interested in developing a Clotho tool that allows the user to drag and drop parts into a plasmid, and then tells the user where invertases can be placed so that every permutation of these parts can be achieved. The first step to doing this is to find algorithms that allow for all permutations to be made. Once we understand these algorithms, we can then place constraints on the problem, such as the number of invertases available. | ||
| + | |||
| + | I believe that my next steps are: | ||
| + | 1. Find multiple expensive invertase architectures and compare the pros and cons of these algorithms. - first week of July | ||
| + | 2. Place constraints on the problem and analyze how this affects our algorithms. Determine the best way to help the user place a limited number of invertases. - half of second week in July | ||
| + | 3. Design a preliminary tool that automates the placement of these invertases and conveys this information to the user in the most intuitive way. - rest of second week and third week in July | ||
| + | 4. Optimize our algorithms - last week of July | ||
| + | |||
| + | |||
| + | Hopefully this information helps everyone else understand my plans and my part of the project. I will be back from vacation next Saturday to pick up where I left off. Of course, if I ever find myself bored down here, I may end up playing with these algorithms :p. | ||
Revision as of 13:02, 20 June 2011
Contents |
Current To Do List
This is an up to date list of different tasks that I am working on.
1. Find general expensive invertase architecture
2. Understand why this design works and assure that is is scalable.
3. Make simulation notation simpler for users.
4. Adjust Checking Tool's architecture in order to speed up the tool.
Daily Journal
6/4/11
- Today I learned how to make a basic GUI in java and use the text fields in this GUI to create format, person, and part objects using the Clotho core. I also learned how to save the part object to the database and make a basic status text label. Most of all though, I learned that it takes more than five minutes to write your first app.
6/5/11
- designed a preliminary GUI layout
6/6/11
- After boot camp, Jenhan taught me about BioFab and we discussed the separation between the BioFab IDE and the functionality of the tools. We think that this needs to be set in stone before we develop our tools, or else there will be compatibility issues between the iPhone style widget and BioFab.
6/7/11
- Today I implemented a search function in my PADS GUI. I'm currently trying to separate the returned collection by parts/formats/vectors etc. Most of my time has been spent learning layouts and swing. I'm also trying to generalize our permutation problem by looking for any modularity that might exist as the number of parts increases. Jenhan had the interesting idea that maybe, rather than find a general algorithm, we might need to find ways to optimize brute force methods of invertase placing...
6/8/11
- Implemented a dynamic tabbed search bar today based on the code from the BioFab's search tool. Jenhan and I are going to fix this up a little and replace the BioFab search with it. We thought this would not only be useful for the BioFab widget but that people could use it for other apps if necessary (I might use it in my PADS app). Also, Swapnil and I discussed a few different sorting methods that are similar to our invertase problem. I'm still trying to play with ideas and make generalizations. I think that these algorithms will be a good starting position.
6/9/11
- Finished the tabbed search today. Jenhan is going to integrate this search into the BioFab IDE. Also, I began categorizing and testing different invertase designs. Thus far, my categories include the following:1. Reconfigurable Sites
- placing invertases inside invertases in order to switch their directionality and continue to use them even though they flip.Pros - reusable sites, might be most easily generalized
Cons - requires extra invertases, requires more steps (added invertases) to get to certain permutations
2. Preemptive Sites
- placing inverases such that they are NOT FACING THE CORRECT DIRECTION in anticipation of a flip that will give them the correct directionality.Pros - requires less sites than Protected Site Method
Cons - probably harder to generalize than Protected Sites
3. Quick Start Sites
- placing invertases such that any part in the design can be quickly moved to the starting position of the order. While testing different ideas, I found that the permutations that required the most invertases added (i.e. the most transformations) were those that placed the final part of the original design at the beginning of the design. For example, if our original part order is ABCD, permutations beginning with C and D required the most number of invertases to be added.Pros - might lower the number of transformations
Cons - i haven't investigated this closely enough to specify the cons
If all of these categories can be generalized to an algorithm, our GUI could offer the user the ability to try different methods which might be interesting.
6/10/11
- Today I began working on an Invertase Simulator. It will take in your design and generate a list of permutations by trying every set of inputs (all permutations). I will update the notebook more when I make progress on this tool.
6/13/11
- I have developed two useful tools that we can use to test designs. The first takes in a particular design and a sequence of input invertases. It shows each inversion as each invertase is added and also tells the user if certain inversions cannot be made. The second tool builds on top of this first tool. It takes in a particular design and tests every permutation/combination of inputs for that design. Based on the results of these tests it tells the user whether their placement of invertases allows for each part permutation to be made.The notations for both of these tools is the following:
Let's say we have the following design: I0 A B C I0'
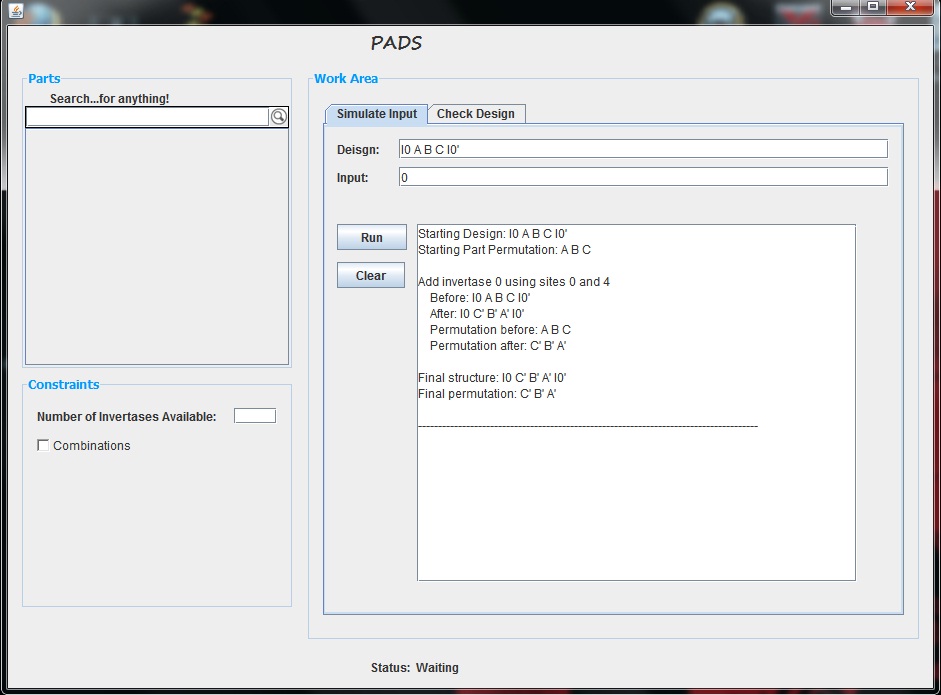
In this design there is one invertase, Invertase 0. This is represented by I0 and I0'. The "'" indicates that the invertase is facing a particular direction. We can imagine I0 to represent an open bracket "[" and I0' to represent a closed bracket "]". When Invertase 0 is added to this design, it flips everything enclosed in these open and closed brackets. Thus, as an example, the first tools produces the following information when Invertase 0 is added (Directly copied and pasted from my tool).
Obviously, this tool allows for much more complicated designs and inversions as well.
6/14/11
- Today I reworked a portion of my checking tool. It is much easier to use and now works much faster. I believe that speed will be an issue with this tool so Jenhan and I spent a portion of time today discussing better architecture that will speed the tool up. For example, if we have 10 different invertases, and we would like to test every permutation/combination of these 10 inputs, the number of input test vectors is more than 10!. Currently, every single test vector is tried, however if we know that certain test vectors do not work, there is no reason to continue down that path. For example if the input vector 123 works but 1234 does not work, there is no reason to try any permutation that begins with the test vector 1234. Tomorrow Jehnan and I will try to implement a number of fixes like this. Currently, the program handles 10 inputs in a matter of 3 minutes or so, but scaling this up to 11 inputs means a huge jump in testing time. With this tool, I have tested a number of designs but I believe that my simple algorithms thus far might require 11 invertases for only five parts! Clearly this is not optimized, but our first task is to just find an algorithm that works even if it is an expensive one.
6/15/11
- Today I am examining my current design algorithm in more detail, seeing if I can figure out a general algorithm that will work for n parts. To do this, I am testing a design for 5 parts which requires about 10 or 11 invertases. If I can make this work, the next task would be to understand better why it works and make sure that it can be scaled to n invertases.I found my first design which works for 5 parts today using a pretty simple algorithm! Now I am working on determining if this algorithm scales properly. For five parts it uses 11 invertases which is certianly not optimized. The following is my 5 part design:
Five Part Design
I5 I11 I1 A I6 I2 I6' B I7 I1' I11 I3 I7' C I8 I2' I10 I4 I8' D I9 I3' I9' E I4' I10 I5'
I hope that now I can begin to understand why this works. The design is a mix of two of my previously defined categories of designs. It mostly uses reconfigurable sites, but it also has two symmetric preemptive flipped invertases, namely I10 and I11. I will explain this algorithm in more detail, hopefully tomorrow.
6/16/11
- Today I adjusted the architecture of my checking tool in order to speed up its computation. To illustrate this fix, we first need to look at how each permutation is generated. The current permutation algorithm spits out the following, for a set of elements {1,2,3,4}.1
1 2
1 2 3
1 2 3 4
1 2 4
1 2 4 3
1 3
........etc
Before implementing a simple fix, the program originally tested every single one of these test vectors. However, let's say that we know that when the input vector 1,2 is passed, invertase 2 cannot be added. Thus, {1,2,3}, {1,2,3,4}, {1,2,4}, {1,2,4,3} should all be skipped since none of them can produce any new and useful information. Originally my program did not skip these test vectors, however, now it does. By making this fix, I am able to test my 5 part design with 11 invertases in less than 5 minutes. Before implementing this fix, such a design required longer than 30 minutes of computation.
The second fix I am working on is developing a hash table where each key is the input vector and the corresponding information is the output design array. By doing this, we can avoid a number of recalculations. For example, when we test input vector {1,2,3,4}, we test every element individually and finally come up with an output design (with corresponding part permutation). Well, rather than test every element, with this hash table, we could find the output design already calculated for {1,2,3}. Starting with this output design, then we only need to test adding element 4, thus reducing the number of recalculations. I have not implemented this yet, but I am working on this today. I believe that this simple fix could allow us to test 6 part designs relatively quickly.
I will continue to update this entry throughout the day.
Hash map implementation is a success! I can now run my 5 part design in about 2 minutes, using 11 invertases. Without completely redesigning the software, I think this is as good as it will ever get. Thus, for now I am going to work on using this "completed" tool to characterize the different categories I outlined last week.
6/20/11
- Although I will not be able to attend Tuesday's meeting this week, I wanted to address the update information that will be discussed.So for, I have been working on developing an initial expensive invertase architecture that is scalable to N inputs. To accomplish this, I have built two tools, both enclosed in a single Clotho tool. One of these tools takes an invertase design and an input, and shows the user what would happen if those invertases were added to the design. The other tool takes a design and automatically checks whether the design allows for all part permutations to be made. Now that these are in working order, I found an expensive algorithm and am currently trying to understand why it works properly.
This fits well into the overall iGEM project because we are interested in developing a Clotho tool that allows the user to drag and drop parts into a plasmid, and then tells the user where invertases can be placed so that every permutation of these parts can be achieved. The first step to doing this is to find algorithms that allow for all permutations to be made. Once we understand these algorithms, we can then place constraints on the problem, such as the number of invertases available.
I believe that my next steps are: 1. Find multiple expensive invertase architectures and compare the pros and cons of these algorithms. - first week of July 2. Place constraints on the problem and analyze how this affects our algorithms. Determine the best way to help the user place a limited number of invertases. - half of second week in July 3. Design a preliminary tool that automates the placement of these invertases and conveys this information to the user in the most intuitive way. - rest of second week and third week in July 4. Optimize our algorithms - last week of July
Hopefully this information helps everyone else understand my plans and my part of the project. I will be back from vacation next Saturday to pick up where I left off. Of course, if I ever find myself bored down here, I may end up playing with these algorithms :p.
Using the Software
This space will be dedicated to teaching any users how to use our invertase simulation software. Later this can be transferred to the Clotho wiki when we have a final product.
Rules of Notation
Before using the Simulation Tool or the Checking tool, you should make sure you understand the notation accepted by both pieces of software, or else the results of the software may not be completely accurate. Luckily, there is not much to learn, so let's begin!
1. Invertases - For this simple simulation and checking software, the design is entered as a string. However, to test a design, we need to distinguish between parts and invertases. To do this, we denote an invertase site as any set of characters that begins with a capital "I". For example, "I1" would be referred to as invertase 1. "Ix" would be referred to as invertase x. This however is not enough notation to represent invertases. Invertases have directionality. Two sites must be facing each other in order for them to properly invert the parts between them. Thus, we can imagine the mentioned notation ("I1" or "Ix") as an invertase site facing a particular direction. Similar to the way the bracket "[" faces to the right, imagine that I1 or Ix face to the right as well. To denote an invertase that faces the opposite direction, to the left, we tack a "'" to the end of the site's notation. Referring to our earlier example, our complement invertase sites would be I1' and Ix' respectively.
2. Parts - Parts, on the other hand, can take on any notation. They can be any alphanumeric character, whatever makes it easiest for you to visualize your design.
3. Designs - Now that we understand how to properly represent invertases and parts, we are ready to enter a design. For this example let's imagine the simple design "I1 A B I1'". Here we only have 1 invertase, I1, and two parts, A and B. When entering this design, every element of the design, whether it be an invertase or a part, must be separated by A SINGLE SPACE. The software parses the design using spaces, so this is a strict rule of the tools.
4. Inputs - For both tools, the user is allowed to enter an input string. This string corresponds to which invertases are used in your design. For example, if our design was "I0 A B I0' I1 C I1'", we could enter the input string "0 1" or "1 0" or "1" or "0". All of these input strings make sense. Entering an input string that contains an element which is not an invertase in the current design does not make sense. For example, entering the input "X 5" would do nothing because there is no invertase X or invertase 5 in our design.
That's it! Now it's time to learn how to use the tools.
Simulation Tool
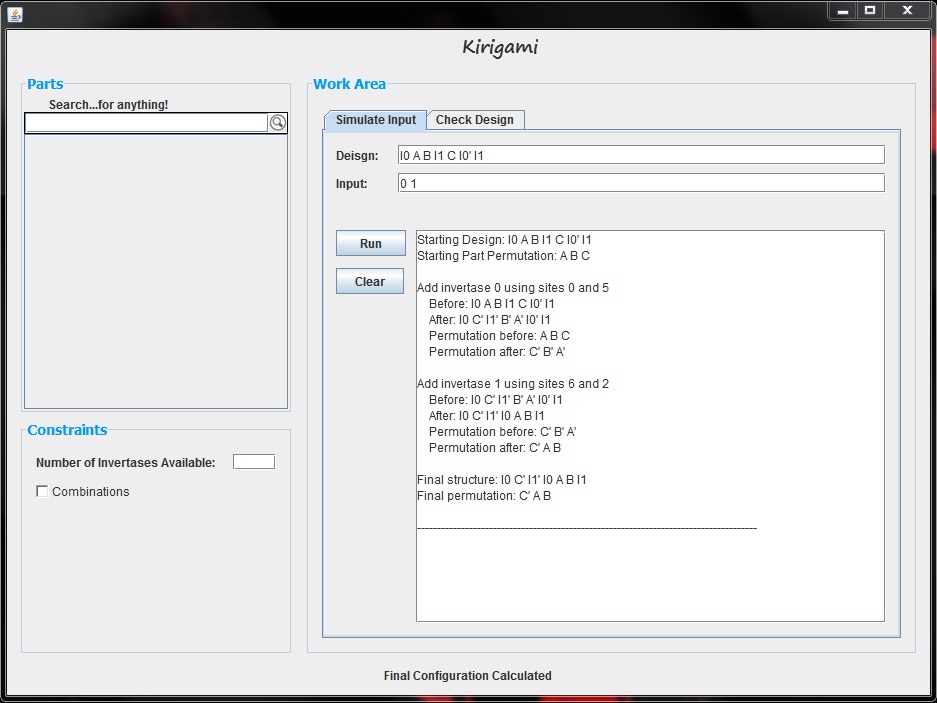
The goal of the simulation tool is to allow the user to test a particular input, or series of inputs, on a proposed design. The GUI offers the user two text bars in which to type their design and their input, following the notation outlined above. After entering this information, the user can press the "Run" button to test the input. Upon pressing this button, the text area shows the inversions made when each invertase is added. It not only displays how the entire design is affected, but it also displays the part permutations before and after each invertase is added. Below is an example of this tool where our design is "I0 A B I1 C I0' I1" and our input vector is "0 1".
Once the user has tested an input vector, they are free to change the input or design and run another test. The new text will be added below the previously generated text; however, the user can choose to clear the text using the "Clear" button.
Checking Tool
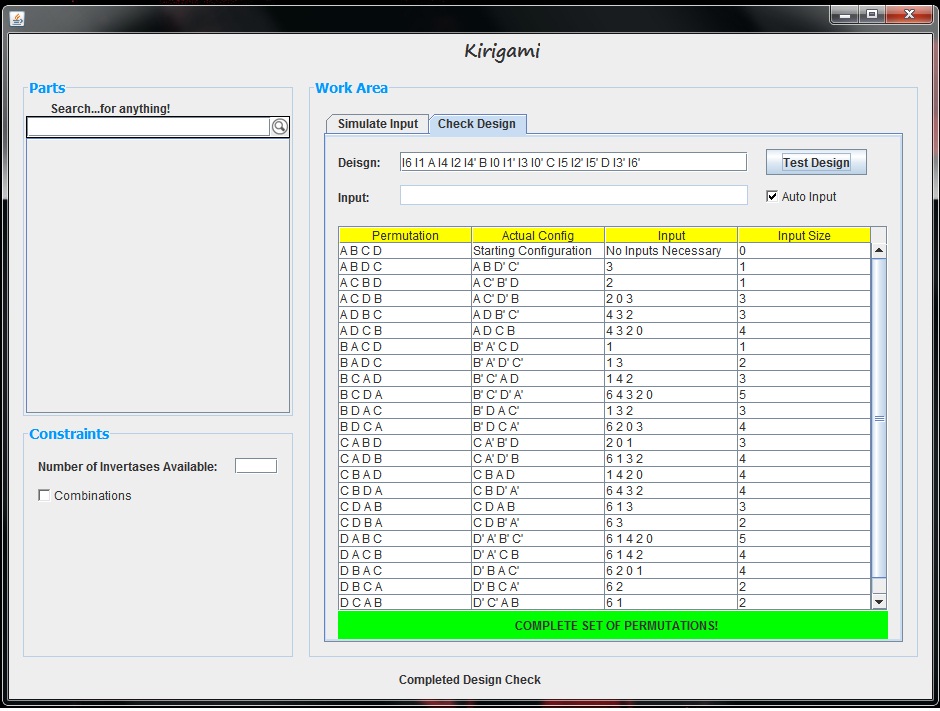
The purpose of the Checking Tool is to quickly determine whether a given design is capable of making every permutation of parts within that design. This of course is determined by testing every permutation and combination of possible input invertase sequences. To use this tool, the user can first enter their design. Given this design, if the "Auto Input" box is checked, the tool will determine what invertases are available for inputting and then test each of these possible input vectors. Here is an example this Checking tool testing a slightly more complicated design. After clicking the "Test Design" button, the GUI produces a table displaying the results. This can be seen below.
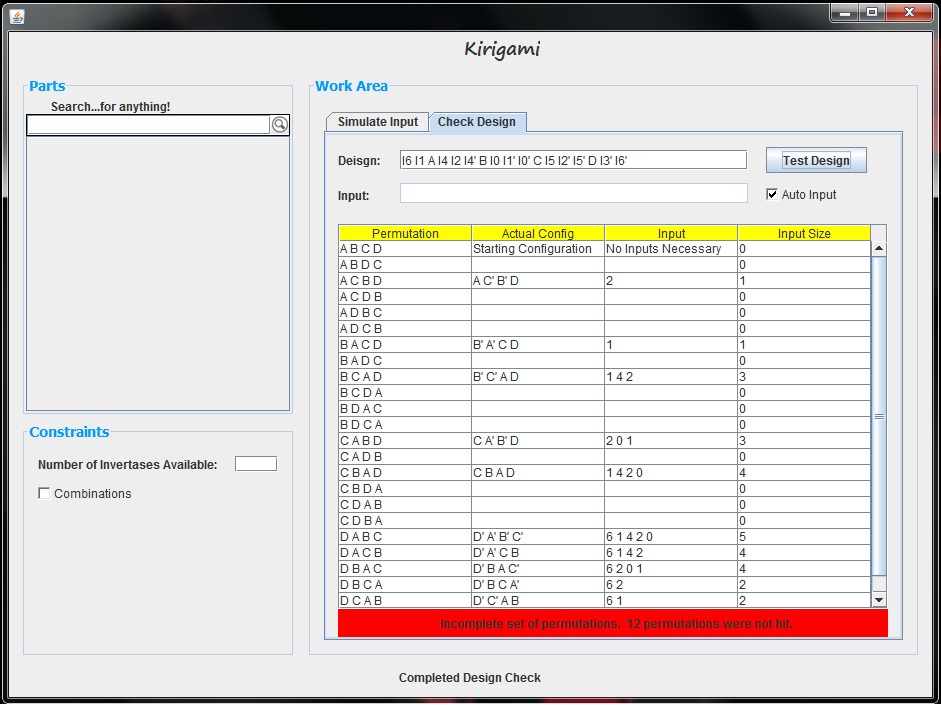
The first column of the table shows each part permutation. If an input is found which creates this configuration, then that row of the table is updated with the following information: the actual configuration of the parts including which parts are complemented, the series of input invertases added which led to that part permutation, and the length of the input vector that led to that permutation. In this example, we see that every part permutation row is filled out with this information, and thus, every part permutation can be made given the design. This is made even more obvious by the bright green bar below the graph which indicates that a complete set of permutations can be generated. If our design was not successful, our table and graph would look something like the following.
It is also important to note that if the "Auto Input" box is not checked, the input text area becomes available. In this area, we can enter which invertases we would like to permute as inputs. For example, if we only wanted to see which part permutations could be made with invertases 1, 2, and 3, in this text area, we could enter "1 2 3". Given this input, the tool tests every permutation and combination of these three elements only.
 "
"


