Team:WHU-China/Notebook/Protocols
From 2011.igem.org
| (2 intermediate revisions not shown) | |||
| Line 88: | Line 88: | ||
if(Sys.ie) | if(Sys.ie) | ||
{ | { | ||
| - | var a1= | + | var a1=6866; |
var a2=document.body.clientHeight; | var a2=document.body.clientHeight; | ||
document.getElementById("bottom").style.top=(a2+a1).toString()+'px'; | document.getElementById("bottom").style.top=(a2+a1).toString()+'px'; | ||
document.getElementById("contact").style.top=(a2+a1+80).toString()+'px'; | document.getElementById("contact").style.top=(a2+a1+80).toString()+'px'; | ||
}else{ | }else{ | ||
| - | var a1= | + | var a1=6730; |
var a2=document.body.clientHeight; | var a2=document.body.clientHeight; | ||
document.getElementById("bottom").style.top=(a2+a1).toString()+'px'; | document.getElementById("bottom").style.top=(a2+a1).toString()+'px'; | ||
Latest revision as of 14:53, 4 October 2011
Ⅰ.Dealing with biobricks
1.1 Storage
1. Dried DNA: room temperature
2. Resuspended DNA: -20℃ freezer
3. The linearized plasmid backbones (25ng/ul at 50ul) should be stored at 4C or lower
1.2 Usage
1. With a pipette tip, punch a hole through the foil cover into the corresponding well to the Biobrick™-standard part that you want. Make sure you have properly oriented the plate. We recommend that you do not remove the foil cover, as it could lead to cross contamination between the wells.
3. Add 10uL of diH2O (deionized water), the resuspension will become red due to the cresol red dye used during manufacturing.
4. Pipette 1 or 2uL of the resuspended DNA transform into your desired competent cells, plate bacteria with the appropriate antibiotic* and grow overnight.
5. Pick a single bacterial colony and transfer it into LB medium. Incubate the culture for 18 hours with vigorous agitation.
6. Store the single colony in physiological saline and on inclined plane, and make recognizable marks on the tube and on the notebook.
Ⅱ. Preparation of competent cells (Using Calcium Chloride)
2.1 Day 0:
Pick a single bacterial colony from a plate that has been incubated for 16-20 hours at 37℃. Transfer the colony into LB medium. Incubate the culture overnight (about 16 hours) at 37℃ with vigorous shaking.
2.2 Day 1:
1. Transfer 1 ml of the culture into 100 ml of LB medium. Incubate the culture for 2.5-3 hours at 37℃ with vigorous agitation (250-300rpm).
2. Transfer 1.5 ml of the culture into sterile ice-cold 1.5ml polypropylene tubes. Cool the cultures by storing the tubes on ice for 10 minutes.
3. Recover the cells by centrifugation at 2500 rpm for 5minutes at 4℃.
4. Decant the medium from the cell pellets. Resuspend each pellet by swirling or gentle vortexing in 100ml of ice-cold 0.1M CaCl2 solution. Store the tubes on ice for 20minutes.
5. Recover the cells by centrifugation at 2500 rpm for 5 minutes at 4℃.
6. Decant the medium from the cell pellets. Resuspend each pellet by swirling or gentle vortexing in 100ml of ice-cold 0.1M CaCl2 solution.
7. The suspension of competent cells should be immediately used in transformation.
Attention:
[1] Mix gently
[2] The newly prepared competent cells should be transformed immediately. They cannot be stored for long (except in -80℃)
[3] Keep sterile environment during operation (sterilize the clean bench by ultra-violet, sterilize hands and implements by alcohol).
[4] Use heat-shock method to transform.
Ⅲ. Plasmid Extraction(Using Plasmid Mini Kit)
3.1 Things to do before starting:
• Preheat Elution Buffer to 70°C if Plasmid DNA is >10kb
• Dilute DNA Wash Buffer with absolute ethanol and Add vial of RNase A provided to Solution I.
3.2 Details:
1. Isolate a single colony from a freshly streaked selective plate, and inoculate a culture of 1- 5 ml LB medium containing the appropriate selective antibiotic. Incubate for~ 12-16 hr at 37°C with vigorous shaking (~ 300 rpm).
2. Decant or Pellet bacterial cells by centrifugation at 10,000 x g for 1 min at room temperature.
3. Resuspend the bacterial pellet by adding 250 μl of Solution I/RNase A solution, and vortexing (or pipetting up and down). Complete re-suspension (no visible cell clumps) of cell pellet is vital for obtaining good yields. Transfer suspension into a new 1.5 ml microcentrifuge tube.
4. Add 250 μl of Solution II and gently mix by inverting and rotating tube several times to obtain a clear lysate. A 2-3 minute incubation may be necessary. Avoid vigorous mixing as this will shear chromosomal DNA and lower plasmid purity.
Note: Do not allow the lysis reaction to proceed more than 5 min.
5. Add 350 μl of Solution III and mix immediately by inverting several times until a flocculent white precipitate forms.
Note: It is vital that the solution is mixed thoroughly and immediately after the addition of Solution III to avoid localized precipitation.
6. Centrifuge at 13,000 x g for 10 min at room temperature. A compact white pellet will form. Promptly proceed to the next step.
7. Prepare a HiBind DNA Mini Column by placing into a 2 mL collection tube.
8. Add 100 μl of Equilibration Buffer. Centrifuge at 13,000 x g for 30-60 seconds.
9. Discard the flow-through liquid and place the HiBind DNA Mini Column back into the same collection tube.
1) Add the cleared supernatant from step 6 by CAREFULLY aspirating it into the HiBind DNA Mini Column. Ensure that the pellet is not disturbed and that no cellular debris has carried over into the HiBind DNA Mini Column. Centrifuge at 13,000 x g for 1 min at room temperature to completely pass lysate through the HiBind DNA Miniprep Column. Discard the flow-through liquid and place the HiBind DNA Mini Column back into the same collection tube.
2) Add 500 μl of HB Buffer and centrifuge at 13,000 x g for 30 to 60 seconds at room temperature to wash the HiBind DNA Mini Column. Discard the flow-through liquid and place the HiBind DNA Mini Column back into the same collection tube. This step ensures that residual protein contaminations are removed, thus ensuring high quality DNA that will be suitable for downstream applications.
3) Add 700 μl of DNA Wash Buffer (diluted with absolute ethanol) and centrifuge at 13,000 x g for 30 to 60 seconds at room temperature to wash the HiBind DNA Column. Discard the flow-through liquid and place the HiBind DNA Mini Column back into the same collection tube.
NOTE: DNA Wash Buffer Concentrate must be diluted with absolute ethanol before use.
10. OPTIONAL: Repeat wash step 10 with another 700 μl of DNA Wash Buffer (diluted with absolute ethanol).
11. Centrifuge the empty HiBind Mini Column at 13,000 x g for 2 min to dry the column
IMPORTANT: Do not skip this step - it is critical for good yields
12. Place the HiBind DNA Mini Column into a new/clean 1.5 ml microcentrifuge tube (not supplied). Depending on desire concentration of final product, add 30-100 μl of Elution Buffer (10 mM Tris-HCl, pH 8.5) or sterile deionized water directly onto the center of the column matrix. Incubate at room temperature for 1 minute. Centrifuge for at 13,000 x g for 1 min to elute DNA. An optional second elution will yield any residual DNA, though at a lower concentration.
13. Yield and quality of DNA: Determine the absorbance of an appropriate dilution of the sample at 260 nm and then at 280nm.
Ⅳ. Transformation (heat-shock method)
1. Add DNA (Plasmid: 1ul; Ligation: all) to each tube in which 100ul newly prepared competent cells are stored. Mix the contents of the tubes by swirling gently. Ensure that the competent cells are stored on the ice all the time.
2. (Negative control: 50uL DH5αcompetent cells+1uL sterile H2O)
3. Store the tubs on ice for 30 minutes.
4. Heat shock:Transfer the tubes to a rack placed in a preheated 42℃ circulating water bath. Store the tubes in the rack for exactly 90 seconds. Do not shake the tubes.
5. Rapidly transfer the tubes to an ice bath. Allow the cells to chill for 1-2 minutes (no more than 2 minutes)
6. Add 200ul-500ul of LB medium (sterile and without antibiotics),Incubate the cultures for 45minutes with gentle agitation (100-120rpm) at 37℃ to allow the bacteria to recover and to express the antibiotic resistance marker encoded by the plasmid.
7. Harvest the cells by centrifugation at 2500rpm for 2minutes.
8. Discard some of the supernatant and resuspend the pellets with the left 100ul of LB medium.
9. Transfer all of the transformed competent cells onto agar LB medium containing appropriate antibiotic. (Preheat the plate in 37℃ incubator).
10. Store the plates at room temperature until the liquid has been absorbed.
11. Invert the plates and incubate at 37℃. Transformed colonies should appear in 12-16 hours.
Attention:
[1] Operate gently throughout the whole procedure.
[2] Include all of the appropriate positive and negative controls every time. Negative controls:Add ddH2O instead of DNA.
Positive controls:Add pure plasmid extraction instead of ligation.
[3] Had better use newly made ice instead of the ice box that has been stored at -20℃, in case of killing cells.
[4] Strictly control the time of heat shock
[5] Store the tubes on ice after heat shock no more than 2min;
[6] The optimizing time of recovery is 45minutes. Ensure that the shaking speed should not be too fast (had better no more than 100rpm).
[7] The agar LB medium should be preheated at 37℃
Ⅴ.Cleavage with two restriction enzymes
System:40ul
|
Restriction enzyme 1 |
0.5ul |
|
BSA(optional) |
4ul |
|
Restriction enzyme 2 |
0.5ul |
|
Corresponding Buffer |
4ul |
|
DNA |
According to the concentration of the plasmid to be cleaved |
|
ddH2O |
To meet 40ul |
Incubate the reaction mixtures for 2 hours at 37℃
Attention:
[1] The efficiency of SpeI is relatively low, therefore the amount of DNA can be decreased. The efficiency of EcoRⅠand XbaⅠis relatively high, therefore the enzymes can be diluted two-three fold.
[2] The type of buffer should be selected according to the restriction enzymes.
[3] The amount of DNA should not exceed 4ug;
[4] The enzymes should be stored on the ice all the time. The buffer should be used after being thawed and blended.
[5] Quick operation is recommended.
Ⅵ. Get Extraction
Things to do before starting:
• Dilute SPW Wash Buffer with absolute ethanol
• Set heating block or water bath to 60°C
1. Perform agarose gel/ethidium bromide electrophoresis to fractionate DNA fragments. Any type or grade of agarose may be used. However, it is strongly recommended that fresh TAE buffer or TBE buffer be used as running buffer. Do not reuse running buffer as its pH will increase and reduce yields.
2. When adequate separation of bands has occurred, carefully excise the DNA fragment of interest using a wide, clean, sharp scalpel. Minimize the size of the gel slice by removing extra agarose.
3. Determine the appropriate volume of the gel slice by weighing it in a clean 1.5 ml microcentrifuge tube. Assuming a density of 1g/ml of gel, the volume of gel is derived as follows: a gel slice of mass 0.3 g will have a volume of 0.3 ml.
4. Add an equal volume of Binding Buffer (XP2). Incubate the mixture at 60°C for 7 min or until the gel has completely melted. Mix by shaking or vortexing the tube in increments of 2-3 minutes.
IMPORTANT: Monitor the pH of the Gel/Binding Buffer mixture after the gel has completely dissolved. DNA yields will significantly decrease when the pH > 8.0. If the color of the mixture becomes orange or red, add 5 μl of 5M sodium acetate (pH 5.2) to bring the pH down. After this adjustment, the color of the Gel/Binding Buffer mixture should be light yellow.
5. Place a HiBind DNA Mini Column in a provided 2 ml collection tube.
6. Add the DNA/agarose solution from step 3 to the HiBind DNA Mini Column and centrifuge at 10, 000 x g for 1 min at room temperature. Discard the flow-through liquid and place the HiBind DNA Mini Column back into the same collection tube.
Note: For volumes greater than 700 μl, load the column and centrifuge successively, 700 μl at a time. Each HiBind DNA Mini Column has a total capacity of 25 μg DNA. If the expected yield is larger, divide the sample into the appropriate number of columns.
7. Add 300 μl of Binding Buffer (XP2) into the HiBind DNA Mini Column. Centrifuge at 13,000 x g for 1 minute at room temperature. Discard the flow-through liquid and place the HiBind DNA Mini Column back into the same collection tube.
8. Add 700 μl of SPW Wash Buffer (diluted with absolute ethanol) to the HiBind DNA Mini Column. Centrifuge at 13,000 x g for 1 min at room temp to wash the HiBind DNA Mini Column. Discard the flow-through liquid and place the HiBind DNA Mini Column back into the same collection tube.
IMPORTANT: SPW Wash Buffer must be diluted with absolute ethanol before use.
Refer to label for instructions. If refrigerated, SPW Wash Buffer must be brought to room temperature before use.
9. OPTIONAL: Repeat steps 7 with another 700 μl of SPW Wash Buffer.
10. Perform the second wash step for any salt sensitive downstream applications
11. Centrifuge the empty HiBind DNA Mini Column for 2 min at maximal speed ( ≥13,000 x g ) to dry the column matrix. Do not skip this step, it is critical for the removal of ethanol from the HiBind DNA column.
12. Place the HiBind DNA Mini Column into a clean 1.5 ml microcentrifuge tube.
13. Depending on desire concentration of the final product, add 30-50 μl Elution Buffer (10 mM Tris-HCl, pH 8.5) or water directly onto the column matrix and incubate at room temperature for 2 minutes. Centrifuge for 1 min at maximum speed (≥13,000 x g) to elute DNA.
14. This represents approximately 70% of bound DNA. An optional second elution will yield any residual DNA, though at a lower concentration.
NOTE: The efficiency of eluting DNA from the HiBind DNA Mini Column is dependent of pH. If eluting DNA with deionized water, make sure that the pH is around 8.5.
15. Yield and quality of DNA: Determine the absorbance of an appropriate dilution of the sample at 260 nm and then at 280nm.
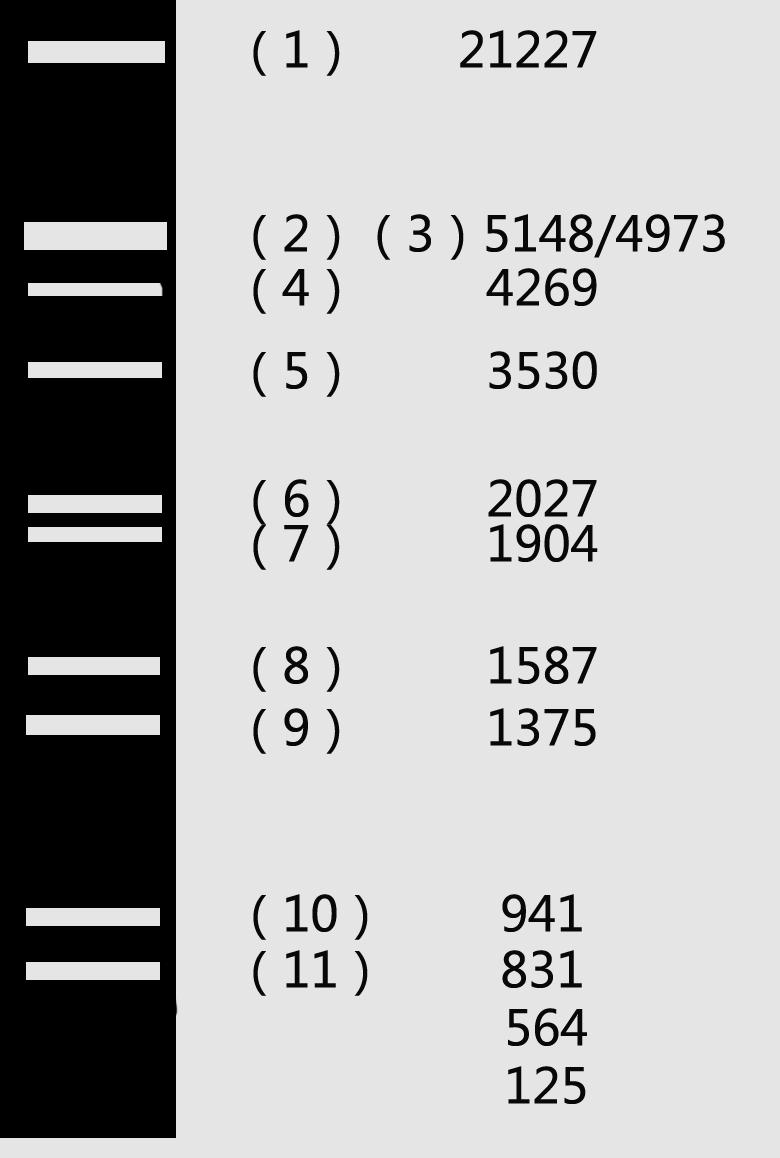
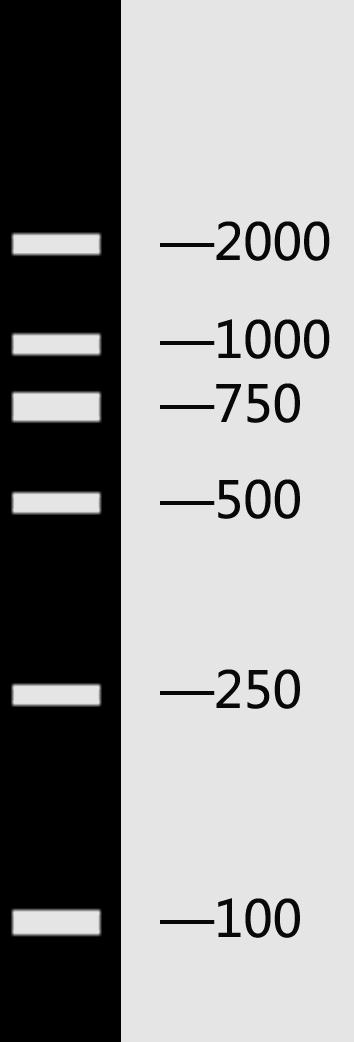
Ⅶ. Identification of DNA by Electrophoresis
Marker:


λDNA/HindⅢ+EcoRⅠ DL 2000
Ⅷ. Ligation
System:30ul
|
T4 Ligase |
1ul |
|
10XBuffer |
3ul |
|
DNA fragment |
According to the concentration of the DNA fragment |
|
Vector |
According to the concentration of the vector |
|
ddH2O |
To meet 30ul |
Incubate the reaction mixtures at 37℃ for 2-3 hours.
Attention:
[1] The ratio of DNA fragments to vector should be 3-5:1
[2] The ligation time should not be too long.
[3] If there are several DNA fragments to be ligated to the same vector, the sequence should be optimized according to actual conditions.
Ⅸ. PCR of the colony
System:20ul
Taq 0.5ul
Primer 1 0.6ul
Primer 2 0.6ul
dNTP 0.8ul
Template 1ul
DMSO 1.2ul
10 X Buffer 2ul
ddH2O 13.3ul
Reaction condition:
94℃ 5min
94℃ 30sec
55-68℃ 30sec
72℃ 1min
72℃ 7min
28cycles
Attention:
[1] Pick ten single colonies for each cloning.
[2] The PCR mix should be a little more than needed, in case of the loss during operation.
[3] DMSO should be added into each PCR tube separately.
[4] The PCR mix should be blended.
Ⅹ.Identification of DNA by Sequencing
Send the plasmids or the cell culture to BGI (A sequencing company in China) for sequencing.
XI.Others
1、LB medium components
|
Volume |
100ml liquid medium |
100ml solid medium |
|
Trptone |
1g |
1g |
|
Yeast Extraction Powder |
0.5g |
0.5g |
|
NaCl |
1g |
1g |
|
Agar |
|
1.5g |
2、Amp mother solution
Preparation:Add 100mg ampicillin into 1mlddH2O
Usage:Add 50ulmother solution into 100ml medium
3、Kana mother solution
Preparation:Add 50mg kanamycin into 1mlddH2O
Usage:Add 100ulmother solution into 100ml medium
4、Chl mother solution
Preparation:Add 50mg kanamycin into 1mlddH2O
Usage:Add 100ulmother solution into 100ml medium
 "
"


