Team:ENSPS-Strasbourg/Tutorial
From 2011.igem.org
| (14 intermediate revisions not shown) | |||
| Line 4: | Line 4: | ||
You can download this tutorial in PDF [https://static.igem.org/mediawiki/2011/e/eb/Tutorial_BBMGS.pdf here]. | You can download this tutorial in PDF [https://static.igem.org/mediawiki/2011/e/eb/Tutorial_BBMGS.pdf here]. | ||
| + | |||
| + | ==Video== | ||
| + | |||
| + | <html align="center"> | ||
| + | <iframe width="854" height="510" src="http://www.youtube.com/embed/X74PHfemkz4" frameborder="0 hd = 1" allowfullscreen></iframe> | ||
| + | </html> | ||
==Requirements== | ==Requirements== | ||
| Line 20: | Line 26: | ||
After downloading the software, go to Launcher folder and double-click on “BBMGS.exe” | After downloading the software, go to Launcher folder and double-click on “BBMGS.exe” | ||
| + | |||
| + | [[File:Tuto_01.png|border|600px|center|link=]] | ||
Then the launcher opens. You have two choices: “Behavioral model generator” or “Conservative model generator”. | Then the launcher opens. You have two choices: “Behavioral model generator” or “Conservative model generator”. | ||
| - | + | ||
| + | [[File:Tuto_02.png|border|400px|center|link=]] | ||
==Behavioral model generator== | ==Behavioral model generator== | ||
After clicking on “Behavioral model generator” from the launcher, it opens the main window for this generator. | After clicking on “Behavioral model generator” from the launcher, it opens the main window for this generator. | ||
| - | + | ||
| - | On the left panel, you can “Add”, “Remove” or “Modify” a species from the available species list. | + | [[File:Tuto_03.png|border|600px|center|link=]] |
| + | |||
| + | On the left panel, you can “Add”, “Remove” or “Modify” a species from the available species list. | ||
| + | |||
“Add” button opens the species window, where you can choose the name of the species you want to add and the initial value (absent: LOW, present: HIGH) | “Add” button opens the species window, where you can choose the name of the species you want to add and the initial value (absent: LOW, present: HIGH) | ||
| - | + | ||
| + | [[File:Tuto_04.png|border|300px|center|link=]] | ||
| + | |||
“Modify” button allows to change the initial value of the selected species. | “Modify” button allows to change the initial value of the selected species. | ||
| + | |||
When all the species you want to use are added, you can go to the right panel. On this panel, you can “Add” or “Remove” a reaction. | When all the species you want to use are added, you can go to the right panel. On this panel, you can “Add” or “Remove” a reaction. | ||
| + | |||
“Add” button opens a selection window to choose between “Inhibition”, “Complexation” and “Synthesis” mechanisms. | “Add” button opens a selection window to choose between “Inhibition”, “Complexation” and “Synthesis” mechanisms. | ||
| + | |||
In this tutorial, we will see the example of GFP synthesis with IPTG as activator and TetR as repressor. To create this mechanism, first you can select a species and then click on the “>>” or “<<” button to move it in the desired box. You obtain the following configuration. To validate, click on “Add”. | In this tutorial, we will see the example of GFP synthesis with IPTG as activator and TetR as repressor. To create this mechanism, first you can select a species and then click on the “>>” or “<<” button to move it in the desired box. You obtain the following configuration. To validate, click on “Add”. | ||
| - | + | ||
| + | [[File:Tuto_05.png|border|500px|center|link=]] | ||
| + | |||
This principle is the same for other mechanisms. | This principle is the same for other mechanisms. | ||
| + | |||
You obtain the following main window, where the reaction was added into reaction panel. | You obtain the following main window, where the reaction was added into reaction panel. | ||
| - | + | ||
| + | [[File:Tuto_06.png|border|800px|center|link=]] | ||
| + | |||
Then the last thing to do is to click on “Create a system”. This opens the “System creation” window. | Then the last thing to do is to click on “Create a system”. This opens the “System creation” window. | ||
| + | [[File:Tuto_07.png|border|800px|center|link=]] | ||
| + | |||
After putting the reactions you want into reactions in the system panel, input species will automatically appear in the constant species panel. You can choose if you want that they will stay constant or become variable species. Finally you select the simulation and the step time and you click on “Create”. | After putting the reactions you want into reactions in the system panel, input species will automatically appear in the constant species panel. You can choose if you want that they will stay constant or become variable species. Finally you select the simulation and the step time and you click on “Create”. | ||
| Line 47: | Line 71: | ||
The models and simulation files were now generated in the sub-folder “bin2launch/generated_files”. | The models and simulation files were now generated in the sub-folder “bin2launch/generated_files”. | ||
| + | [[File:Tuto_08.png|border|600px|center|link=]] | ||
| + | |||
==Simulations== | ==Simulations== | ||
To launch Smash, you can double-click on the file “*.pat” in the generated files folder. You obtain the following window. | To launch Smash, you can double-click on the file “*.pat” in the generated files folder. You obtain the following window. | ||
| + | |||
| + | [[File:Tuto_09.png|border|900px|center|link=]] | ||
To launch the simulation, you just have to tap the “ctrl+T” keyboard shortcut. You obtain the following window, in which you can select the species you want to see, and click on “Add” button to see them in the scope. | To launch the simulation, you just have to tap the “ctrl+T” keyboard shortcut. You obtain the following window, in which you can select the species you want to see, and click on “Add” button to see them in the scope. | ||
| + | [[File:Tuto_10.png|border|900px|center|link=]] | ||
| + | |||
==Conservative model generator== | ==Conservative model generator== | ||
The conservative model generator works in the same way as behavioral model generator. But some differences are listed below: | The conservative model generator works in the same way as behavioral model generator. But some differences are listed below: | ||
| + | |||
The initial value of a species is now a real number and is a concentration. | The initial value of a species is now a real number and is a concentration. | ||
| + | |||
| + | [[File:Tuto_11.png|border|300px|center|link=]] | ||
The “Inhibition” mechanism has disappeared from the suggested mechanisms list because it is not useful in conservative model and can be simulated with a complexation mechanism. | The “Inhibition” mechanism has disappeared from the suggested mechanisms list because it is not useful in conservative model and can be simulated with a complexation mechanism. | ||
| + | |||
Finally the main modification is the adding of BioBricks parameters in the mechanism window. | Finally the main modification is the adding of BioBricks parameters in the mechanism window. | ||
| + | |||
| + | [[File:Tuto_12.png|border|800px|center|link=]] | ||
Latest revision as of 13:18, 28 October 2011
Tutorial - BioBricks model generator for electronic simulator
You can download this tutorial in PDF here.
Video
Requirements
First you need to download the software at these following URLs:
Main repository: https://github.com/igemsoftware/ENSPS-Strasbourg_2011
Mirror: https://github.com/Dadomba/IGEM_2011_ENSPS_Final_Folder
For the simulation part, you need Dolphin Smash, mixed-signal multi-level and multi-domain simulation software to use the model files generated by the BioBricks model generator.
You can found it at: http://www.dolphin.fr/medal/smash/smash_overview.php
Launcher
After downloading the software, go to Launcher folder and double-click on “BBMGS.exe”
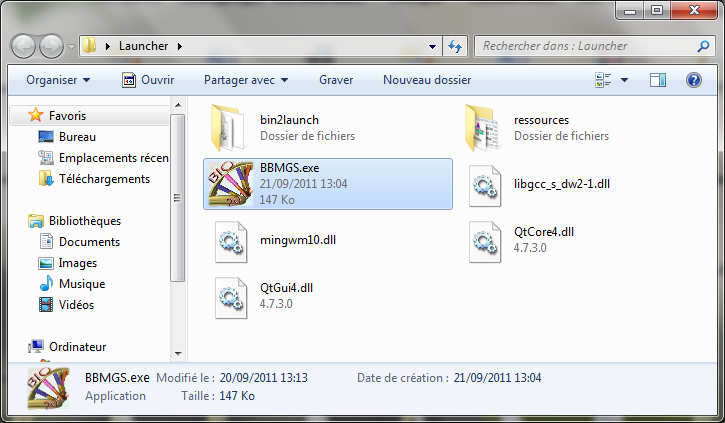
Then the launcher opens. You have two choices: “Behavioral model generator” or “Conservative model generator”.
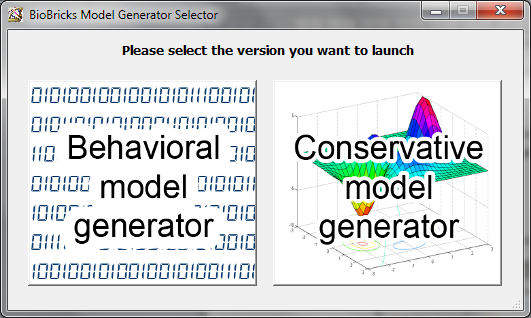
Behavioral model generator
After clicking on “Behavioral model generator” from the launcher, it opens the main window for this generator.
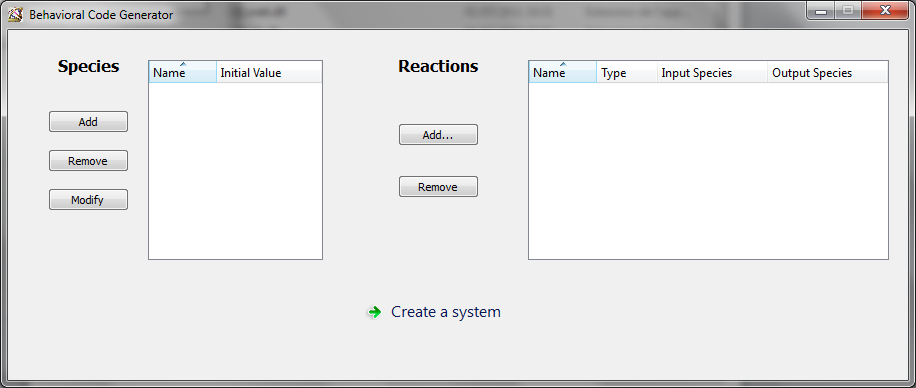
On the left panel, you can “Add”, “Remove” or “Modify” a species from the available species list.
“Add” button opens the species window, where you can choose the name of the species you want to add and the initial value (absent: LOW, present: HIGH)
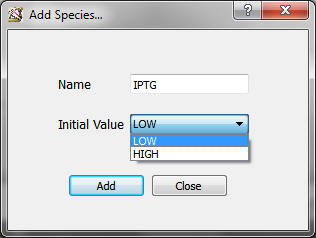
“Modify” button allows to change the initial value of the selected species.
When all the species you want to use are added, you can go to the right panel. On this panel, you can “Add” or “Remove” a reaction.
“Add” button opens a selection window to choose between “Inhibition”, “Complexation” and “Synthesis” mechanisms.
In this tutorial, we will see the example of GFP synthesis with IPTG as activator and TetR as repressor. To create this mechanism, first you can select a species and then click on the “>>” or “<<” button to move it in the desired box. You obtain the following configuration. To validate, click on “Add”.

This principle is the same for other mechanisms.
You obtain the following main window, where the reaction was added into reaction panel.
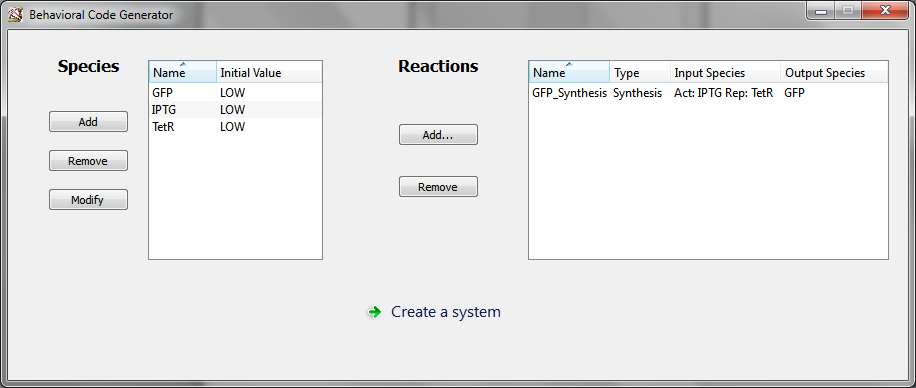
Then the last thing to do is to click on “Create a system”. This opens the “System creation” window.
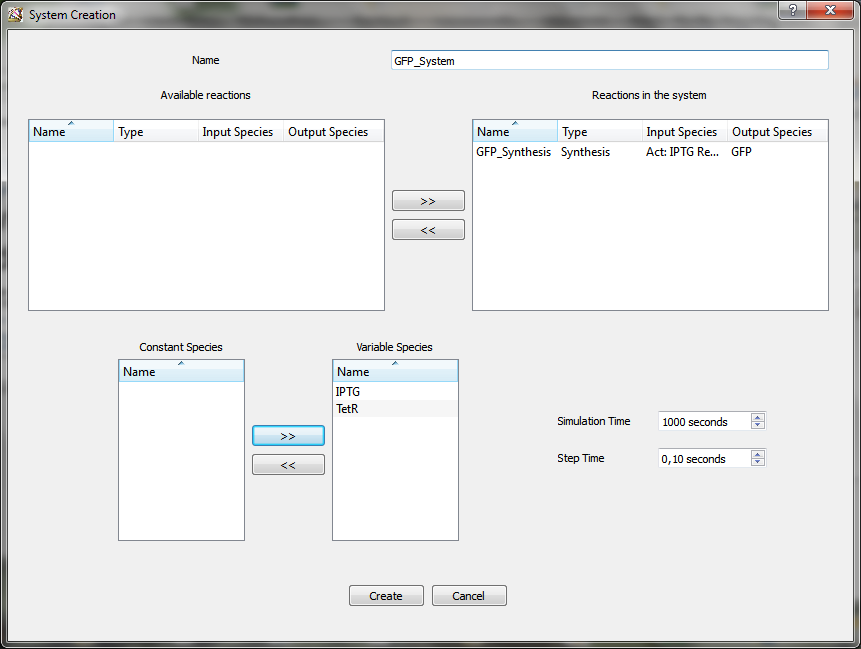
After putting the reactions you want into reactions in the system panel, input species will automatically appear in the constant species panel. You can choose if you want that they will stay constant or become variable species. Finally you select the simulation and the step time and you click on “Create”.
Files obtained
The models and simulation files were now generated in the sub-folder “bin2launch/generated_files”.
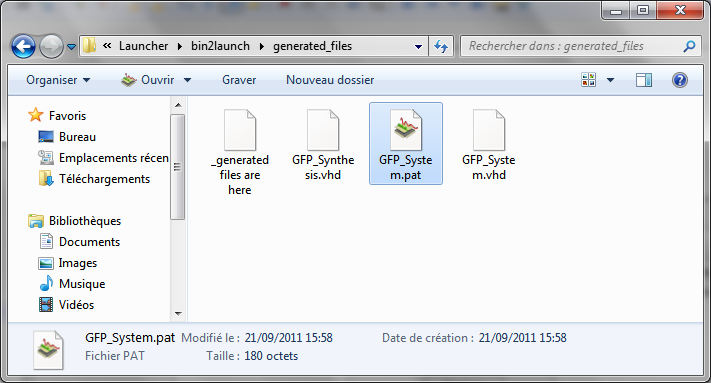
Simulations
To launch Smash, you can double-click on the file “*.pat” in the generated files folder. You obtain the following window.
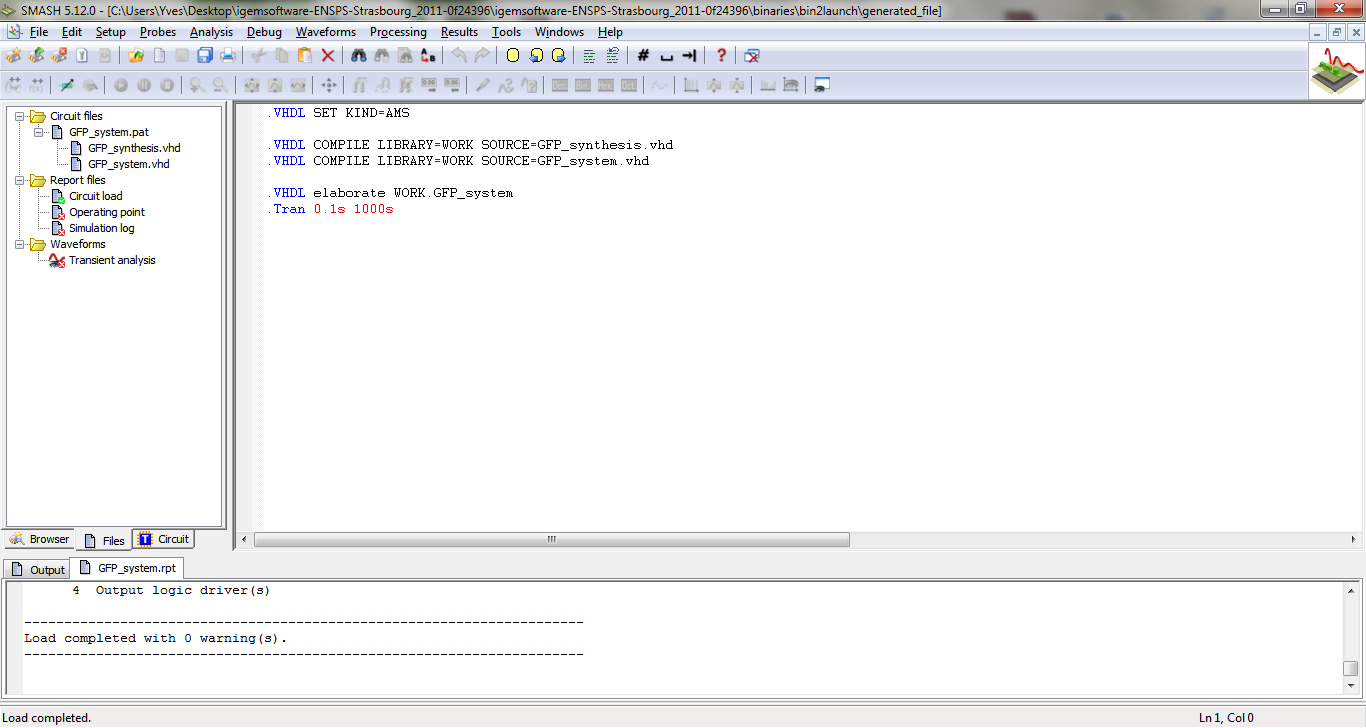
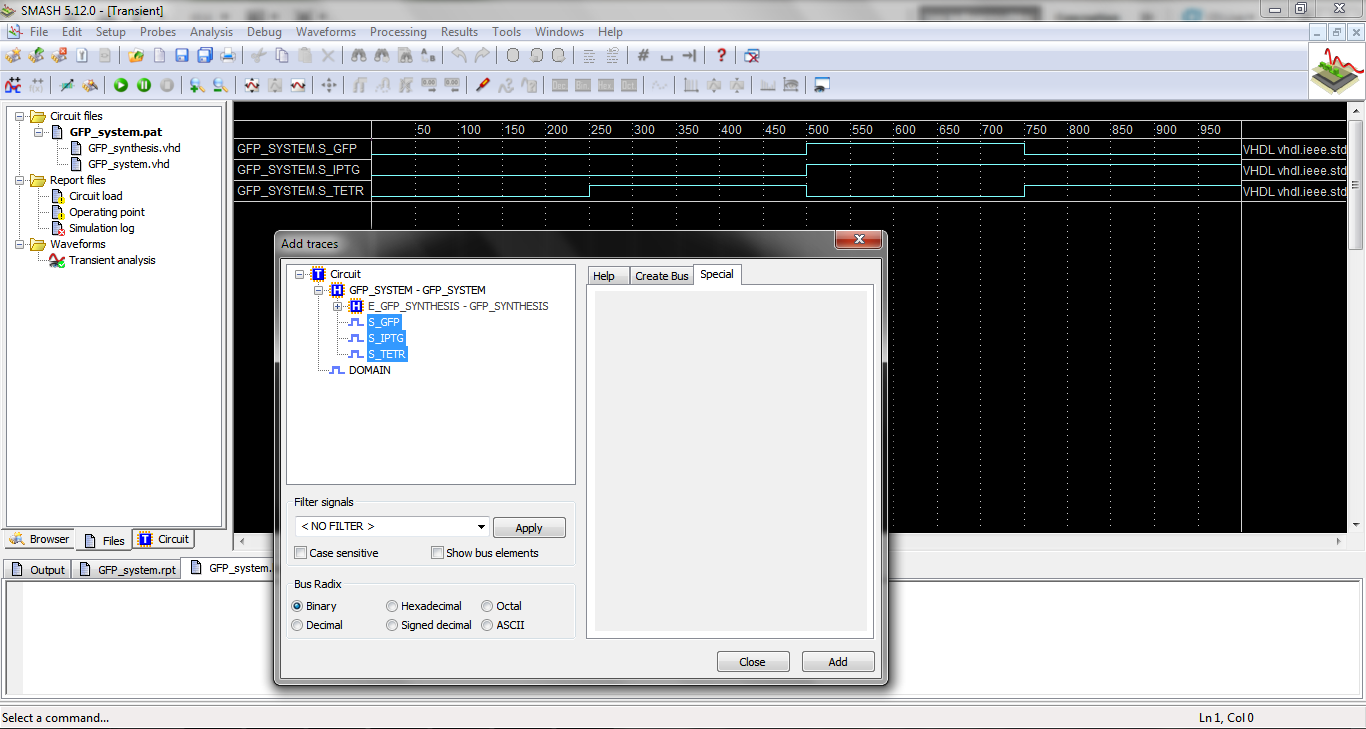
To launch the simulation, you just have to tap the “ctrl+T” keyboard shortcut. You obtain the following window, in which you can select the species you want to see, and click on “Add” button to see them in the scope.
Conservative model generator
The conservative model generator works in the same way as behavioral model generator. But some differences are listed below:
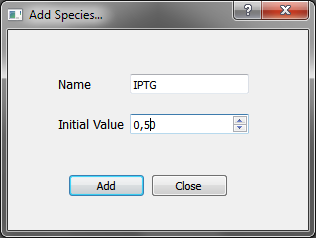
The initial value of a species is now a real number and is a concentration.
The “Inhibition” mechanism has disappeared from the suggested mechanisms list because it is not useful in conservative model and can be simulated with a complexation mechanism.
Finally the main modification is the adding of BioBricks parameters in the mechanism window.

 "
"