Team:Gaston Day School/Project
From 2011.igem.org
(→Part 2: Safety) |
|||
| (33 intermediate revisions not shown) | |||
| Line 1: | Line 1: | ||
| + | https://static.igem.org/mediawiki/2009/9/9e/Gds_banner.png | ||
{| style="color:#FFFFFF;background-color:#4169E1;" cellpadding="7" cellspacing="4" border=".5" bordercolor="#fff" width="100%" align="center" | {| style="color:#FFFFFF;background-color:#4169E1;" cellpadding="7" cellspacing="4" border=".5" bordercolor="#fff" width="100%" align="center" | ||
!align="center"|[[Team:Gaston_Day_School| <span style="color:white">Home</span>]] | !align="center"|[[Team:Gaston_Day_School| <span style="color:white">Home</span>]] | ||
!align="center"|[[Team:Gaston_Day_School/Team| <span style="color:white">Team]] | !align="center"|[[Team:Gaston_Day_School/Team| <span style="color:white">Team]] | ||
| - | !align="center"|[ | + | !align="center"|[https://igem.org/Team.cgi?id=614|<span style="color:white">Official Team Profile</span>] |
!align="center"|[[Team:Gaston_Day_School/Project| <span style="color:white">Project</span>]] | !align="center"|[[Team:Gaston_Day_School/Project| <span style="color:white">Project</span>]] | ||
!align="center"|[[Team:Gaston_Day_School/Parts| <span style="color:white">Parts Submitted to the Registry</span>]] | !align="center"|[[Team:Gaston_Day_School/Parts| <span style="color:white">Parts Submitted to the Registry</span>]] | ||
| - | |||
!align="center"|[[Team:Gaston_Day_School/Notebook| <span style="color:white">Notebook</span>]] | !align="center"|[[Team:Gaston_Day_School/Notebook| <span style="color:white">Notebook</span>]] | ||
!align="center"|[[Team:Gaston_Day_School/Safety| <span style="color:white">Safety</span>]] | !align="center"|[[Team:Gaston_Day_School/Safety| <span style="color:white">Safety</span>]] | ||
| Line 11: | Line 11: | ||
|} | |} | ||
| - | |||
| - | |||
| - | |||
| - | |||
| - | |||
| - | |||
| - | |||
| - | |||
| - | |||
| - | |||
| - | |||
| - | |||
| - | |||
| - | |||
| - | + | ||
| + | == '''Overall project''' == | ||
{|align="justify" | {|align="justify" | ||
| - | |||
| - | |||
| - | |||
| | | | ||
| - | + | ||
| - | + | Gaston Day School’s iGEM project for 2011 has two distinct but complementary parts. First, we plan to build a functional nitrate detector using RFP. Red Fluorescent Protein has one distinct advantage over the more traditional Green Fluorescent Protein; it is visible without any special equipment. Our goal is to have a detector that is easy for anyone to use in the field. Most people, including farmers and ranchers, who would need to detect nitrogen pollution will not have a pocket UV light! We envision a kit that could be used to determine if the runoff of a particular farm was high in nitrogen. The kit will include all necessary components for running the test and then decontaminating the resulting growth to prevent release of the engineered bacteria into the environment. | |
| + | |||
| + | The second part of our project involves a close look at the actual risks of accidental release of the engineered bacteria into the environment. Many groups, including ours, have proposed and built environmental detectors of various sorts. Often, these detectors come with sophisticated mechanisms for preventing the release or for preventing the bacteria from growing if released. We would like to include a very simple mechanism for killing or denaturing the bacteria in our detector kit – bleach. Bleach is highly effective at killing bacteria and is readily available to the average person. Even if we include the bleach in the kit, we realize that many people do not (or will not) read and follow directions. We plan to simulate a variety of conditions under which our detector could be introduced into the environment, ranging from simply dumping it in the sink to pouring it into the local creek or soil. By producing survivorship curves, we can estimate the real risk of spreading the recombinant bacteria into the environment. | ||
| + | |||
|- | |- | ||
| | | | ||
| - | |||
|} | |} | ||
| - | |||
| - | |||
| - | |||
| - | |||
| - | |||
| - | |||
| - | |||
| - | |||
| - | |||
| - | |||
| - | |||
| - | |||
| Line 58: | Line 32: | ||
| + | === Part 1: Construction=== | ||
| + | We built the RFP Nitrate Detector using NEB's BioBrick Construction Kit. We digested the PyeaR promoter (BBa_216005) with EcoRI and SpeI and digested the RFP plasmid (BBa_K081014) with XbaI and PstI. Both initial plasmids were Ampicillin resistant. These digested fragments were mixed and ligated to the provided, liniarized pSB3C1 plasmid. The ligation mix was grown under Chloramphenicol selection. The resulting colonies were tested for nitrate responsive RFP production. A schematic of the process is shown below. | ||
| + | <div class="center" style="width:auto; margin-left:auto; margin-right:auto;">[[Image:uploadCSGDS.jpg|600px]] | ||
| + | </div> | ||
| + | === Experiments and Results === | ||
| + | We grew the nitrate detector with varying concentrations of both sodium nitrate and calcium nitrate to determine its sensitivity. With either form of nitrate, the detector produced the Red Fluorescent Protein at or above 10mM. Photos of results are shown below. | ||
| + | <div class="center" style="width:auto; margin-left:auto; margin-right:auto;">[[Image:nrfptestGDS.jpg|425px]] | ||
| + | </div> | ||
| + | <div class="center" style="width:auto; margin-left:auto; margin-right:auto;">[[Image:nrfptest3GDS.jpg|425px]] | ||
| + | </div> | ||
| + | As we moved on to the safety part of our project, we thought of ways to find out how safe our nitrate detector really was. We found that after 5 minutes in 10% household bleach, all of the bacteria had died and there were no viable colonies. We also tested survival in tap water. Dilutions of 5mL of our bacteria in 1 liter of municiple tap water were left for 0, 15, 30, 45, and 60 minutes. Our results showed that even at 60 minutes, the number of viable bacteria remained stable. This is a significant safety issue which must be resolved before products of this nature can be released for general use. A picture of the time progression is below. | ||
| + | <div class="center" style="width:auto; margin-left:auto; margin-right:auto;">[[Image:tweGDS.jpg|425px]] | ||
| + | </div> | ||
| - | === Part 2 === | + | === Part 2: Safety === |
| + | To ensure that our detector can be sent out to everyone, we need to make sure that it would do little to harm the environment, even if not disposed of properly. Our bacteria carries the antibiotic resistance gene for chloramphenocol and if this was spread, it could result in other bacteria gaining the same resistance. These harmful bacteria could potentially be dangerous to the environment and possibly humans. The bacteria could potentially conjugate if someone did not follow the directions and killed the bacteria with bleach provided in the kit. This person might pour the bacteria down the drain and into the municipal water supply or even just on the ground. The worst case senario would be pouring the bacteria into a local stream or pond. | ||
| - | + | <html> | |
| - | + | <head> | |
| - | = | + | <style type="text/css"> |
| - | + | body { | |
| - | + | background: #fff url(https://static.igem.org/mediawiki/2011/1/14/Bgtryupload2.png) repeat fixed; | |
| - | + | } | |
| - | + | ||
| - | + | ||
| - | + | ||
| - | + | ||
| - | + | ||
| - | + | ||
| - | + | ||
Latest revision as of 20:51, 28 September 2011

| Home | Team | Official Team Profile | Project | Parts Submitted to the Registry | Notebook | Safety | Attributions |
|---|
Contents |
Overall project
|
Gaston Day School’s iGEM project for 2011 has two distinct but complementary parts. First, we plan to build a functional nitrate detector using RFP. Red Fluorescent Protein has one distinct advantage over the more traditional Green Fluorescent Protein; it is visible without any special equipment. Our goal is to have a detector that is easy for anyone to use in the field. Most people, including farmers and ranchers, who would need to detect nitrogen pollution will not have a pocket UV light! We envision a kit that could be used to determine if the runoff of a particular farm was high in nitrogen. The kit will include all necessary components for running the test and then decontaminating the resulting growth to prevent release of the engineered bacteria into the environment. The second part of our project involves a close look at the actual risks of accidental release of the engineered bacteria into the environment. Many groups, including ours, have proposed and built environmental detectors of various sorts. Often, these detectors come with sophisticated mechanisms for preventing the release or for preventing the bacteria from growing if released. We would like to include a very simple mechanism for killing or denaturing the bacteria in our detector kit – bleach. Bleach is highly effective at killing bacteria and is readily available to the average person. Even if we include the bleach in the kit, we realize that many people do not (or will not) read and follow directions. We plan to simulate a variety of conditions under which our detector could be introduced into the environment, ranging from simply dumping it in the sink to pouring it into the local creek or soil. By producing survivorship curves, we can estimate the real risk of spreading the recombinant bacteria into the environment. |
Project Details
Part 1: Construction
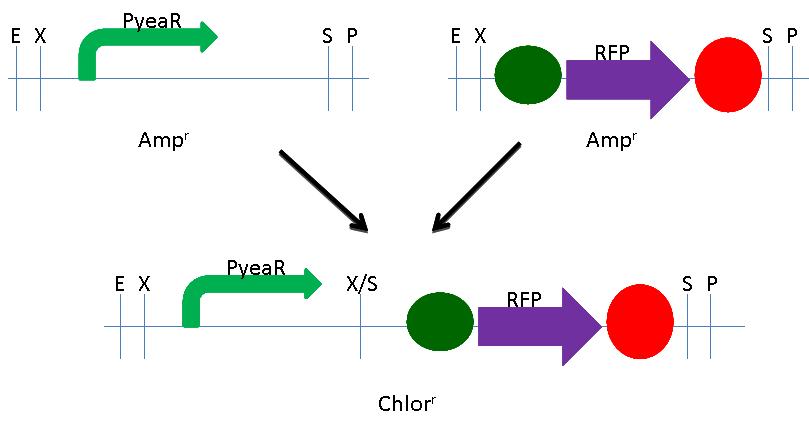
We built the RFP Nitrate Detector using NEB's BioBrick Construction Kit. We digested the PyeaR promoter (BBa_216005) with EcoRI and SpeI and digested the RFP plasmid (BBa_K081014) with XbaI and PstI. Both initial plasmids were Ampicillin resistant. These digested fragments were mixed and ligated to the provided, liniarized pSB3C1 plasmid. The ligation mix was grown under Chloramphenicol selection. The resulting colonies were tested for nitrate responsive RFP production. A schematic of the process is shown below.
Experiments and Results
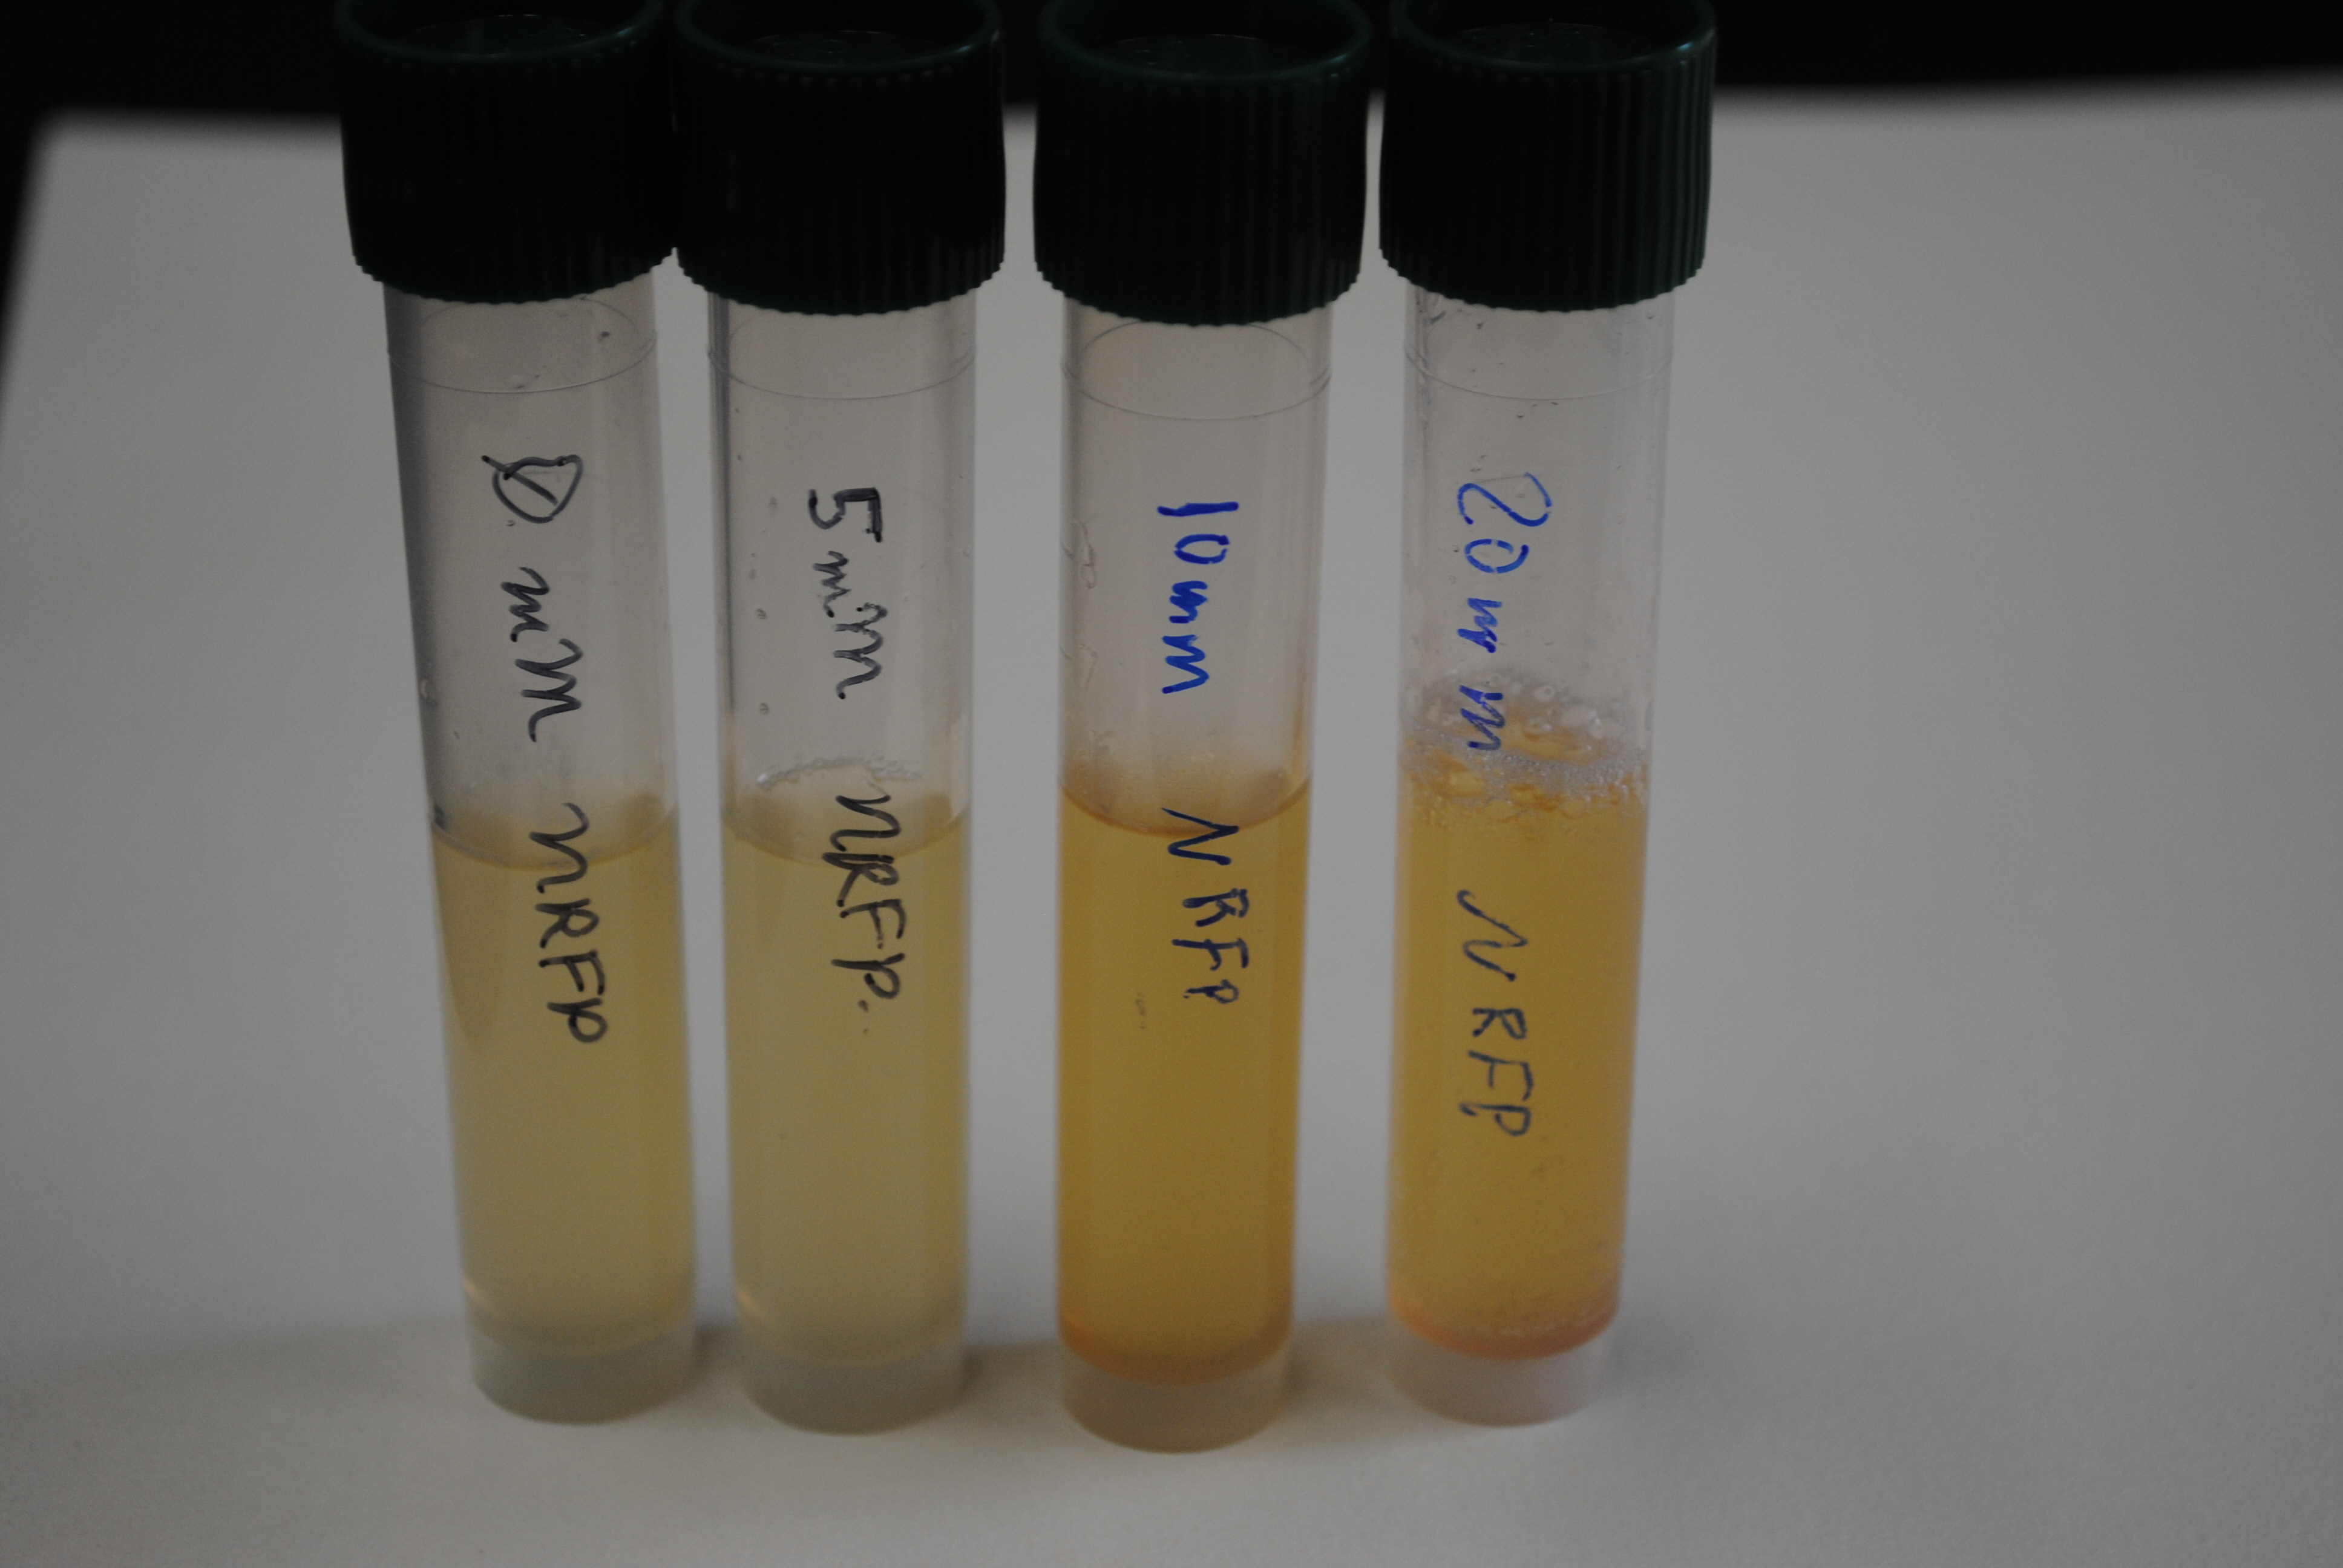
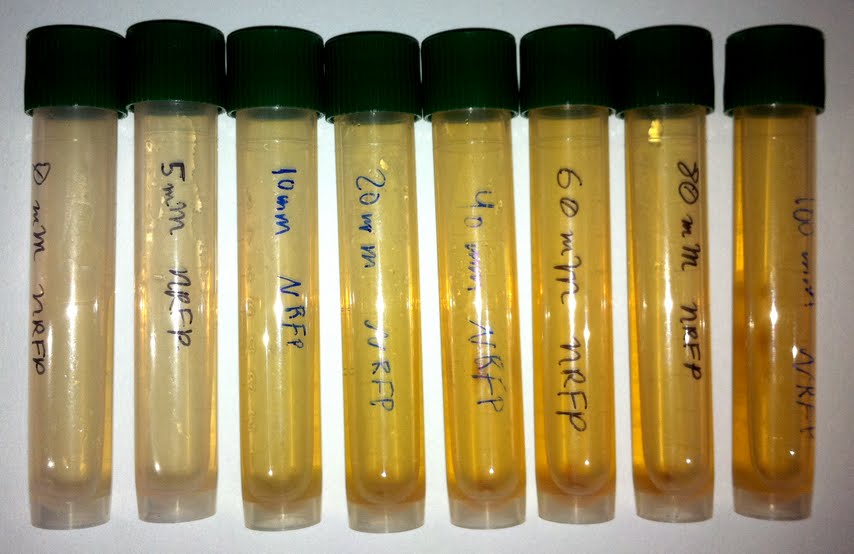
We grew the nitrate detector with varying concentrations of both sodium nitrate and calcium nitrate to determine its sensitivity. With either form of nitrate, the detector produced the Red Fluorescent Protein at or above 10mM. Photos of results are shown below.
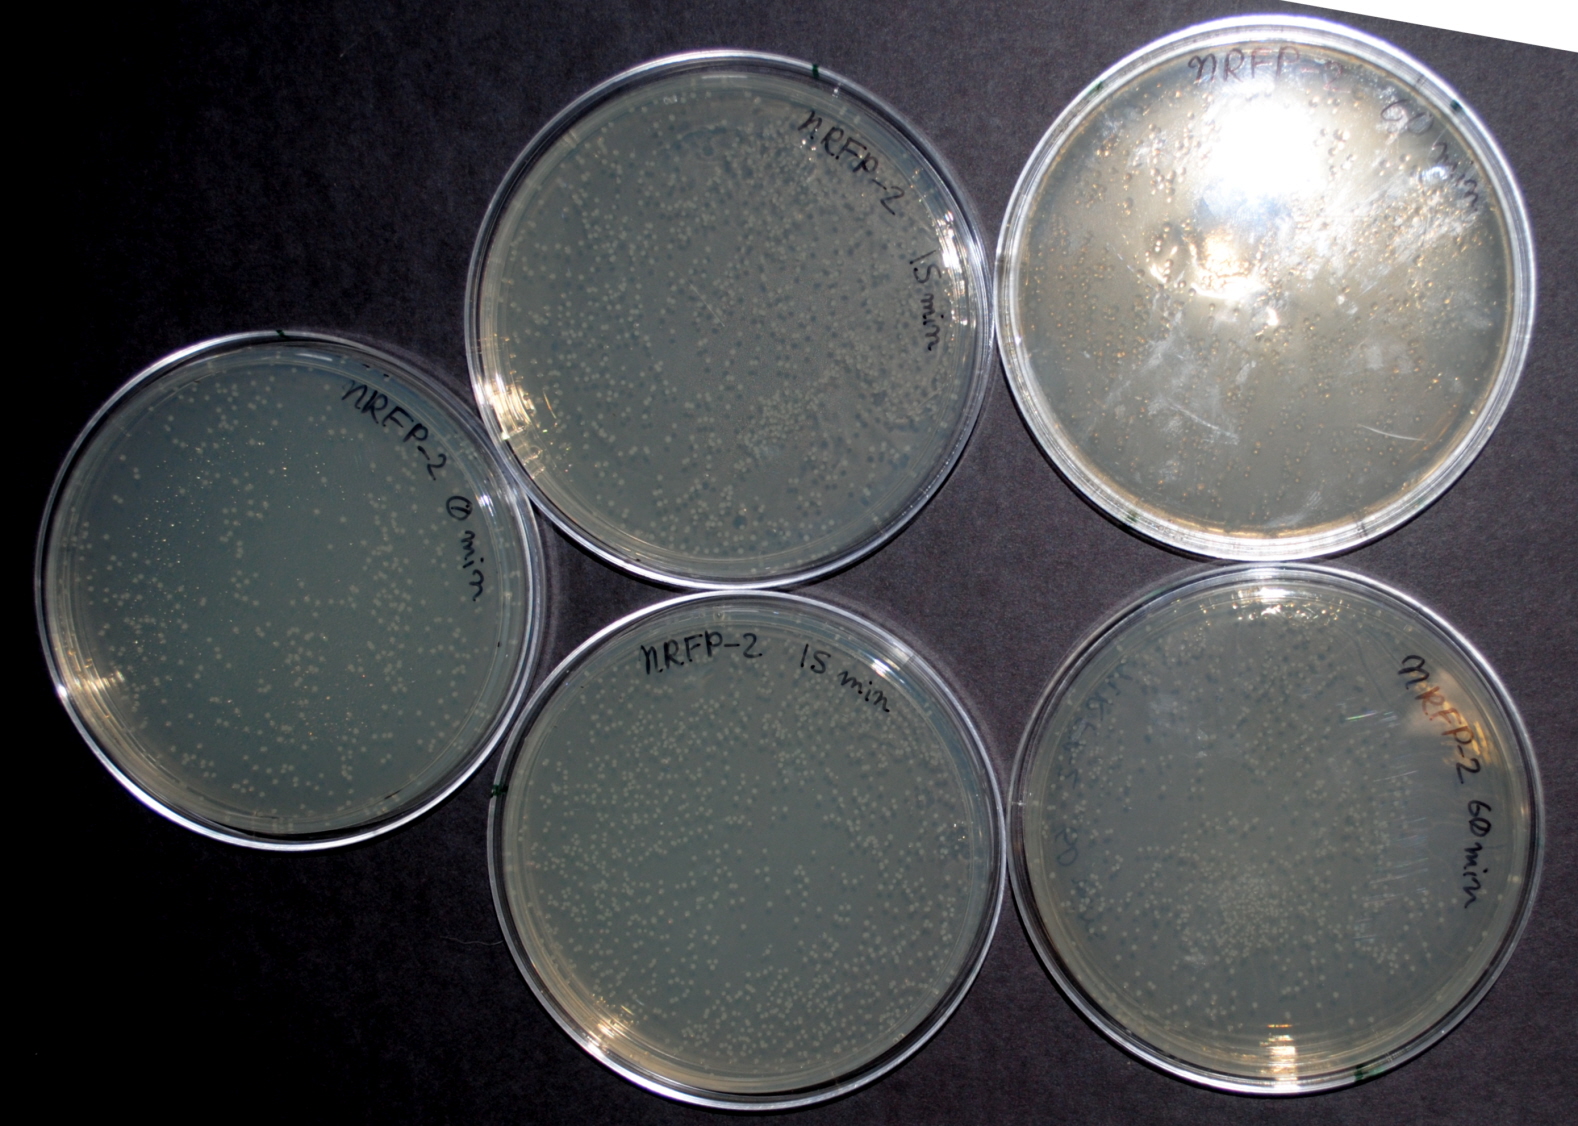
As we moved on to the safety part of our project, we thought of ways to find out how safe our nitrate detector really was. We found that after 5 minutes in 10% household bleach, all of the bacteria had died and there were no viable colonies. We also tested survival in tap water. Dilutions of 5mL of our bacteria in 1 liter of municiple tap water were left for 0, 15, 30, 45, and 60 minutes. Our results showed that even at 60 minutes, the number of viable bacteria remained stable. This is a significant safety issue which must be resolved before products of this nature can be released for general use. A picture of the time progression is below.
Part 2: Safety
To ensure that our detector can be sent out to everyone, we need to make sure that it would do little to harm the environment, even if not disposed of properly. Our bacteria carries the antibiotic resistance gene for chloramphenocol and if this was spread, it could result in other bacteria gaining the same resistance. These harmful bacteria could potentially be dangerous to the environment and possibly humans. The bacteria could potentially conjugate if someone did not follow the directions and killed the bacteria with bleach provided in the kit. This person might pour the bacteria down the drain and into the municipal water supply or even just on the ground. The worst case senario would be pouring the bacteria into a local stream or pond.
 "
"


