| Lab Protocol
|
| A. DNA WORK
|
| Agarose Gel Electrophoresis
|
- Preparation of agarose gel
- Pour 100 mL of 1X TAE buffer into a conical flask.
- Add the agarose powder to the buffer in the amount with respect to the concentration of the agarose solution (e.g. add 1 g for preparing 1% agarose gel solution).
- Use a plastic wrap to cover the opening of the conical flask and microwave for approximately 2 minutes or until the agarose dissolves completely.
- Pour the agarose solution into another conical flask which specifies for holding ethidium bromide (EB) – containing solution.
- Add 1 – 2 ul of EB into the agarose solution and mix well.
- Pour the solution into a gel tray with a comb. Remove any bubbles formed.
- Allow the gel to solidify which takes approximately 30 minutes.
- Discard all the wastes into the EB waste box.
- Electrophoresis
- Remove the comb and place the solidified gel into the electrophoresis tank.
- Add TAE buffer to the tank when necessary.
- Add 6X loading buffer to the DNA sample in the ratio of 1:6 and mix well.
- Load the samples into the wells with care.
- Load 2-3 ul of marker to a well for reference.
- Run the electrophoresis at around 140V for about 30 minutes.
- Take the gel photo in the UV-illuminating machine.
|
| DNA Extraction from Agarose Gel
|
- Gel extraction
- Wear UV protection glasses before the gel extraction.
- Place the gel onto the transilluminator.
- Turn on the transilluminator and quickly cut the desired gel band.
- Place the cut band into an eppendorf tube for further processing.
- Discard all the wastes into the EB waste box.
- DNA extraction (Adopt from Qiagen)
- Weight the Eppendorf tube and determine the weight of the cut band.
- Add 3 volumes of extraction buffer to 1 volume of the cut get.
- Place the Eppendorf tube (with the cut gel and the extraction buffer) into 55oC water bath to dissolve all the agarose gel.
- After dissolving, add the mixture to the spin column with a collection tube.
- Centrifuge at 11,000 rpm for 1 minute.
- Discard flow through.
- Add 750 ul of washing buffer and centrifuge at 11,000 rpm for 1 minute.
- Discard the flow through and centrifuge again at 11,000 rpm for 1 minute.
- Place the collection tube to a new Eppendorf tube.
- Add 20 mL elution buffer directly to the centre of the membrane of the collection tube.
- Let it stand for approximately 3 minutes.
- Centrifuge at 11,000 rpm for 1 minutes and collect the flow through (i.e. product).
- Take a small portion of the DNA product for confirmation by gel electrophoresis.
Protocol adopt from http://www.qiagen.com/literature/render.aspx?id=201083
|
| DNA Digestion
|
- Add the following reagents, with the enzymes added at the last, into a tube

|
| Reagents for DNA digestion.
|
- All steps should be carried out on ice.
- Mix well after addition of all the reagent.
- Incubate the mixture at 37oC for several hours.
|
| Miniprep(Adopt from Qiagen)
|
- Centrifuge the sample at 8,000 rpm for 1 minute.
- Discard the supernatant.
- Add 250 ul P1 buffer to resuspend the pellet (tap to suspend the pellet completely).
- Add 250 ul P2 buffer and mix gently by inverting the tube for several times.
- Add 350 ul N3 buffer and mix thoroughly. The solution should now turn cloudy.
- Centrifuge the solution at 13,000 rpm for 10 minutes.
- Transfer the supernatant to a spin column with a collection tube inside.
- Centrifuge at 12,500 rpm for 1 minute. Discard the flow through.
- Add 750 ul PE buffer to the collection tube and centrifuge at 12,500 rpm for 1 minute.
- Discard the flow through and centrifuge again to remove all remaining washing buffer.
- Place the collection tube into a new eppendorf tube.
- Add 50 ul elution buffer directly at the centre of the membrane of the collection tube.
- Let it stand for approximately 3 minutes.
- Centrifuge at 12,500 rpm for 1 minutes and collect the flow through (i.e. the product).
Protocol adopt from: http://www.qiagen.com/literature/render.aspx?id=201081
|
| Polymerase Chain Reaction
|
- Colony PCR
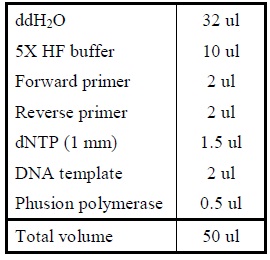
- Add the following reagents into a PCR tube (in order) and mix well.

|
| Reagents for colony PCR.
|
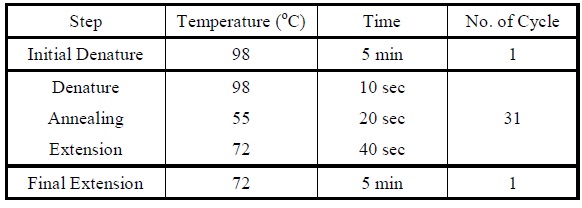
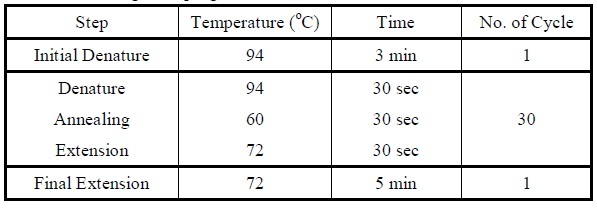
- Set the following PCR program.
|
| Reaction program for colony PCR.
|
- Reverse PCR
- Add the following reagents into a PCR tube (in order) and mix well.
|
| Reagents for reverse PCR.
|
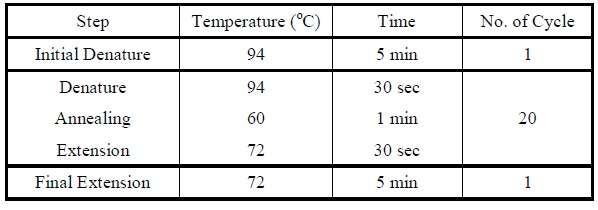
- Set the following PCR program.
|
| Reaction program for reverse PCR.
|
- Overlap PCR
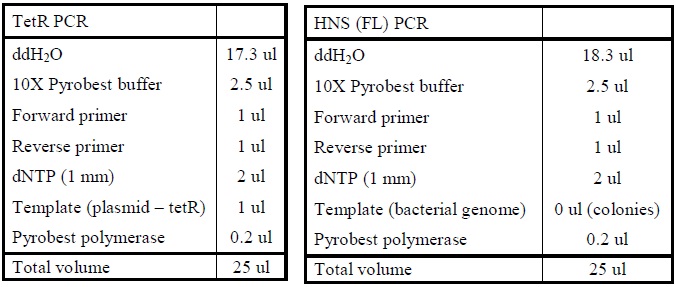
- First, two PCR reactions are set for amplifying the two genes, tetR and HNS, separately.
- Add the following reagents into a PCR tube (in order) and mix well.
|
| Reagents for amplifying genes.
|
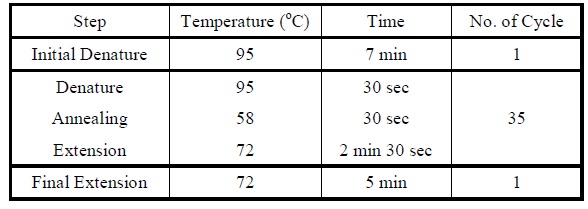
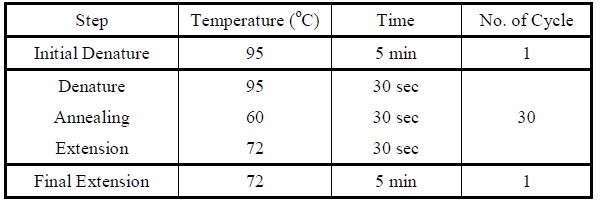
- Set the following PCR program.
|
| Reaction program for amplifying genes.
|
- Set up another PCR reaction using a primer with a linker to link the two genes.
- Add the following reagents into a PCR tube (in order) and mix well.
|
|
| Reagents for linking two genes.
|
- Set the following PCR program.
|
| Reaction program for linking two genes.
|
- Set up another PCR reaction to further amplify the fused product.
- Add the following reagents into a PCR tube (in order) and mix well.

|
| Reagents for amplifying the fused product.
|
- Set the following PCR program.
|
| Reaction program for amplifying the fused product.
|
|
| DNA ligation
|
- Add the following reagents, with the enzymes added at the last, into a tube.

|
| Composition for DNA ligation.
|
- Incubate at 16oC overnight.
|
| Sequencing
|
- Send to BGI company for sequencing.
|
| B. BACTERIAL WORK
|
| Overnight culture
|
- Pipette 3 mL of LB broth into a culture tube.
- Add 3 ul of Ampicillin or 3 ul of Chloramphenicol.
- Pick a single colony by a sterile pipette tip.
- Place the culture tube in the rotary shaker and incubate at 37oC overnight.
|
| Preparation of competent cell
|
- Seed culture:
- Pick a single colony from a plate with fresh grown cells (for 16 – 20 hours at 37oC) and transfer it into 3 mL of LB broth in a sterilized 15-mL polypropylene tube.
- Incubate the culture overnight at 37oC in a rotatory shaker to provide vigorous shaking.
- Main culture:
- Inoculate 1,000 ul of seed culture into 100 mL of LB broth in a sterile 250-mL flask.
- Incubate the culture at 37oC with vigorous shaking (in a rotary shaker) for approximately 2 hours or until the OD600 value reaches 0.3 to 0.4.
- Aseptically transfer the cells to a sterilized, chilled 50-mL polypropylene tube and cool the cultures to 0oC by placing the tube on ice for 10 minutes.
- Centrifuge at 4,000 rpm for 5 – 15 minutes at 4oC.
- Decant the media from the cell pellets.
- Resuspend the cell pellets in 20 mL of filtered, sterilized, chilled 0.1M calcium chloride (CaCl2).
- Vortex gently to mix it and place the tube on ice for 15 to 30 minutes.
- Centrifuge at 4,000 rpm for 5 minutes at 4oC.
- Add 1 mL of chilled glycerol to each tube of culture.
- Pipette up and down to mix it gently.
- Add 100 ul culture in each eppendorf tube.
- Store the culture at -80oC for approximately 1 hour.
|
| Spread plate
|
- Pipetting the liquid culture (about 200 ul) onto the surface of the LB agar plate.
- Sterilize an L-shape glass rod.
- Spread the cells evenly on the plate.
- Incubate the plate at 37oC overnight with the bottom facing upward.
|
| Streak plate
|
- Sterilize the inoculating loop in flame.
- Pick a portion of a single colony of the sample.
- Make the first phase streak.
- Flame sterilize the inoculation loop.
- Cross the first phase of inoculum and make the second phase streak.
- Repeat step d and e for making the third phase streak.
- Flame sterilize the inoculating loop.
- Incubate the plate at 37oC overnight with the bottom facing upward.
|
| Transformation
|
- Mix 1 ul of DNA in 100 ul of competent cells.
- Place the mixture on ice for 40 minutes.
- Heat shock the cells in 42oC water bath for 90 – 100 sec.
- Incubate on ice for 3 minutes.
- Recovery:
- Add 900 ul LB broth to the tube.
- Incubate the mixture at 37oC for 1 hour in the rotary machine.
- Spread 100 ul of each culture on a LB agar plate.
- Incubate at 37oC overnight.
|
| C. Preparation of materials
|
| Preparation of ampicillin
|
- Add 1 g of ampicillin powder to 10 mL of ddH2O. Mix well.
- Filter the solution using 0.22 um filter.
- Store the filtrate at -20 oC.
|
| Preparation of LB agar plate
|
- Add 7 g of LB powder to 200 mL of ddH2O. Mix well.
- Autoclave the solution.
- Add 180 ul of ampicillin to 180 mL of molten agar, in a ratio of 1:1000 (if necessary).
- Pour 10 mL agar solution per plate.
- Let the agar solidify.
|
| Preparation of LB broth
|
- Add 4 g of LB powder to 200 mL of ddH2O. Mix well.
- Autoclave the solution.
- Add 200 ul of ampicillin to 200 mL of LB broth (1:1000).
|
| Preparation of 1X TAE buffer
|
- Add 50 mL of 50X TAE buffer.
- Add 2.5 L of ddH2O.
|
| D. Protein Work
|
| Gel Shift Assays (Adopt from Promega)
|
- Gel Preparation
- Clean all the glassware by distilled water (ions-free).
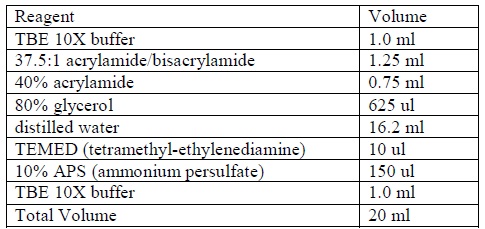
- Prepare a non-denaturing 4% acrylamide gel according to the following formula:
|
| Formula for preparing acrylamide gel.
|
- Allow the gel to stand until the gel is completely polymerized.
- DNA Binding Reactions
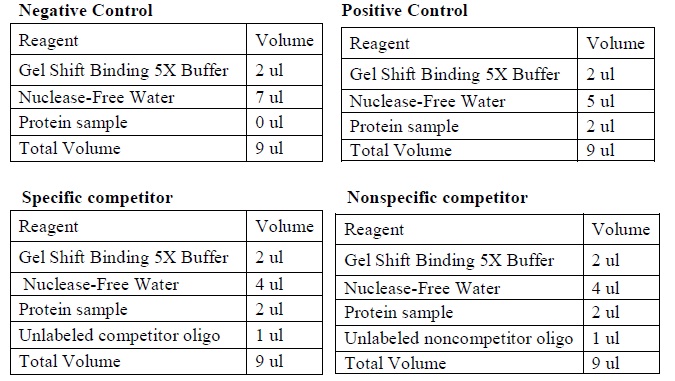
- Set up four binding reactions (if necessary) with the following composition.
|
| The four binding reactions: Negative control, Positive control, Specific competitor and Non-specific competitor
|
- Incubate the reactions at room temperature for 10 minutes.
- Add 1 ul of labeled DNA sample to each reaction.
- Incubate the reactions at room temperature for 20 minutes.
- Add 1 ul of 10X loading buffer for each reaction.
- Electrophoresis
- Pre-run the gel in 0.5X TBE buffer for 10 minutes at 350V.
- Load the sample.
- Run the gel at 350V until the loading dye reached three fourth of the gel.
- Maintain the gel temperature under 30oC.
Protocol adopt from:
http://www.promega.com/~/media/Files/Resources/Protocols/Technical%20Bulletins/0/Gel%20Shift%20Assay%20Systems.ashx
|
 "
"


